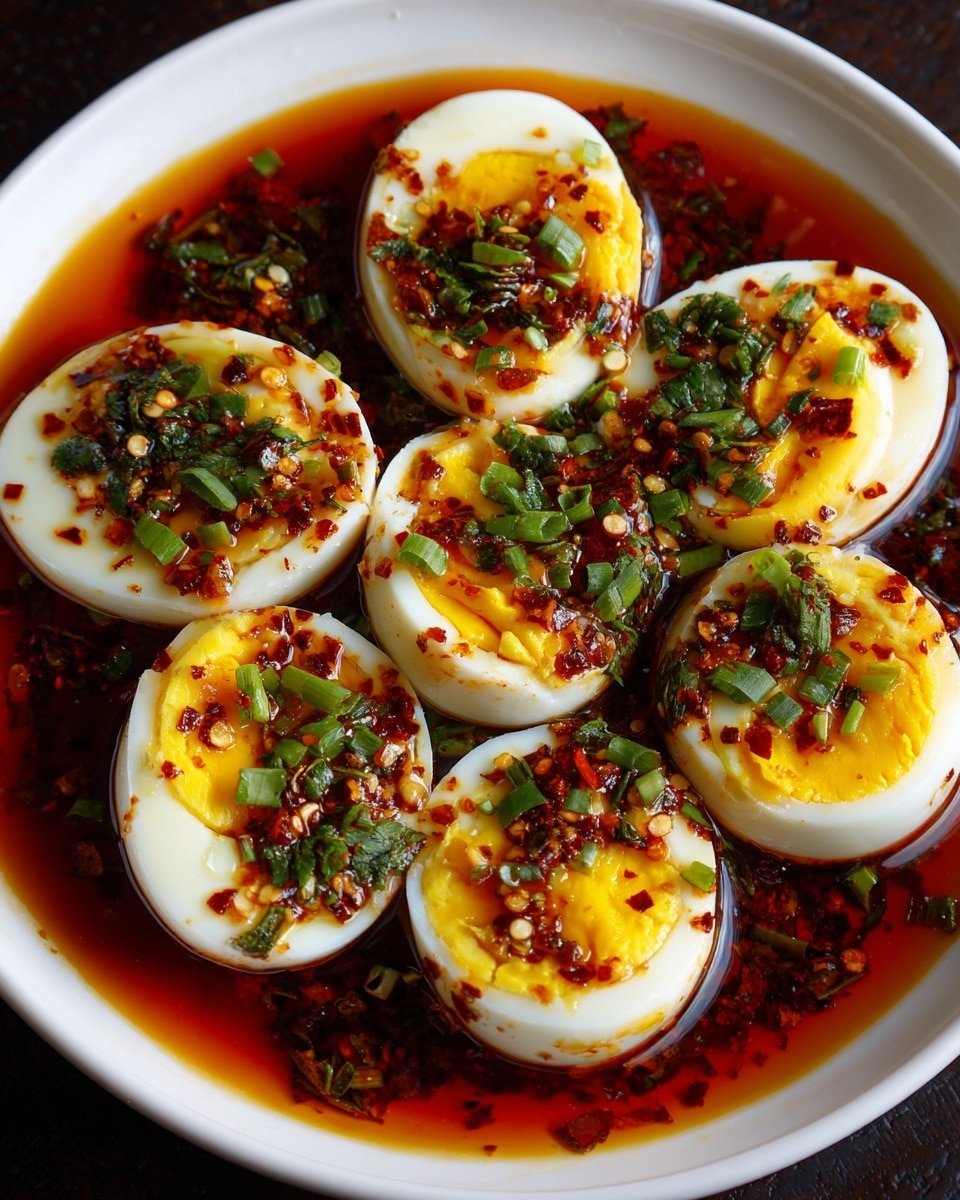
Deviled eggs get a fiery makeover with this bold and tangy Spicy Chili Garlic Deviled Eggs Recipe. Perfect for parties, potlucks, or just an afternoon snack, these deviled eggs balance creamy, spicy, and garlicky flavors that will have everyone reaching for seconds. If you love that mix of heat and richness, this recipe is your new go-to.

Jump to:
In the Kitchen
This Spicy Chili Garlic Deviled Eggs Recipe is all about elevating classic deviled eggs with a powerful chili-garlic punch that’ll wake up your taste buds without overwhelming them. I love how the chili garlic sauce adds depth and heat in every creamy bite.
- Juicy and Tender Every Time: Properly timed boiling with an ice bath ensures firm whites and tender yolks without dryness.
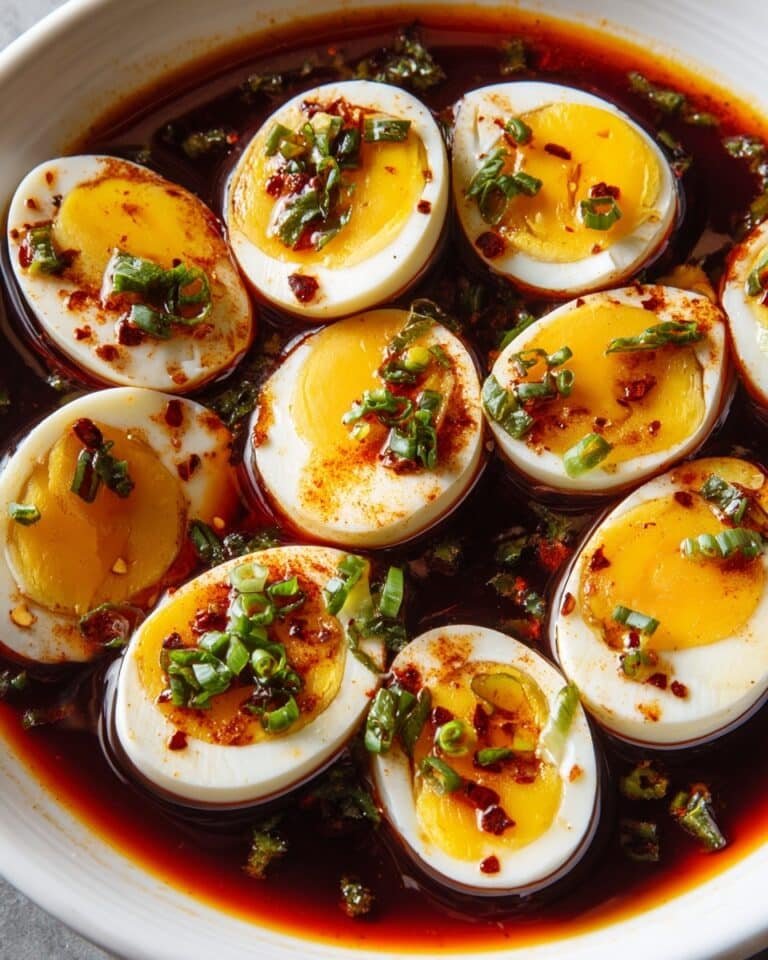
- Golden, Satisfying Finish: The vibrant yolk filling blends creaminess with spicy kick for a mouthwatering contrast.
- Simple Ingredients, Big Impact: Using pantry staples like mayo and chili garlic sauce keeps things easy yet flavorful.
- Weeknight to Weekend Ready: Whip these up quickly for an elegant appetizer any day of the week.
Ingredients at a Glance
When it comes to the Spicy Chili Garlic Deviled Eggs Recipe, fresh, high-quality ingredients make all the difference. Choose eggs that are as fresh as possible and pick a chili garlic sauce that you enjoy for the perfect level of heat.
- Large eggs: Fresh eggs have easier-to-peel shells and better texture after boiling.
- Mayonnaise: Use a good-quality mayo or swap with Greek yogurt for tang and lighter texture.
- Dijon mustard: Adds subtle sharpness without overpowering the chili.
- Chili garlic sauce: This is your spicy star—choose one with balanced heat and garlicky notes.
- Sriracha (optional): Perfect for an extra spicy drizzle on top.
- Rice vinegar: Brightens the filling with a touch of acidity.
- Fresh herbs: Cilantro or green onions bring freshness and crunch when sprinkled last.
Heads-Up: Exact measurements are in the printable recipe card at the bottom.
How to Make Spicy Chili Garlic Deviled Eggs Recipe
Step 1 — Perfectly Boil Your Eggs
Start by gently placing six large eggs in a saucepan and covering them with cold water by about an inch. Bring the water to a rolling boil over medium-high heat. Once boiling, reduce the heat to low and cover the pan. Let the eggs cook for 12 minutes to get that firm yet creamy yolk. Overcooking can lead to a grey ring around the yolk, which I always try to avoid—it’s harmless but not very pretty.
Step 2 — Chill Quickly in an Ice Bath
While the eggs cook, fill a large bowl with ice and cold water. This ice bath stops the cooking and makes peeling a breeze. When the time’s up, transfer the hot eggs immediately into the ice bath and let them cool for at least 5 minutes. Your hands will thank you for this step — peeling hot eggs is no fun!
Step 3 — Peel and Prep Each Egg
Tap each cooled egg gently on your counter, then roll it lightly to crack the shell all over. Peel the shells off under a slow stream of cold running water—that helps get beneath the membrane and frees the shell quickly. Slice each egg in half lengthwise and gently scoop out the yolks into a bowl. The whites will be your canvases for that filling magic.
Step 4 — Whip Up the Spicy Chili Garlic Filling
Grab a fork and mash the yolks until crumbly and smooth. Stir in 3 tablespoons of mayo, 1 teaspoon Dijon mustard, 1 tablespoon chili garlic sauce, and 1 teaspoon of rice vinegar. Season with kosher salt and freshly ground black pepper to your taste. Mix all these flavors until you get a creamy, spicy mixture that’s got that perfect balance of heat and tang. Feel free to taste as you go—adjust the chili garlic sauce or sriracha for your preferred spice level.
Step 5 — Fill and Garnish Your Deviled Eggs
Spoon the spicy yolk mix back into the egg white halves, or for an elegant look, use a piping bag fitted with a star tip. It’s really satisfying to watch those beautifully filled eggs come together! Finish with a little drizzle of sriracha for extra kick and sprinkle chopped cilantro or green onions on top for a fresh pop of color and flavor.
Things to Remember
I’ve learned that a few small tricks make this Spicy Chili Garlic Deviled Eggs Recipe shine: temperature control while boiling, biting into balanced heat, and nailing that silky filling texture. Don’t rush the cooling step—it really helps with peeling and final egg texture.
- Doneness Cue: The yolk should be fully set but still creamy, not chalky or dry.
- Temperature Trick: Adding eggs to cold water and bringing it up to boil avoids cracking and promotes even cooking.
- Make-Ahead Move: You can prep the filling a day ahead and store it in the fridge—just fill the eggs before serving.
- Common Pitfall: Overmixing the yolks can make the filling crumbly—aim for smooth but still slightly textured.
Ways to Serve It

Finishing Touches
I love a finishing drizzle of sriracha on top—it adds just the right amount of fiery flair without overwhelming the garlic and chili sauce base. Fresh cilantro or thinly sliced green onions bring brightness and a little crunch that contrast beautifully with the creamy filling. Sometimes, I even sprinkle a tiny pinch of toasted sesame seeds to add an irresistible nuttiness.
Plays Well With
These spicy deviled eggs pair wonderfully with crisp, refreshing sides like a simple cucumber salad or crunchy celery sticks. If you’re serving a crowd, add some crisp crackers or a vibrant slaw for contrasting textures. I like pairing them with a cool, creamy dip to balance the heat.
Simple Plating Upgrades
For a casual vibe, arrange the eggs on a rustic wooden board sprinkled with fresh herbs. For a party, use a pretty platter and pipe the filling in neat swirls. Adding little edible flowers or extra chili flakes gives a festive look that’ll impress guests without stressing you out.
Make-Ahead & Keeping Fresh
Storing Leftovers
Store deviled eggs in an airtight container in the fridge for up to two days. I find it best to keep filled eggs separate from the filling when possible, filling them just before serving to keep whites firm. If already filled, keep a tight cover to prevent them from drying out and losing that creamy texture.
Freezing Tips
Deviled eggs don’t freeze well due to the change in texture once thawed, especially in the creamy filling. It’s best to enjoy them fresh, but you can freeze hard-boiled eggs without filling if needed, then prepare the filling after thawing.
Reheating Spicy Chili Garlic Deviled Eggs Recipe Without Drying Out
Because they’re best served chilled or at room temp, I don’t recommend reheating deviled eggs. But if you want to warm them slightly, do it gently in a microwave at low power for just a few seconds or enjoy them fresh from the fridge to preserve that luscious creamy filling and firm whites.
Frequently Asked Questions
Absolutely! You can reduce or increase the amount of chili garlic sauce and sriracha to suit your heat preference. Start small and taste as you go to find your perfect balance.
Cooling the eggs thoroughly in an ice bath right after boiling helps. Peeling under running water gently separates the shell and makes the process less frustrating.
Yes! Prepare the filling up to a day ahead and keep it refrigerated. Fill the egg whites right before serving to keep everything looking fresh and delicious.
Greek yogurt or avocado make great alternatives. Greek yogurt adds a tangy creaminess, while avocado brings richness with a healthy twist.
Final Thoughts
This Spicy Chili Garlic Deviled Eggs Recipe is one of those simple dishes that always impress. Whether you’re making it for a family gathering or a weekday snack, the combination of creamy yolk, garlic heat, and fresh herbs brings a well-rounded flavor everyone will love. I've found this recipe becomes a fast favorite over and over. Give it a try—you’ll enjoy how easy and satisfying it is to whip up a batch that feels both classic and exciting at the same time.
PrintFull Printable Recipe
Spicy Chili Garlic Deviled Eggs Recipe
These Spicy Chili Garlic Deviled Eggs offer a tantalizing blend of creamy, tangy, and spicy flavors with a smooth texture. Hard-boiled eggs are filled with a zesty mixture of mayo, Dijon mustard, chili garlic sauce, and rice vinegar, then garnished with fresh herbs and a drizzle of sriracha for an extra kick. Perfect as a bold appetizer or snack for any occasion.
- Total Time: 25 minutes
- Yield: 6 servings
Ingredients
Eggs
- 6 large eggs
Filling
- 3 tablespoons mayonnaise
- 1 teaspoon Dijon mustard
- 1 tablespoon chili garlic sauce
- 1 teaspoon rice vinegar
- Kosher salt, to taste
- Freshly ground black pepper, to taste
Garnish
- 1 teaspoon sriracha (optional)
- Chopped fresh cilantro or green onions
Instructions
- Boil the Eggs: Place 6 large eggs in a saucepan and cover with cold water. Bring to a rolling boil over medium-high heat. Then reduce heat to low, cover, and cook for 12 minutes to achieve perfectly hard-boiled eggs.
- Prepare an Ice Bath: While the eggs cook, fill a large bowl with ice water to stop cooking and make peeling easier.
- Cool the Eggs: Transfer cooked eggs to the ice bath with a slotted spoon. Let cool completely for about 5 minutes.
- Peel the Eggs: Gently tap each egg on a hard surface and roll between your hands to crack the shell. Peel under cold running water for easier removal.
- Make the Filling: Slice peeled eggs in half lengthwise and scoop out yolks into a mixing bowl. Mash yolks with a fork, then add mayonnaise, Dijon mustard, chili garlic sauce, rice vinegar, salt, and pepper. Mix until creamy and well combined.
- Pipe the Filling: Spoon or pipe the yolk mixture back into the egg white halves for an elegant presentation.
- Garnish and Serve: Drizzle sriracha over each filled egg and sprinkle with chopped cilantro or green onions. Serve immediately.
Notes
- Substitute mayonnaise with Greek yogurt or avocado for a healthier creamy texture.
- Adjust chili garlic sauce and sriracha quantities to control the spiciness to your liking.
- Peeling eggs under cold running water helps remove shells more easily.
- Use a piping bag with a star tip for a professional look when filling the eggs.
- Store any leftovers covered in the refrigerator for up to 2 days.
- Prep Time: 10 minutes
- Cook Time: 15 minutes
- Category: Appetizer
- Method: Stovetop
- Cuisine: American
- Diet: Vegetarian


Leave a Reply