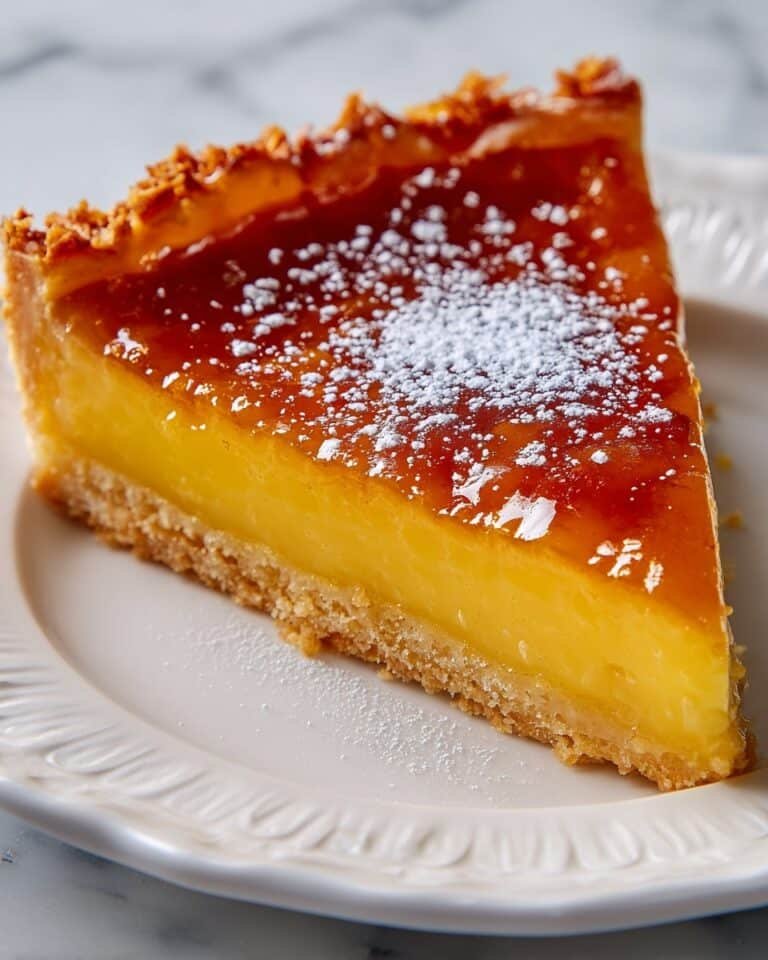
If you’re looking for a dessert that masterfully combines sweet richness with a hint of savory allure, you’re going to love this Salted Honey Pie: A Perfect Blend of Sweet and Salty Recipe. It’s exactly what you want to pull out when you crave something comforting yet a little different—whether it’s for a cozy weeknight treat or a weekend celebration. This pie’s creamy custard, drizzled with honey and finished with a sprinkle of sea salt, creates a truly unforgettable flavor harmony.

Jump to:
In the Kitchen
What draws me to this Salted Honey Pie: A Perfect Blend of Sweet and Salty Recipe again and again is how effortlessly it transforms simple ingredients into a memorable dessert. The custard is silky and smooth, the honey brings just the right natural sweetness, and the sea salt finish adds that satisfying edge that keeps you coming back for another slice.
- Juicy and Tender Every Time: Chilling the pie crust first helps it stay crisp and flaky even with the rich custard filling.
- Golden, Satisfying Finish: Baking at a steady 375°F allows the filling to set beautifully without cracking or overbrowning.
- Simple Ingredients, Big Impact: Brown sugar, honey, and cornstarch come together for a luscious, caramel-like custard that feels indulgent yet approachable.
- Weeknight to Weekend Ready: Weeknight-friendly prep and no pre-bake crust mean you’ll be enjoying this dessert with ease anytime.
Ingredients at a Glance

Choosing quality ingredients is key here. I always opt for raw honey with robust floral notes, fresh eggs, and real vanilla extract to get that warm, inviting custard flavor that defines this Salted Honey Pie: A Perfect Blend of Sweet and Salty Recipe.
- Pie crust: A good-quality premade or homemade crust chilled to keep it flaky and prevent shrinking.
- Heavy whipping cream: Full-fat for richness and creaminess in the custard.
- Brown sugar: Adds depth and caramel undertones; use light or dark depending on preference.
- Cornstarch: The perfect thickener to get a luscious, firm custard texture.
- Egg yolks: Bring richness and help the custard set—temper carefully to avoid scrambling.
- Honey: The star; choose raw or artisan honey for natural complexity.
- Vanilla extract: Enhances the sweetness and rounds out flavors.
- Flaky sea salt: Sprinkled on top just before serving for that signature salty crunch.
Heads-Up: Exact measurements are in the printable recipe card at the bottom.
How to Make Salted Honey Pie: A Perfect Blend of Sweet and Salty Recipe
Step 1 — Prepare and Chill the Pie Crust
Begin by placing your pie crust into an 8-inch deep dish or a 9-inch pie pan. There's no need to pre-bake it for this recipe – simply let it chill in the fridge while you get the filling ready. Chilling the crust is a game-changer; it helps keep the butter solid so the dough remains flaky and sturdy once baked. If you’re making a homemade crust, this step is especially important to prevent shrinking and sogginess. For a little extra flair, I like to sprinkle a thin layer of sugar on the crust’s surface before baking to add a subtle crunchy sweetness on top.
Step 2 — Heat the Cream Mixture Until Thickened
In a medium saucepan, combine the heavy whipping cream, brown sugar, cornstarch, and salt over medium heat. Stir constantly as the mixture heats, watching as it gently thickens and comes to a rolling boil. You’ll notice that deep caramel aroma from the brown sugar that fills the kitchen, an early indicator of the indulgent filling to come. Keep stirring to prevent lumps, and once boiling, maintain the heat for just a moment until the mixture thickens to a creamy consistency.
Step 3 — Temper the Egg Yolks for Silky Custard
Remove the cream mixture from heat. It’s tempting to rush this next step, but tempering the eggs carefully is the secret to a velvety custard. Slowly ladle a few spoonfuls of the hot cream into the egg yolks while whisking steadily to warm them up without cooking. Continue gradually adding the cream, whisking until the eggs are fully combined and smooth. This prevents any curdling and keeps your filling beautifully smooth.
Step 4 — Combine, Add Honey and Vanilla
Pour the tempered egg mixture back into the saucepan with the remaining cream mixture. Stir well to fully incorporate. Now add in the honey and vanilla extract, stirring until the filling is smooth and fragrant. The honey does more than sweeten here; it adds a complex, natural flavor that’s the hallmark of this pie. Vanilla deepens the aroma, making the custard feel warm and inviting.
Step 5 — Fill the Chilled Pie Crust
Pour your creamy custard mixture into the chilled pie crust. The filling should still be warm but not hot to the touch, helping it settle evenly without soaking through the crust prematurely. Spread it gently to avoid trapping air bubbles which could cause uneven texture. I love how the pale golden custard gleams just before baking—it’s a promise of the silky smooth pie you’re about to enjoy.
Step 6 — Bake Until Golden and Set
Place the pie in a preheated 375°F (190°C) oven for about 40 to 45 minutes. You’ll see the filling bubble gently, and the crust edges turn a beautiful golden hue. The top develops a slight golden crust, signaling that the custard is setting perfectly. It’s important not to overbake—when you take it out, the center might still jiggle a bit, and that’s okay. It will firm up nicely as it cools, resulting in that perfect custard texture.
Step 7 — Cool Completely and Chill Before Serving
After baking, let the pie cool on the counter to room temperature. This resting period allows the custard to set further and the flavors to meld. Once cooled, place the pie in the fridge for several hours or overnight. Chilling is key—it ensures the filling will be firm enough to slice cleanly and lets the honey and vanilla deepen in flavor for that rich, luscious finish you’ll love.
Step 8 — Finish with a Flaky Sea Salt Sprinkle
Right before serving, sprinkle a generous layer of flaky sea salt over the top. This final flourish is what truly makes this a Salted Honey Pie: A Perfect Blend of Sweet and Salty Recipe. The salt crystals pop in your mouth, balancing the sweetness and adding a delightful texture contrast. It’s the kind of finish that makes your guests think you put in a little extra magic.
Step 9 — Slice, Serve, and Enjoy!
Slice the pie into 8 to 10 generous pieces to savor the creamy custard and flaky crust in every bite. I love pairing this pie with a simple cup of coffee or an herbal tea, letting the pie’s complex flavors shine. Whether you’re serving family or friends, this salted honey pie always brings smiles and requests for seconds.
Things to Remember
Drawing from my own kitchen adventures with this Salted Honey Pie: A Perfect Blend of Sweet and Salty Recipe, I've learned a few handy pointers that help guarantee success and keep you feeling confident throughout the process.
- Doneness Cue: Look for the custard to bubble gently and the crust edges to become golden; a slight jiggle in the center is perfect when removing from the oven.
- Temperature Trick: Always temper the eggs gradually to prevent scrambling and ensure a smooth custard.
- Make-Ahead Move: Bake the pie a day in advance and refrigerate; this enhances the flavor and texture dramatically.
- Common Pitfall: Don’t skip chilling the crust—it’s key to a flaky, sturdy base that holds up to the creamy filling.
Ways to Serve It

Finishing Touches
A simple dusting of powdered sugar or a dollop of lightly whipped cream can add that extra creaminess and visual appeal. I also love adding a few toasted nuts on top—like sliced almonds or pistachios—for a little crunch that complements the sea salt sprinkle beautifully.
Plays Well With
This pie pairs wonderfully with a cup of strong black coffee, a fragrant cup of chai, or even a scoop of vanilla ice cream for an extra indulgent twist. If you want to keep things light, fresh berries on the side offer a lovely contrast of tartness and texture.
Simple Plating Upgrades
Serve slices on rustic ceramic plates to highlight the pie’s golden colors, and add a small sprig of fresh mint or edible flowers for a colorful pop that feels effortlessly elegant—perfect for guests or a casual dinner.
Make-Ahead & Keeping Fresh
Storing Leftovers
Keep leftovers tightly covered in an airtight container or wrapped securely with plastic wrap in the fridge. The pie will stay fresh for up to 3-4 days. You’ll notice the crust softens slightly over time, but the custard remains silky and delicious.
Freezing Tips
While freezing can affect the crust’s texture and custard’s smoothness, you can freeze leftover slices wrapped tightly in plastic and foil for up to 1 month. Thaw in the fridge overnight and gently warm before serving to restore creaminess, though fresh is always best for this kind of pie.
Reheating Salted Honey Pie: A Perfect Blend of Sweet and Salty Recipe Without Drying Out
To reheat, the oven or air fryer works best for restoring the crust’s texture. Warm at 300°F (150°C) for 8-10 minutes, keeping an eye so it doesn’t dry out. The microwave is faster but can steam the filling—heat briefly in 20-second bursts, covering loosely with a damp paper towel to help retain moisture.
Frequently Asked Questions
Absolutely! A good-quality store-bought pie crust works perfectly. Just make sure to chill it before filling to keep it flaky and prevent shrinking during baking.
Tempering prevents the eggs from cooking too fast, which can create lumps or scramble them in the custard. This step keeps the filling smooth and silky.
Honey is the star flavor here, providing a unique floral caramel note that’s hard to replicate. While you can try maple syrup, the flavor and texture of the pie will change and may not be as balanced.
Use flaky sea salt with large crystals, like Maldon or fleur de sel. These add a delicate crunch and burst of saltiness without overpowering the custard’s sweetness.
Final Thoughts
I hope this Salted Honey Pie: A Perfect Blend of Sweet and Salty Recipe inspires you to try something a bit different but totally satisfying. It’s one of those desserts that feels elegant without fuss and always impresses with its flavor balance. Whenever I bring it out, it sparks conversation and delighted smiles—just one more reason to keep it in my dessert rotation. Give it a try, and I’m sure you’ll find yourself reaching for this recipe again and again too.
PrintFull Printable Recipe
Salted Honey Pie: A Perfect Blend of Sweet and Salty Recipe
Salted Honey Pie is a luscious dessert combining a flaky pie crust with a rich, creamy custard filling infused with honey and vanilla. The perfect balance of sweet and salty is achieved by a final sprinkle of flaky sea salt, creating an indulgent treat ideal for any occasion.
- Total Time: 1 hour 15 minutes
- Yield: 8 servings
Ingredients
Pie Crust
- 1 deep dish 8-inch pie crust or 1 9-inch pie crust (store-bought or homemade)
Custard Filling
- 1 ½ cups heavy whipping cream
- ¾ cup brown sugar
- 2 tablespoons cornstarch
- ¼ teaspoon salt
- 4 large egg yolks
- ⅓ cup honey
- 1 teaspoon vanilla extract
Topping
- 1 tablespoon flaky sea salt
Instructions
- Prepare the Pie Crust: Place the unbaked pie crust in a deep dish 8-inch or 9-inch pie pan and chill it in the refrigerator while you prepare the filling to help it bake evenly and prevent shrinking. Optionally, sprinkle a bit of sugar on top for extra flavor.
- Heat the Cream Mixture: In a medium saucepan over medium heat, combine heavy cream, brown sugar, cornstarch, and salt. Stir constantly until the mixture reaches a rolling boil and thickens slightly, taking care to avoid lumps.
- Temper the Eggs: Remove the cream mixture from heat. Slowly ladle some of the hot cream into the egg yolks while whisking constantly, gradually adding more until smooth, to prevent the eggs from scrambling.
- Combine the Mixture: Pour the tempered egg mixture back into the saucepan with the remaining cream. Stir thoroughly, then add honey and vanilla extract, mixing to combine evenly.
- Fill the Pie Crust: Pour the warm custard filling into the chilled pie crust, spreading evenly to avoid air pockets.
- Bake the Pie: Bake the pie in a preheated 375°F oven for 45 minutes until the top is golden and the filling bubbles. The pie may be slightly jiggly when done.
- Cool and Set: Let the pie cool to room temperature on the counter, then refrigerate until completely chilled and firm.
- Finish with Sea Salt: Sprinkle flaky sea salt over the top of the pie just before serving.
- Serve and Enjoy: Slice the pie into 8-10 portions and serve chilled for a creamy, texturally balanced dessert.
Notes
- Ensure the pie crust is well chilled before filling to prevent shrinking during baking.
- Temper the eggs slowly to avoid curdling the custard.
- Do not overbake to keep the custard smooth and creamy.
- Use flaky sea salt for the best texture contrast and flavor enhancement.
- Leftover pie can be stored covered in the refrigerator for up to 3 days.
- For a gluten-free option, use a gluten-free pie crust.
- Prep Time: 20 minutes
- Cook Time: 45 minutes
- Category: Dessert
- Method: Baking
- Cuisine: American


Leave a Reply