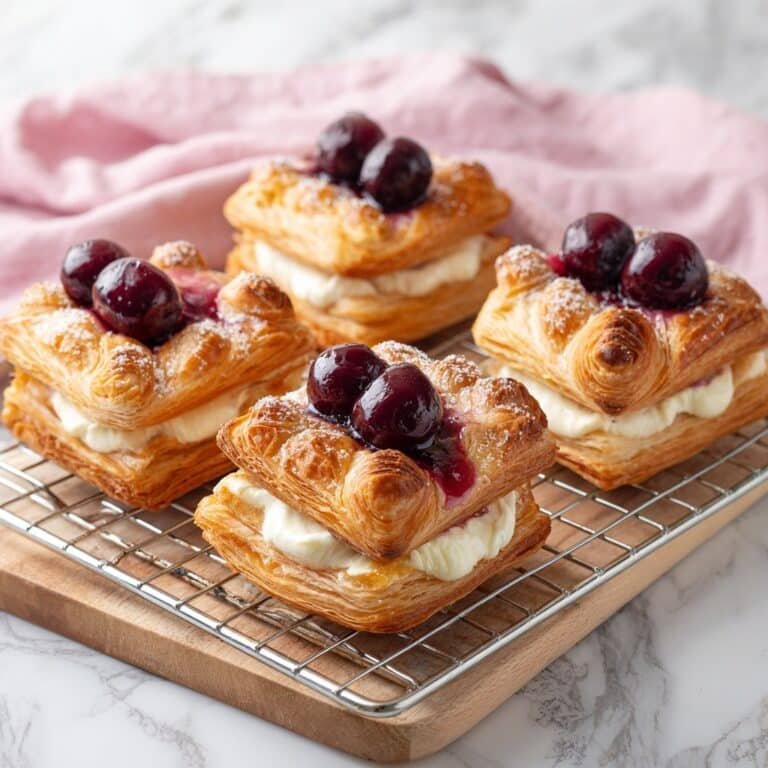
There’s something wonderfully nostalgic and comforting about these delicate Danish-style treats, and this Puff Pastry Cream Cheese Hearts with Raspberry Jam Recipe captures that magic perfectly. Whether you’re craving a special weekend breakfast, hosting brunch with friends, or just want a sweet but not-too-heavy dessert, these fluffy, golden hearts filled with creamy cheese and vibrant raspberry jam always hit the spot.

Jump to:
In the Kitchen
I love how this Puff Pastry Cream Cheese Hearts with Raspberry Jam Recipe balances flaky layers and smooth richness with just the right pop of fruity sweetness. It’s a simple joy to make and even easier to enjoy, perfect for a treat that feels fancy but comes together with straightforward ingredients.
- Juicy and Tender Every Time: Using softened cream cheese and fresh-ish jam guarantees a luscious filling that stays moist inside the flaky pastry.
- Golden, Satisfying Finish: Brushing with egg wash before baking creates that toasty, golden crust you'll find irresistible.
- Simple Ingredients, Big Impact: You don’t need anything fancy; quality puff pastry and good jam make all the difference.
- Weeknight to Weekend Ready: Whether quick morning breakfast or casual dessert, these hearts come together fast without fuss.
Ingredients at a Glance

I always suggest using the freshest ingredients you can find, especially for the cream cheese and raspberry jam here. The quality really shines through in this Puff Pastry Cream Cheese Hearts with Raspberry Jam Recipe.
- Puff Pastry Sheet: Choose a high-quality, thawed sheet for maximum flakiness and rise.
- Cream Cheese: Use full-fat and softened to room temperature for easier mixing and creamier texture.
- Raspberry Jam: Look for seedless or smooth jam for easy spreading and pretty presentation.
- Egg: Fresh and lightly beaten, important for that golden finish.
- Powdered Sugar: For just a touch of sweet dusting at the end.
Heads-Up: Exact measurements are in the printable recipe card at the bottom.
How to Make Puff Pastry Cream Cheese Hearts with Raspberry Jam Recipe
Step 1 — Prepare Your Oven and Baking Sheet
Preheat your oven to 375°F (190°C). Line a baking sheet with parchment paper to ensure the pastries don’t stick and clean-up stays quick. This step feels basic but sets you up for success — you want a hot oven ready for those flaky layers to puff right up.
Step 2 — Mix the Cream Cheese Filling
In a small bowl, combine your softened cream cheese with granulated sugar and a splash of vanilla extract. Stir until silky smooth. No lumps here! This mixture is the creamy heart of your pastries, so take a moment to make it luscious and well blended.
Step 3 — Cut and Shape the Puff Pastry
On a lightly floured surface, roll out your puff pastry sheet gently to smooth the edges. Cut it into 8 even squares — try to keep them uniform so they bake evenly. Place a spoonful of cream cheese mixture in the center of each square. Then top with a few juicy raspberries or a dollop of raspberry jam if you prefer.
Step 4 — Fold and Seal Your Hearts
Take each corner of the pastry square and fold it in towards the center, overlapping just a bit to create a lovely heart shape or pinwheel. Press gently to seal the edges without squashing the filling out. This little step shapes your dessert’s signature look, so don't rush it — you'll notice how neat folds help your pastries puff beautifully.
Step 5 — Brush and Bake for Golden Perfection
Brush the beaten egg over the exposed pastry edges to encourage a rich golden color. Pop the sheet into your hot oven and bake for about 18 to 20 minutes, or until your hearts have puffed up and turned a stunning golden brown. You'll start to smell that toasty, buttery aroma—your cue that they’re nearly done.
Step 6 — Cool Slightly and Dust with Powdered Sugar
Let the pastries cool on the baking sheet for about 5 minutes. This brief resting helps the filling set and prevents burns when you bite in. Just before serving, lightly dust powdered sugar over the top for a pretty, delicate finish that adds a hint of sweetness without overwhelming the filling.
Things to Remember
From my experience making this Puff Pastry Cream Cheese Hearts with Raspberry Jam Recipe over and over, a few tips can really make your process smooth and your results perfect every time.
- Doneness Cue: Look for puffed, golden edges and no raw dough showing; the color says it all.
- Temperature Trick: Keep your oven fully preheated to 375°F for even rise and baking.
- Make-Ahead Move: Assemble your hearts and freeze on a baking sheet before baking; then bake straight from frozen, adding a few minutes.
- Common Pitfall: Avoid overfilling to prevent leaks; less is more with cream cheese and jam here.
Ways to Serve It

Finishing Touches for Puff Pastry Cream Cheese Hearts with Raspberry Jam Recipe
A light dusting of powdered sugar is my go-to final touch, but you might also try a drizzle of melted dark chocolate or a few fresh raspberries on the side. These little extras complement the tart jam and creamy cheese without overpowering them, adding elegance if you’re serving guests.
Plays Well With
Pair these hearts with a cup of strong coffee or an aromatic tea. For a brunch spread, they also get along beautifully with fresh fruit salad or a crisp green salad to balance richness and sweetness with some freshness and crunch.
Simple Plating Upgrades
Serving on a rustic wooden board or a pretty dessert plate with a small bowl of raspberry jam for dipping makes the presentation extra inviting. Garnish with a sprig of fresh mint or basil for a pop of color that’s effortless yet festive.
Make-Ahead & Keeping Fresh
Storing Leftovers
Store any uneaten Puff Pastry Cream Cheese Hearts with Raspberry Jam Recipe in an airtight container in the fridge for up to 2 days. The pastry may soften slightly but keeping them chilled preserves the cream cheese filling nicely.
Freezing Tips
This recipe freezes wonderfully. After assembling but before baking, freeze your shaped pastries on a tray until solid, then transfer to a freezer-safe container or bag. Bake from frozen, adding a few extra minutes to baking time. This way, you can enjoy fresh-tasting treats any time.
Reheating Puff Pastry Cream Cheese Hearts with Raspberry Jam Recipe Without Drying Out
To reheat, I find a low oven around 300°F works best to warm the pastries evenly without drying them out. Pop them on a baking tray for 8-10 minutes. If short on time, a quick zap in a microwave covered loosely with a damp paper towel helps retain moisture but sacrifices crispiness.
Frequently Asked Questions
Absolutely! Homemade puff pastry will work beautifully, adding a personal touch and possibly even flakier layers, but it takes longer to prepare. Store-bought puff pastry is a fantastic shortcut that still yields delicious results.
Don’t overfill the pastries — a small spoonful of cream cheese mixture and jam is enough. Also, folding the corners neatly and gently pressing to seal helps keep everything inside as it bakes.
Definitely! Raspberry is classic, but blueberry, strawberry, or cherry jams work just as well. Fresh sliced berries can be swapped in too—just make sure they’re not too juicy to avoid sogginess.
Yes! You can assemble the pastries, freeze them, and bake them fresh on the day of your event. This makes your hosting stress-free while still delivering fresh, flaky bites to your guests.
Final Thoughts
This Puff Pastry Cream Cheese Hearts with Raspberry Jam Recipe has become a favorite in my kitchen for its effortless elegance and delightful flavors. With just a few simple ingredients and quick steps, you can create something that looks special and tastes like it took hours—perfect for sharing or sneaking bites with a warm cup of coffee on a cozy morning. I hope you enjoy making and eating these as much as I do!
PrintFull Printable Recipe
Puff Pastry Cream Cheese Hearts with Raspberry Jam Recipe
Delight in these homemade Danish Pastries filled with smooth cream cheese and juicy cherries, wrapped in flaky puff pastry and baked to golden perfection. Perfect for breakfast or a sweet snack.
- Total Time: 35 minutes
- Yield: 8 pastries
Ingredients
Pastry
- 1 sheet puff pastry, thawed
Filling
- 4 oz cream cheese, softened
- 3 tablespoon granulated sugar
- 1 teaspoon vanilla extract
- 1 cup frozen cherries, thawed and drained
Egg Wash and Garnish
- 1 egg, beaten
- 1 tablespoon powdered sugar
Instructions
- Preheat Oven: Preheat your oven to 375°F (190°C) and line a baking sheet with parchment paper to prevent sticking.
- Prepare Cream Cheese Mixture: In a small bowl, combine the softened cream cheese, granulated sugar, and vanilla extract. Mix well until the texture is smooth and creamy, ensuring even sweetness.
- Cut Puff Pastry: Roll out the thawed puff pastry sheet on a lightly floured surface to smooth the edges. Cut the sheet into 8 equal squares, setting aside any leftover pastry for optional decorative leaves.
- Fill Pastry Squares: Place a spoonful of the cream cheese mixture in the center of each square, then top each with several cherries, distributing evenly for balanced flavor.
- Fold Pastry: Fold the corners of each pastry square toward the center, slightly overlapping to form a pinwheel or diamond shape. Press lightly to seal the edges, and if desired, add decorative leaves made from the leftover puff pastry on top.
- Apply Egg Wash: Brush the beaten egg over the exposed edges and tops of the pastries to achieve a beautiful golden-brown finish after baking.
- Bake: Place the pastries on the prepared baking sheet and bake in the preheated oven for 20 minutes until puffed and golden brown.
- Cool and Garnish: Remove from the oven and let the pastries cool for 5 minutes. Dust with powdered sugar before serving to add a delicate sweetness and presentation finish.
Notes
- Ensure the cream cheese is softened to room temperature for easier mixing and smoother filling.
- Use frozen cherries that are well drained to avoid soggy pastry.
- Decorative leaves made from extra puff pastry add visual appeal but are optional.
- If you prefer fresh cherries, pit and chop them before use.
- For a dairy-free version, substitute cream cheese with a vegan cream cheese alternative.
- Prep Time: 15 minutes
- Cook Time: 20 minutes
- Category: Breakfast
- Method: Baking
- Cuisine: Danish
- Diet: Vegetarian


Leave a Reply