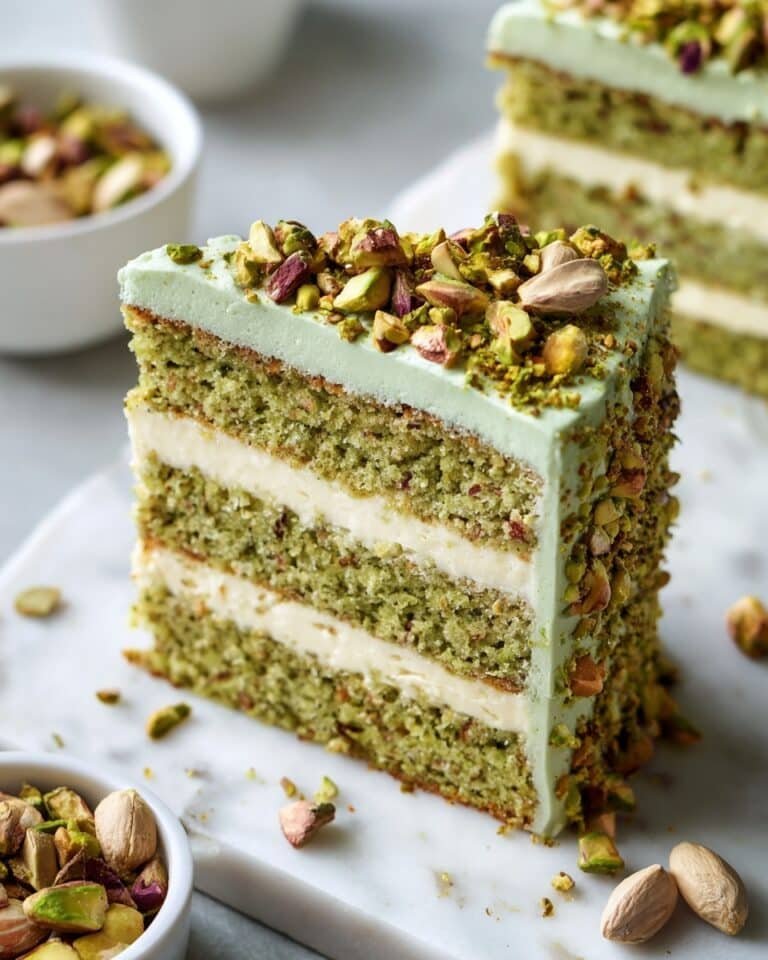
The Pistachio Mascarpone Layer Cake: A Dreamy Delight Recipe is truly a showstopper whenever I make it. Perfect for special occasions or when you simply want to treat yourself, this cake strikes a lovely balance of nutty, creamy, and subtly sweet flavors. You’ll notice how the pistachios lend a toasty richness while the mascarpone cream adds that melt-in-your-mouth smoothness that keeps everyone coming back for more.

Jump to:
In the Kitchen
This Pistachio Mascarpone Layer Cake: A Dreamy Delight Recipe is one I've found to be both approachable and indulgent. It’s my go-to when I want a cake that feels fancy but doesn’t overwhelm with complicated steps.
- Juicy and Tender Every Time: Toasting and finely grinding the pistachios rather than using flour alone adds moistness and a gentle crunch.
- Golden, Satisfying Finish: The balance of butter, oil, and whole milk creates a soft crumb with a subtle crust that invites that first bite.
- Simple Ingredients, Big Impact: With pantry staples and fresh mascarpone, you get elegant layers that impress without stress.
- Weeknight to Weekend Ready: Prepare ahead and chill for a couple of hours to let the flavors marry perfectly.
Ingredients at a Glance

Choosing quality pistachios and fresh mascarpone is where this Pistachio Mascarpone Layer Cake: A Dreamy Delight Recipe truly shines. Fresh ingredients create that fragrant, nutty depth and a luxuriously creamy texture you’ll adore.
- Unsalted shelled pistachios: Opt for fresh, unsalted nuts to control saltiness and toast lightly for a fragrant base.
- Mascarpone cheese: Use cold and high-quality mascarpone for the richest, smoothest frosting.
- Unsalted butter: Room temperature butter whips up light and helps create a tender crumb.
- Heavy cream: Chilled for whipping into a smooth, stable mascarpone filling.
Heads-Up: Exact measurements are in the printable recipe card at the bottom.
How to Make Pistachio Mascarpone Layer Cake: A Dreamy Delight Recipe
Step 1 — Toast and Grind the Pistachios
Start by placing the shelled pistachios in a dry skillet over medium heat. Stir frequently until they’re fragrant and lightly golden, about 4–5 minutes. This toasty step amps up their nuttiness, a key part of the cake’s unique flavor. Next, pulse the toasted pistachios in a food processor until finely ground, but watch carefully so it doesn’t turn into a paste—you want a crumbly texture that blends beautifully with the flour.
Step 2 — Prepare and Bake the Cake Layers
In a large bowl, beat room temperature butter and granulated sugar until fluffy—it usually takes about 3 minutes using a handheld or stand mixer. You’ll want that pale, creamy texture as your base. Add eggs one at a time, mixing well between each addition, then stir in milk, vegetable oil, vanilla extract, and almond extract for a subtle nutty aroma. Gently fold in your flour-pistachio mixture just until combined to keep the batter light and airy.
Divide the batter evenly between three greased and parchment-lined 8-inch round pans. Bake in a preheated 350°F (175°C) oven for roughly 22–25 minutes. Keep a close eye from the 20-minute mark—insert a toothpick in the center; it should come out clean but still slightly moist for that perfect crumb. Once baked, let your layers cool completely on a wire rack before frosting.
Step 3 — Whip Up the Mascarpone Cream Filling
Chill your mixing bowl and beaters for about 10 minutes—that chill helps the cream whip up better. Whip the heavy cream until soft peaks form, then fold in mascarpone cheese, powdered sugar, and vanilla. Mix gently until smooth and firm but don’t overdo it or the cream might separate. Pop this luscious filling into the fridge until all the layers are ready.
Step 4 — Assemble and Chill for Flavor Fusion
Place your first cake layer on a serving plate and spread a generous layer of mascarpone cream. Repeat with remaining layers, carefully stacking them to stay even. Finish by frosting the sides and top smoothly, then press chopped pistachios onto the cake's sides and sprinkle some over the top for an inviting crunch and burst of green color.
Refrigerate the entire cake for at least two hours. I always find this resting time is when the magic happens – the flavors marry, the cream firms up, and the pistachios soften just enough to complement the cake.
Things to Remember
This Pistachio Mascarpone Layer Cake: A Dreamy Delight Recipe becomes easier and even more delightful as you get familiar with the rhythm of the steps. Be patient with the baking times and chilling—the payoff is that irresistible texture and flavor.
- Doneness Cue: Toothpick should come out clean but moist for tender layers, not dry and crumbly.
- Temperature Trick: Always use room temperature eggs and butter to help batter whip up perfectly.
- Make-Ahead Move: Cake layers and mascarpone filling can be made a day ahead; just wrap layers well and keep cream chilled.
- Common Pitfall: Avoid overmixing the mascarpone cream to keep it smooth and prevent it from breaking.
Ways to Serve It

Finishing Touches
The beauty of this Pistachio Mascarpone Layer Cake: A Dreamy Delight Recipe lies in its elegant simplicity. Chopped pistachios on the outside add great texture and a lovely pop of color, while optional white chocolate shavings or a touch of edible gold leaf can give it that extra sparkle if you’re celebrating something special. I like to serve mine chilled for the best creaminess and flavor balance.
Plays Well With
This cake pairs wonderfully with a cup of rich, freshly brewed espresso or a subtly floral herbal tea. The nutty richness of the pistachios balances beautifully with those warm, slightly bitter notes. Fresh berries on the side are also a nice touch that brings brightness and cut through the richness.
Simple Plating Upgrades
When serving for dinner parties or just a treat-yourself moment, add a dusting of powdered sugar or a drizzle of white chocolate on the plate. A few mint leaves alongside can add a fresh green note that complements the pistachio hues. Even just cutting clean slices and stacking thoughtfully creates an inviting presentation that looks more special than the work it takes.
Make-Ahead & Keeping Fresh
Storing Leftovers
Store leftover Pistachio Mascarpone Layer Cake in an airtight container or cover tightly with plastic wrap to prevent the mascarpone cream from drying out. Keep it refrigerated and enjoy within 3–4 days for the best texture and flavor. The nuts stay crunchy and the cream fresh when properly chilled.
Freezing Tips
This cake freezes reasonably well if you wrap each layer separately in plastic wrap and then foil, or freeze the assembled cake if well covered. Thaw in the refrigerator overnight. Note that the mascarpone cream may soften slightly after freezing, so it’s best enjoyed a day or two after thawing rather than immediately.
Reheating Pistachio Mascarpone Layer Cake: A Dreamy Delight Recipe Without Drying Out
If you want to warm up a slice, the oven is your friend—wrap the slice loosely in foil and heat at 300°F for about 10 minutes. This gently warms the cake without drying it out. The microwave works for a quick warm-up; use low power and 10–15 second bursts to keep moisture. Air fryers can be tricky here, so I recommend the oven method for even, gentle reheating.
Frequently Asked Questions
Almond flour will give a different flavor and texture; it’s less crunchy and nutty compared to toasted pistachios, so I recommend sticking with pistachios for the signature taste of this dreamy delight recipe.
Keep all dairy cold before whipping and avoid overmixing. Whip just until smooth and thick to maintain a luscious texture without curdling.
Yes! Swap the all-purpose flour with a 1:1 gluten-free baking blend. Just keep an eye on baking times as it may vary slightly.
Chill the cake thoroughly before transport. Use a sturdy cake carrier with a secure lid to keep the layers stable, and try to keep it upright and cool during travel.
Final Thoughts
I always get such joy from making the Pistachio Mascarpone Layer Cake: A Dreamy Delight Recipe—it’s a reminder that with a few thoughtful touches, you can elevate simple ingredients into something truly special. When it’s time to cut that first slice, the combination of the toasted pistachio crumb, the creamy layers, and the subtle almond aroma feels like a warm hug on a plate. I hope you’ll enjoy baking and sharing this cake just as much as I do.
PrintFull Printable Recipe
Pistachio Mascarpone Layer Cake: A Dreamy Delight Recipe
This Pistachio Mascarpone Layer Cake is a luscious and elegant dessert featuring delicate pistachio-spiked layers paired with a rich mascarpone cream frosting. Perfect for special occasions or an indulgent treat, this cake combines nutty flavors with a creamy texture and a beautiful finish garnished with chopped pistachios and optional decorative accents.
- Total Time: 2 hours 45 minutes
- Yield: 8 servings
Ingredients
Dry Ingredients
- 1 cup (130g) shelled pistachios (unsalted)
- 1 ½ cups (190g) all-purpose flour
- 2 teaspoon baking powder
- ¼ teaspoon salt
Wet Ingredients
- ½ cup (115g) unsalted butter, softened
- ¾ cup (150g) granulated sugar
- 3 large eggs, room temperature
- ½ cup (120ml) whole milk
- ¼ cup (60ml) vegetable oil
- 1 teaspoon vanilla extract
- ¼ teaspoon almond extract (optional for extra nutty aroma)
Mascarpone Cream
- 1 ½ cups (350g) mascarpone cheese, cold
- 1 cup (240ml) heavy cream
- ⅓ cup (40g) powdered sugar
- 1 teaspoon vanilla extract
Decoration
- ½ cup (70g) chopped pistachios (for the sides and top)
- Optional: white chocolate shavings or edible gold leaf for decoration
Instructions
- Prepare Pistachio Flour: Add the pistachios to a food processor and pulse until finely ground, being careful not to over-process to avoid turning into paste. Combine the ground pistachios with the flour, baking powder, and salt in a bowl, then set aside.
- Make Cake Batter: In a large bowl, beat the softened butter and granulated sugar until the mixture is light and fluffy, about 3 minutes. Add the eggs one at a time, fully incorporating each before adding the next. Pour in the milk, vegetable oil, vanilla extract, and optional almond extract and mix gently. Fold the dry pistachio-flour mixture into the wet ingredients until just combined to avoid overmixing.
- Bake Cake Layers: Divide the batter evenly into three greased 8-inch round cake pans lined with parchment paper. Bake in a preheated oven at 175°C (350°F) for 25 minutes or until a toothpick inserted into the center comes out clean. Allow the cake layers to cool fully on wire racks.
- Prepare Mascarpone Cream: In a chilled mixing bowl, whip the heavy cream until soft peaks form. Add the cold mascarpone cheese, powdered sugar, and vanilla extract, then beat until the cream is smooth and thick, taking care not to overbeat. Refrigerate until ready to use.
- Assemble the Cake: Place the first cooled cake layer on your serving plate and spread a generous layer of mascarpone cream over the surface. Repeat this layering with the remaining cake layers and cream. Frost the entire top and sides of the cake with the remaining mascarpone cream.
- Decorate and Chill: Press the chopped pistachios gently onto the sides of the cake and sprinkle the remaining pistachios over the top. Optionally, add white chocolate shavings or edible gold leaf for an elegant finish. Refrigerate the cake for at least 2 hours before serving to allow the flavors to meld and the cream to set properly.
Notes
- Be careful not to over-process pistachios to avoid turning them into a paste when grinding.
- Make sure cake layers are completely cooled before frosting to prevent the cream from melting.
- Chilling the mascarpone cream bowl and beaters beforehand helps achieve better whipping results.
- For a stronger pistachio flavor, use almond extract but it is optional.
- The cake tastes best when refrigerated for at least 2 hours but can be stored for up to 2 days refrigerated.
- For an elegant touch, garnish with white chocolate shavings or edible gold leaf as suggested.
- Prep Time: 20 minutes
- Cook Time: 25 minutes
- Category: Dessert
- Method: Baking
- Cuisine: Italian


Leave a Reply