When the holidays roll around, I love bringing out a dessert that’s festive, indulgent, and easy to share—enter the No-Bake Christmas Oreo Lasagna Recipe. This layered treat combines creamy, chocolatey, and minty flavors with that classic Oreo crunch, perfect for any holiday gathering or cozy winter night. It’s a showstopper that you don’t need to bake, saving you oven space and stress during busy holiday prep.

Jump to:
In the Kitchen
This No-Bake Christmas Oreo Lasagna Recipe is a delicious blend of Oreo cookies, cream cheese layers, fluffy whipped topping, and a hint of peppermint that beautifully captures the spirit of the season without heating up your kitchen. You’ll find it’s perfect for holiday parties or as a quick dessert fix when you want something impressive but fuss-free.
- Juicy and Tender Every Time: The cream cheese layer stays smooth and luscious, perfectly balancing Oreo crunch.
- Golden, Satisfying Finish: A sweet whipped topping adds lightness and a festive vibe, often garnished with crushed Oreos or peppermint bits.
- Simple Ingredients, Big Impact: You probably have most ingredients on hand, and assembling is straightforward.
- Weeknight to Weekend Ready: Whether busy or relaxed, you can prepare it in advance for stress-free serving.
Ingredients at a Glance

To make your No-Bake Christmas Oreo Lasagna Recipe stand out, choosing quality ingredients makes a big difference. Look for full-fat cream cheese for the creamiest filling and Oreos that are fresh and snappy—classic or peppermint-flavored work wonderfully this time of year.
- Oreos: Choose your favorite kind—regular double-stuffed or peppermint—for that nostalgic crunch and flavor burst.
- Cream Cheese: Use full-fat, softened well to avoid lumps in your layers.
- Whipped Topping: Freshly whipped cream or quality store-bought; homemade whips up fluffiest textures.
- Powdered Sugar: For sweetening without grit or graininess.
- Butter: Unsalted, melted, for mixing Oreo crumbs into a secure base.
- Vanilla Extract: A small splash lifts every layer with warmth.
- Peppermint Extract (optional): A touch adds holiday spirit if you love minty notes.
Heads-Up: Exact measurements are in the printable recipe card at the bottom.
How to Make No-Bake Christmas Oreo Lasagna Recipe
Step 1 — Crush the Oreos and Prepare Your Base
Start by pulsing about 30 Oreo cookies in a food processor until you have fine crumbs. If you don’t have a processor, place them in a sealed bag and crush with a rolling pin. Mix these crumbs with about half a cup of melted unsalted butter until everything resembles damp sand. Press this mixture firmly into a 9x13-inch pan, forming an even, compact base. You’ll notice it holds together well when pressed tight—this creates the foundation that keeps the layers sturdy.
Step 2 — Whip Up the Cream Cheese Layer
In a mixing bowl, beat softened full-fat cream cheese with powdered sugar until smooth and creamy — this takes about 2-3 minutes on medium speed. Add a splash of vanilla extract (and peppermint extract if you like) for that festive flair. Gently fold in whipped topping or homemade whipped cream until fully combined and fluffy. This layer adds that silky texture that contrasts beautifully with the crunchy crust below.
Step 3 — Assemble the Layers
Spread half of your cream cheese mixture over the Oreo crust, smoothing with a spatula. Next, layer more crushed Oreos — roughly half a cup broken into chunks for texture — and then spread the rest of the cream cheese layer on top. Finish with a generous layer of whipped topping. This layering is where the magic of the No-Bake Christmas Oreo Lasagna Recipe happens, giving you those beautiful, distinguishable layers with every bite.
Step 4 — Chill to Set and Serve
Cover the lasagna tightly with plastic wrap and refrigerate for at least 4 hours, but overnight is even better. This lets everything firm up nicely and the flavors meld. When ready to serve, sprinkle crushed Oreos or crushed peppermint candies atop for a festive crunch. You’ll love how the layers slice cleanly and look stunning on a plate.
Things to Remember
From my experience making the No-Bake Christmas Oreo Lasagna Recipe, patience during chilling is key. Skipping refrigeration or rushing the process can make the layers slide or not set properly. Also, don't over-beat the cream cheese mixture to avoid it becoming too stiff for spreading.
- Doneness Cue: The dessert is ready when the layers hold together firmly and slice cleanly after chilling.
- Temperature Trick: Keep the cream cheese at room temperature before mixing for a smooth, lump-free layer.
- Make-Ahead Move: Prep this lasagna a day ahead to save yourself last-minute stress and develop flavor.
- Common Pitfall: Don’t skip pressing the crust firmly—that’s what keeps everything from sliding.
Ways to Serve It

Finishing Touches
I like topping my No-Bake Christmas Oreo Lasagna Recipe with freshly whipped cream and a light dusting of cocoa powder or crushed peppermint candies for a festive touch. A drizzle of warm chocolate ganache adds rich shine and extra indulgence if you’re celebrating a special occasion.
Plays Well With
This Oreo lasagna pairs wonderfully with a hot cup of coffee or peppermint tea. If you want to balance the richness, serve alongside tangy fruit slices like orange or pomegranate seeds for a burst of freshness against the creamy sweetness.
Simple Plating Upgrades
For quick styling, garnish with mini candy canes or edible gold dust for holiday sparkle. Use a clear glass dish to showcase the beautiful layers, and slice portions with a warm knife for clean edges. These little touches elevate your presentation effortlessly.
Make-Ahead & Keeping Fresh
Storing Leftovers
Store leftovers tightly covered in an airtight container or keep the lasagna pan wrapped with plastic wrap. It will stay fresh in the refrigerator for up to 4-5 days, though I bet it won’t last that long! The texture stays creamy, and the crust holds its crunch without getting soggy too quickly.
Freezing Tips
I generally don't recommend freezing this dessert because the whipped topping can break down and become watery after thawing. But if you want to freeze, wrap the whole dish tightly in plastic and foil, then thaw overnight in the fridge. Re-whip the topping slightly before serving to refresh the texture.
Reheating No-Bake Christmas Oreo Lasagna Recipe Without Drying Out
This no-bake dessert is meant to be enjoyed chilled, so reheating isn’t recommended. If the cream cheese feels too firm after refrigeration, let it sit at room temperature for 15 minutes before serving—that softens it perfectly without losing that refreshing coolness you want from this holiday treat.
Frequently Asked Questions
Absolutely! Making it the day before not only saves time but also allows the flavors to meld beautifully. Just be sure to keep it well covered in the fridge.
No worries! Place the Oreos in a zip-top bag and crush them by hand with a rolling pin or even a heavy pan until they turn into fine crumbs or chunks, depending on the layer.
Cream cheese is key to the structure and tangy flavor. If you want a lighter version, you could try mascarpone or a well-drained ricotta, but the texture will change. I stick with cream cheese for the best results.
Yes! Use dairy-free cream cheese and whipped topping alternatives. Be sure to check the Oreos, as many varieties are accidentally vegan but double-check the label to be sure.
Final Thoughts
This No-Bake Christmas Oreo Lasagna Recipe is honestly one of my favorite holiday desserts because it delivers festive flavor without any oven time. It lets you focus on making memories instead of fussing in the kitchen, and the crowd-pleasing layers mean everyone leaves happy. Once you’ve tried it, I bet you’ll find it becomes a holiday tradition for you, too.
PrintFull Printable Recipe
No-Bake Christmas Oreo Lasagna Recipe
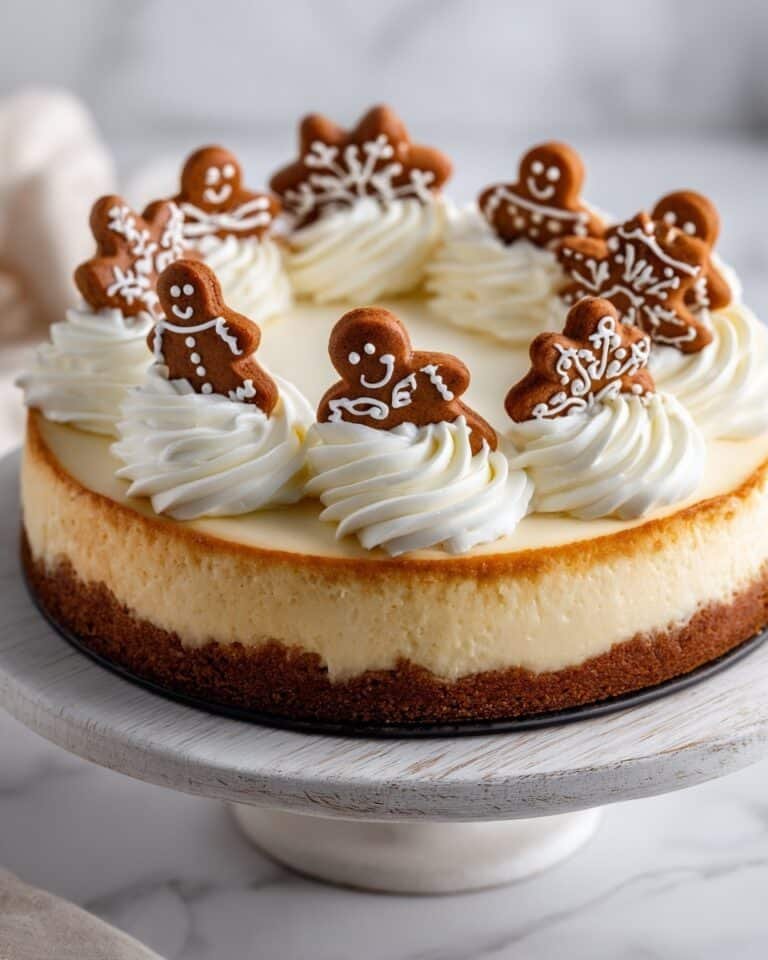
This Gingerbread Cheesecake recipe combines the warm, spicy flavors of gingerbread with a creamy, rich cheesecake filling. A spiced graham cracker crust forms a perfect base, complemented by a smooth cream cheese filling enhanced with molasses and warming spices. Topped with a fluffy maple cream cheese frosting, this dessert is ideal for festive occasions and holiday gatherings.
- Total Time: 8 hours 20 minutes
- Yield: 12 servings
Ingredients
Crust
- 1 ½ cups graham cracker crumbs
- ¼ cup dark brown sugar
- 2 tablespoon unsalted butter, melted
- 2 tablespoon molasses
- 1 teaspoon ground ginger
- ½ teaspoon ground nutmeg
- ½ teaspoon cinnamon
- ¼ teaspoon ground allspice
Cheesecake Filling
- 32 oz cream cheese, softened
- 3 eggs, room temperature
- ¾ cup dark brown sugar
- ½ cup heavy whipping cream
- ¼ cup molasses
- ¼ cup sour cream
- 2 tablespoon cornstarch
- 2 teaspoon vanilla extract
- 2 teaspoon ground cinnamon
- 2 teaspoon ground ginger
- ½ teaspoon ground nutmeg
- ½ teaspoon ground allspice
Frosting
- 8 oz cream cheese, softened
- 1 cup heavy whipping cream, cold
- 3 tablespoon maple syrup
- ½ teaspoon maple extract (optional)
- ¾ cup powdered sugar
Instructions
- Prepare Oven and Pan: Preheat your oven to 325°F (163°C). Grease a 9-inch springform pan thoroughly. Prepare a large roasting pan that can accommodate the springform pan with space around it. To prevent water leaks during the water bath, wrap the outside of the springform pan with heavy-duty aluminum foil from the bottom up to the sides.
- Make the Crust: In a mixing bowl, combine graham cracker crumbs, dark brown sugar, molasses, melted butter, ground ginger, nutmeg, cinnamon, and allspice. Stir well to fully incorporate all ingredients. Spray the springform pan with cooking spray, then press the crumb mixture evenly onto the bottom and slightly up the sides to form the crust.
- Prepare Cheesecake Filling: Using an electric mixer, beat the softened cream cheese on medium-high speed for 1 to 2 minutes until smooth and fluffy. Scrape the sides and bottom of the bowl, then add the dark brown sugar and beat until combined. Add the eggs one at a time, beating well and scraping the bowl after each addition to ensure smoothness.
- Add Flavorings and Thickeners: Mix in the molasses, sour cream, heavy whipping cream, and vanilla extract. Reduce mixer speed and gradually blend in the ground cinnamon, ginger, nutmeg, allspice, and cornstarch. Scrape the bowl again to make sure all ingredients are fully integrated.
- Assemble Cheesecake: Pour the cheesecake batter over the prepared crust in the springform pan and spread it evenly.
- Bake with Water Bath: Place the springform pan inside the large roasting pan. Pour hot water into the roasting pan until it reaches halfway up the sides of the springform pan. Bake in the preheated oven for 85 minutes. When baking is complete, turn off the oven, open the oven door halfway, and let the cheesecake rest for 10 to 15 minutes.
- Cool and Chill: Remove the springform pan from the roasting pan, unwrap any foil, and let it rest on the counter for 10 minutes. Run a butter knife around the edges to loosen the cheesecake from the pan, then let it cool for an additional hour. Cover the cheesecake with plastic wrap and refrigerate for at least 6 hours or overnight for best results.
- Prepare Frosting: Soften the cream cheese for 30 to 45 minutes while keeping the heavy whipping cream cold. Using a whisk attachment, beat the cream cheese and powdered sugar on medium-high speed for about one minute. Gradually pour in the cold heavy whipping cream while mixing continuously, then add the maple syrup and maple extract if using. Continue beating until stiff peaks form.
- Decorate: Transfer the frosting into a piping bag fitted with a decorative tip. Frost the chilled cheesecake as desired and serve immediately.
Notes
- Wrapping the springform pan in foil is crucial to preventing water from leaking into the cheesecake during the water bath baking method.
- Allowing the cheesecake to chill overnight enhances flavor and texture, making it creamier and more set.
- If you prefer a sweeter frosting, adjust the powdered sugar to taste.
- Use room temperature eggs and cream cheese to achieve a smooth batter with no lumps.
- To soften cream cheese quickly, leave it at room temperature for about 30 to 45 minutes or microwave in short bursts with caution.
- The water bath helps prevent cracks on the cheesecake surface by maintaining even heat and moisture.
- Maple extract is optional but adds a warm depth of flavor to the frosting.
- Store leftovers covered in the refrigerator for up to 4 days.
- Prep Time: 30 minutes
- Cook Time: 1 hour 25 minutes
- Category: Dessert
- Method: Baking
- Cuisine: American
- Diet: Vegetarian


Leave a Reply