If you're looking for a fun, sweet treat to make your next Harry Potter movie night truly special, this Magical Harry Potter Butterbeer Popcorn for Movie Nights Recipe is just the ticket. It's that perfect mix of buttery caramel and a hint of butterscotch, all wrapped up in crunchy, golden popcorn that's easy to throw together and impossible to stop munching on. Whether you're settling in for a binge-watching session or a festive gathering with friends, this popcorn will bring a little magic to your snack game.
Jump to:
In the Kitchen
This Magical Harry Potter Butterbeer Popcorn is such an easy way to capture that nostalgic Butterbeer flavor in a handheld, crunchy snack. I love how buttery and subtly sweet it is, and you’ll notice it’s perfect for nibbling while your favorite wizarding scenes unfold.
- Juicy and Tender Every Time: The popcorn stays crisp without getting soggy thanks to the quick, careful application of the butterbeer glaze.
- Golden, Satisfying Finish: Caramel and butterscotch notes create that warm, inviting color and irresistible scent.
- Simple Ingredients, Big Impact: An everyday pantry stash of popcorn, butter, brown sugar, and a touch of cream brings this to life.
- Weeknight to Weekend Ready: You can whip this up last minute or prep ahead for movie marathons and parties.
Ingredients at a Glance
Choosing good quality ingredients makes all the difference in this Magical Harry Potter Butterbeer Popcorn for Movie Nights Recipe. Fresh popcorn kernels and real butter elevate the flavor beyond anything store-bought.
- Popcorn kernels: Opt for fresh, organic kernels if possible—they’ll pop more fully and taste cleaner.
- Unsalted butter: Using unsalted butter lets you control the saltiness in the glaze perfectly.
- Brown sugar: Dark or light brown sugar works, but dark adds a richer caramel tone.
- Vanilla extract: Pure vanilla enhances the sweetness and gives that classic Butterbeer warmth.
- Butterscotch or caramel sauce: Adds that unmistakable, silky finish to the popcorn.
- Salt: Just a pinch to balance all the sweetness and bring out the flavors.
Heads-Up: Exact measurements and full instructions are detailed in the printable recipe card at the bottom.
How to Make Magical Harry Potter Butterbeer Popcorn for Movie Nights Recipe
Step 1 — Pop Your Perfect Popcorn
Start with popping your kernels for a light, fluffy base. I recommend using an air popper or stovetop method—both yield popcorn that's crisp and avoids that greasy feeling you get with microwave bags. The popcorn should be nearly all popped, with just a few unpopped kernels left—not too dense, not too airy. This sets the foundation for that magical buttery coating to cling beautifully.
Step 2 — Whip up the Buttery Butterbeer Glaze
In a small saucepan, melt the butter over medium heat. Add in brown sugar, vanilla extract, and a pinch of salt, stirring until the sugar dissolves and the mixture starts bubbling gently. This is when the flavors swirl together, giving you that deep caramel aroma that reminds me of Butterbeer from the wizarding world. Be careful not to burn it—keep the heat moderate and stir frequently.
Step 3 — Combine and Coat Quickly
Once the glaze is ready, immediately pour it over your freshly popped popcorn in a large mixing bowl. Toss quickly but gently with a large spoon or spatula to evenly coat every fluffy piece. Don't wait too long; the glaze starts to harden as it cools. You'll see the popcorn turning that beautiful golden hue, perfectly shiny and scrumptious.
Step 4 — Let It Cool and Crunch Up
Spread your popcorn onto a parchment-lined baking sheet in an even layer and let it cool at room temperature for about 15 minutes. This step allows the glaze to set, so when you bite into the popcorn, you get that satisfying crunch followed by the warm, buttery sweetness melting on your tongue. I like to mix it gently once halfway through cooling to avoid clumps and keep the texture even.
Things to Remember
Making this Magical Harry Potter Butterbeer Popcorn is straightforward but a few tips can safeguard your success every time. The right heat level when melting the glaze is key to avoid bitterness, and popping your kernels fresh makes the biggest difference to texture.
- Doneness Cue: When your glaze bubbles steadily but isn't darkening too fast, it's ready to coat.
- Temperature Trick: Medium heat works best for slow, even caramelization without burning.
- Make-Ahead Move: You can prepare the popcorn and glaze early, but coat and toss just before serving.
- Common Pitfall: Don't pour glaze onto popcorn that's still hot from popping or you'll end up with soggy kernels.
Ways to Serve It
Finishing Touches
A sprinkle of flaky sea salt over the finished popcorn really wakes up the flavors and adds a lovely contrast. Sometimes I throw in a handful of crushed pretzels or butterscotch chips for an extra layer of texture and sweetness that’s just irresistible. It’s all about creating that cozy, magical vibe.
Plays Well With
This Magical Harry Potter Butterbeer Popcorn works wonders alongside a cold glass of cream soda or sparkling apple cider. For movie nights, soft caramel or chocolate-covered almonds are great for balancing the buttery popcorn with some nutty crunch.
Simple Plating Upgrades
Serve the popcorn in tall glass bowls or large mason jars tied with rustic twine to channel that Hogwarts house charm. A few sprigs of dried thyme or cinnamon sticks on the side add visual warmth and a whiff of spice, elevating the whole snack experience without much fuss.
Make-Ahead & Keeping Fresh
Storing Leftovers
Store your popcorn in an airtight container at room temperature—it will stay crispy for up to 3 days, though I have to admit it doesn’t usually last that long in my house! Avoid the fridge since moisture can sneak in and soften the crunch.
Freezing Tips
This popcorn isn’t the best candidate for freezing; the delicate buttery coating can get a bit dull and soggy when thawed. If you do freeze it, use a super airtight bag and plan to enjoy it soon after thawing to keep a bit of that original crunch.
Reheating Magical Harry Potter Butterbeer Popcorn for Movie Nights Recipe Without Drying Out
If your popcorn loses some crispness, pop it in a preheated oven at 250°F for about 5 minutes on a parchment-lined baking sheet. This helps revive the crunch without over-drying. Avoid microwaving since it tends to toughen the popcorn and make it chewy rather than crispy.
Frequently Asked Questions
Microwave popcorn tends to be pre-oiled and flavored, which can make it greasy and less receptive to the butterbeer glaze. I recommend popping from kernels fresh on the stove or an air popper for the best coating and crispness.
Absolutely! You can substitute with coconut oil or a vegan butter alternative. The flavor will shift slightly towards coconut or the substitute’s profile but will still be delicious and magical.
Using either a good-quality butterscotch sauce or adding a bit of butterscotch-flavored extract to your glaze will bring that signature flavor. The brown sugar and butter combo adds natural caramel tones that help balance it beautifully.
You can prepare the popcorn and glaze separately in advance but save mixing them together for shortly before serving. This keeps the popcorn crisp and prevents it from getting sticky or soggy.
Final Thoughts
This Magical Harry Potter Butterbeer Popcorn for Movie Nights Recipe has become a favorite of mine whenever a marathon of magic is in order. It’s nostalgic, comforting, and just a little decadent. Most importantly, it’s incredibly easy to make—perfect whether you’re a seasoned home cook or just looking for a fun, quick snack. Trust me, once you try this buttery, sweet popcorn, you’ll want it as your go-to for every wizarding adventure.
PrintFull Printable Recipe
Magical Harry Potter Butterbeer Popcorn for Movie Nights Recipe
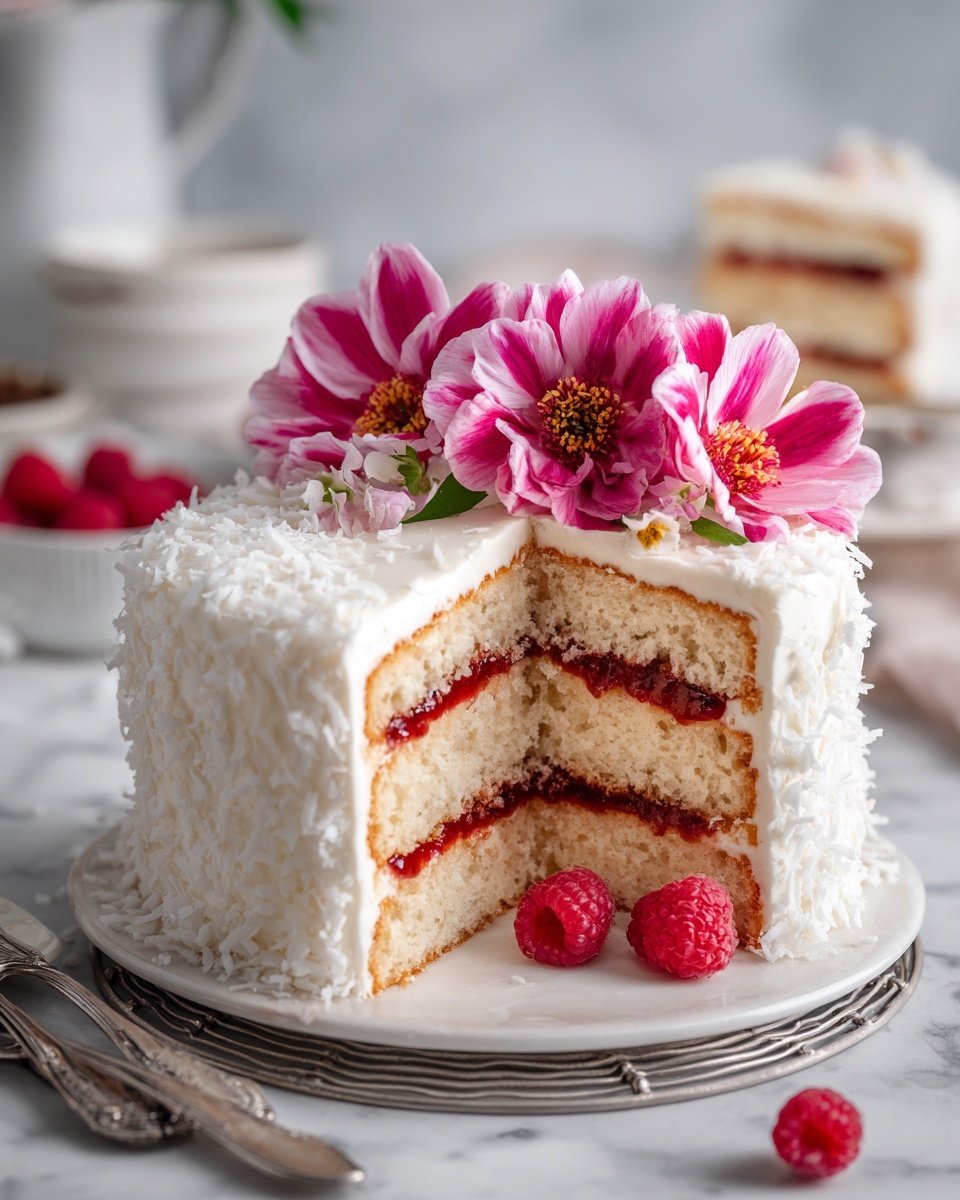
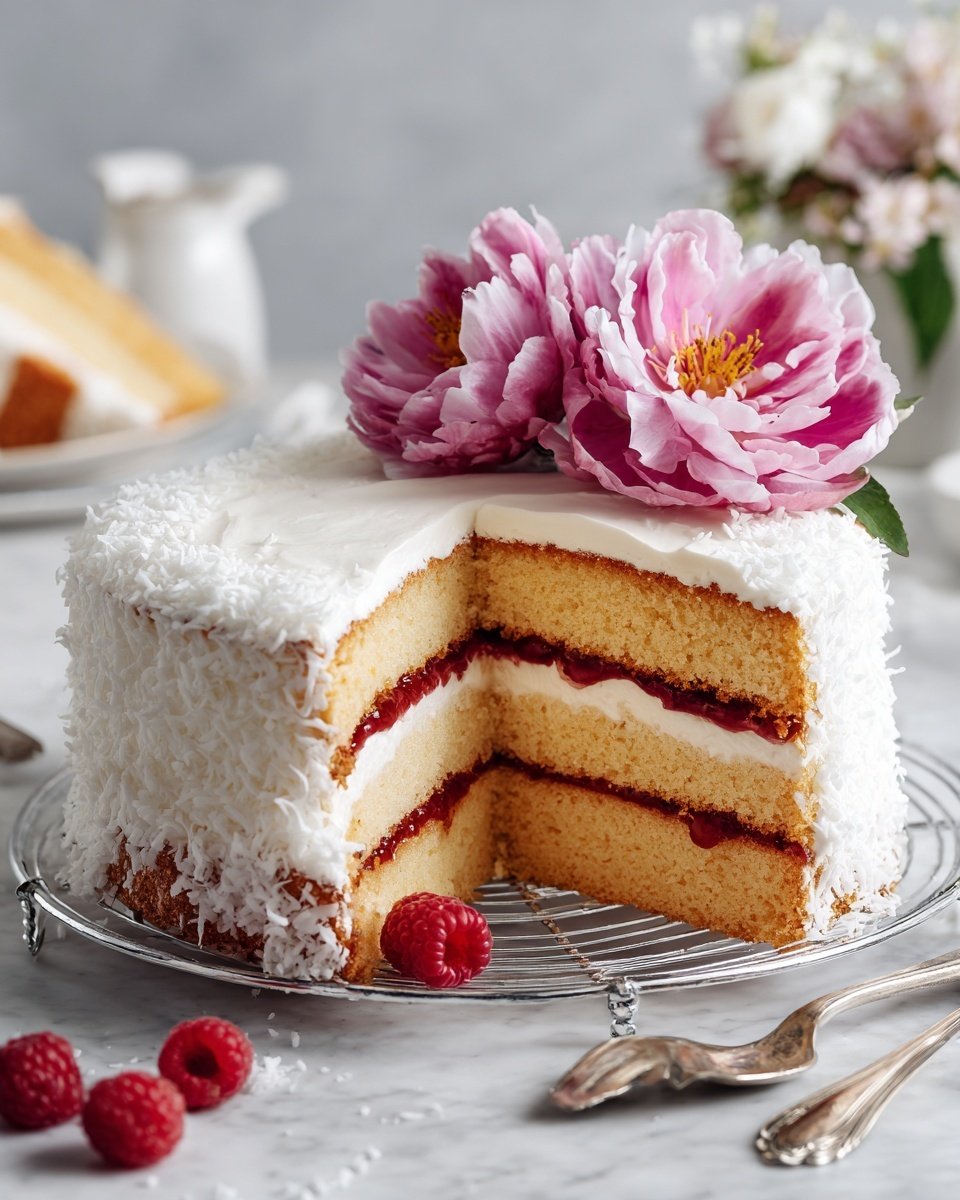
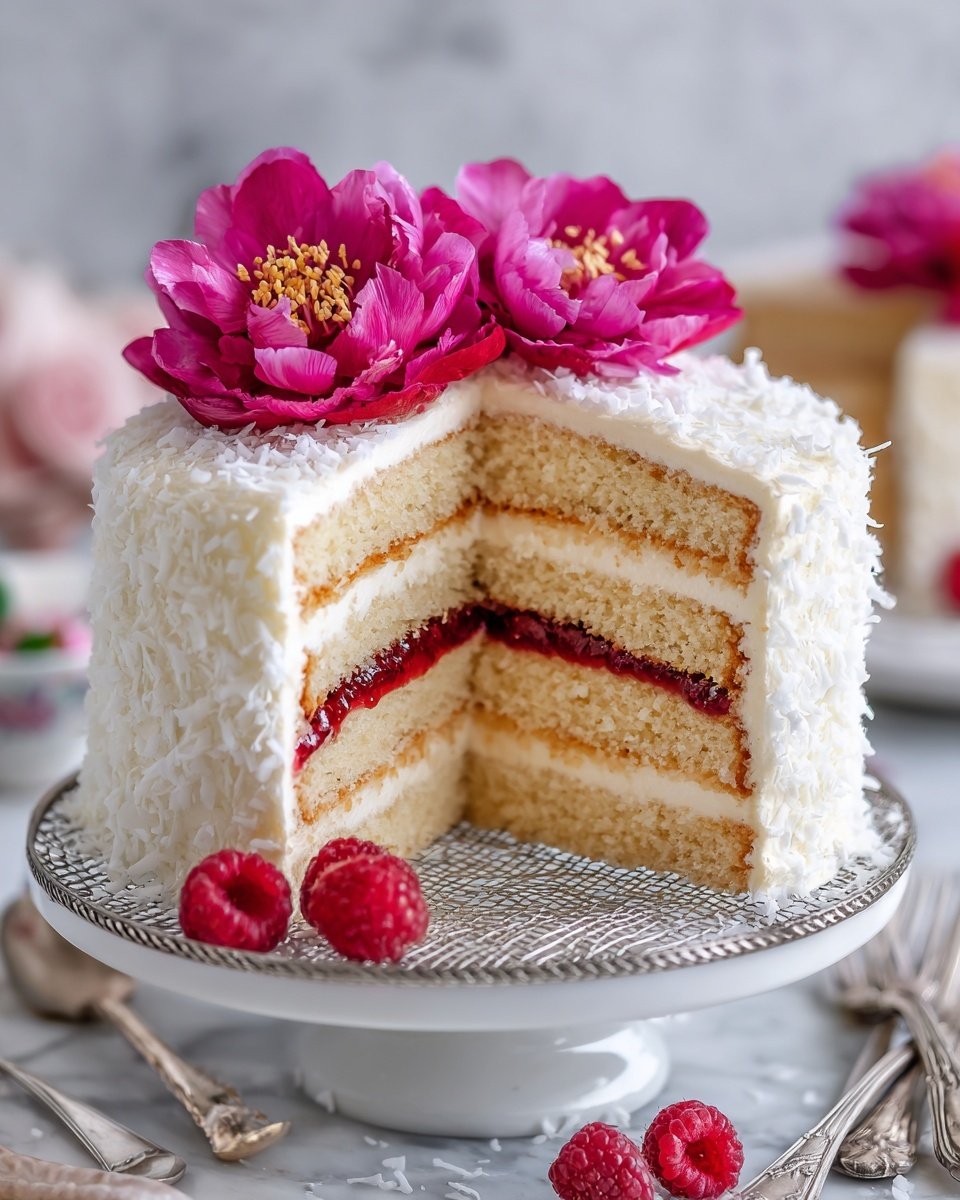
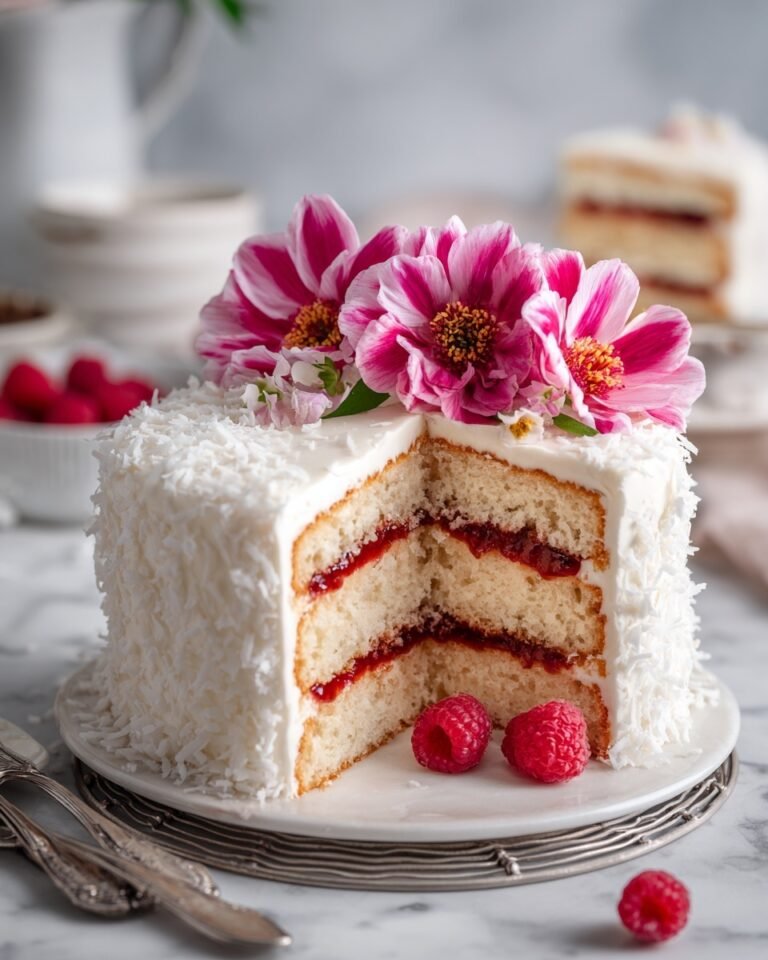
This Raspberry Swirl Coconut Snowball Cake is a moist, flavorful coconut cake layered and frosted with a luscious coconut cream cheese frosting and raspberry preserves swirl. The cake is decorated with shredded coconut, creating a snowy, tropical appearance perfect for celebrations or a special dessert treat.
- Total Time: 1 hour 20 minutes
- Yield: 12 servings
Ingredients
For the Coconut Cake:
- 2 and ½ cups (310 grams) all-purpose flour
- 1 Tablespoon (13 grams) baking powder
- ½ teaspoon (2 grams) baking soda
- ¾ teaspoon (4 grams) salt
- ½ cup (113 grams) unsalted butter, softened to room temperature
- 1 and ½ cups (298 grams) granulated sugar
- 1 teaspoon vanilla extract
- 1 and ½ teaspoons coconut extract
- ¼ teaspoon almond extract
- 6 large egg whites, lightly beaten until foamy on top
- 1 cup (227 grams) canned coconut milk
- ½ cup (113 grams) sour cream, at room temperature
- ⅓ cup (67 grams) unrefined coconut oil, liquified
- 1 cup (54 grams) unsweetened shredded coconut
For the Coconut Cream Cheese Frosting:
- 1 cup (226 grams) unsalted butter, at room temperature
- 8 ounces cream cheese, at room temperature
- 1 teaspoon vanilla extract
- ¼ teaspoon salt
- ½ teaspoon coconut extract
- 3 Tablespoons canned coconut milk
- 4 and ½ cups (510 grams) confectioners’ sugar
- ½ cup raspberry preserves
- 2 cups (108 grams) shredded coconut, for decorating
Instructions
- Prepare pans: Preheat oven to 350 degrees F. Generously grease the bottom and sides of three 9-inch round cake pans; line with parchment paper rounds and set aside.
- Mix dry ingredients: In a large bowl sift together the flour, baking powder, baking soda, and salt. Set aside.
- Cream butter and sugar: In a stand mixer or large bowl with electric mixer, beat the butter on medium-high speed until smooth and creamy, about 1 minute. Gradually add sugar, then beat on high for 2 minutes until light and fluffy.
- Add extracts: Beat in vanilla extract, coconut extract, and almond extract.
- Incorporate egg whites: Reduce mixer speed to low; add beaten egg whites in three additions, beating well and scraping bowl sides after each addition.
- Combine wet and dry mixtures: In a measuring cup, mix coconut milk and sour cream until combined. On low speed, alternate adding flour mixture and coconut milk mixture to batter in three additions, beginning and ending with flour, mixing just until combined.
- Add oil and coconut: Beat in liquified coconut oil until combined. Fold in shredded coconut using a spatula gently until combined.
- Divide batter and bake: Evenly divide batter (~510 grams per pan) into prepared pans and smooth tops. Bake for 20 minutes or until edges are lightly browned and toothpick comes out clean.
- Cool cake layers: Cool cakes in pans on wire rack for 20 minutes. Then invert layers onto racks and cool completely.
- Make frosting: Beat butter and cream cheese on medium-high speed until smooth, about 2 minutes. Beat in vanilla, salt, coconut extract, and coconut milk. On low speed, gradually add sifted confectioners’ sugar ¼ cup at a time, beating well before next addition. Increase speed to high and beat 2 minutes for fluffiness.
- Trim cakes: Using a serrated knife, trim any domes on cake layers if needed.
- Assemble cake: Place one cake layer on a plate or stand. Spread 1 cup frosting evenly, then spread ¼ cup raspberry preserves over frosting. Repeat with second layer. Top with third layer and frost entire cake with remaining frosting.
- Decorate cake: Press shredded coconut around sides of cake and sprinkle remaining coconut on top.
- Set and serve: Let cake set for 30 minutes before slicing. Slice and serve.
Notes
- Ensure all ingredients are at room temperature for best mixing results.
- To avoid dry cake, do not overmix batter after adding flour.
- Using parchment paper helps ensure cakes release easily from pans.
- For a more pronounced raspberry swirl, gently swirl the preserves into the frosting rather than layering.
- Store leftovers in the refrigerator for up to 3 days, covered tightly.
- Shredded coconut for decoration can be toasted lightly for added flavor if desired.
- Prep Time: 30 minutes
- Cook Time: 20 minutes
- Category: Dessert
- Method: Baking
- Cuisine: American
- Diet: Vegetarian


Leave a Reply