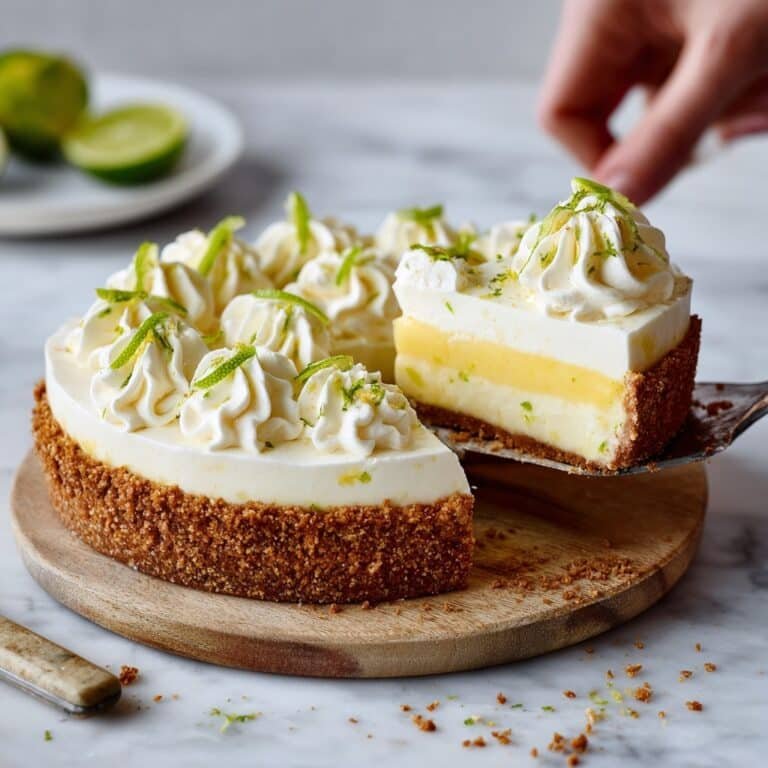
If you’ve ever craved a dessert that’s bright, creamy, and a little bit tangy, then you’re going to love this Key Lime Pie Recipe. It’s a classic treat that’s perfect for summer evenings, family gatherings, or anytime you want a fresh, zesty finish to a meal. I find it’s the perfect balance of tart lime and velvety sweetness, making every bite irresistible.

Jump to:
In the Kitchen
This Key Lime Pie Recipe is my go-to when I want a dessert that’s quick to pull together, yet feels special. The tang from fresh key limes cuts through the richness of the creamy filling, while the graham cracker crust brings that perfect toasty crunch. It’s a wonderful combination of textures and flavors that never gets old.
- Juicy and Tender Every Time: Using fresh key lime juice and zest makes all the difference in flavor vibrancy.
- Golden, Satisfying Finish: A gentle bake firms the filling without cracking or curdling – watch for a slight jiggle.
- Simple Ingredients, Big Impact: Nothing fussy here – just pantry staples and fresh citrus come together beautifully.
- Weeknight to Weekend Ready: You can prep it ahead of time and impress guests with minimal last-minute effort.
Ingredients at a Glance

Choosing fresh, quality ingredients is the secret to nailing this Key Lime Pie Recipe. Using real key limes for juice and zest brings an authentic tartness you just can’t replicate with bottled lime juice.
- Graham cracker crumbs: Aim for finely crushed for an even, crunchy crust that holds together well.
- Unsalted butter: Melting it fresh allows you to control salt levels and ensures a buttery crust.
- Key limes: These smaller, more aromatic limes have a uniquely bright tartness essential to the flavor.
- Sweetened condensed milk: This is the base for the silky filling – don’t substitute with evaporated milk.
- Large egg yolks: They add richness and help set the filling as it bakes gently.
- Heavy whipping cream: For a fluffy, lightly sweetened topping that balances out the tart pie.
Heads-Up: Exact measurements are in the printable recipe card at the bottom.
How to Make Key Lime Pie Recipe
Step 1 — Prepare and Bake the Graham Cracker Crust
Start by preheating your oven to 350°F (175°C). In a bowl, mix together the graham cracker crumbs, sugar, salt, and melted butter until the mixture feels like damp sand. Press this firmly and evenly into the bottom and up the sides of a 9-inch pie pan. Pressing firmly is key to a sturdy crust that won’t crumble when serving. Bake it for about 8 minutes until it turns a toasty golden color. Let it cool completely; a warm crust can make the filling slide around.
Step 2 — Whisk Together the Key Lime Filling
In a large bowl, whisk the egg yolks until slightly thickened and pale, about 1-2 minutes — this helps create a smooth texture. Then, add the sweetened condensed milk, fresh key lime juice, lime zest, vanilla extract, and salt. Whisk everything until the mixture is silky and uniform. I love how the bright citrus aroma wafts up at this stage, promising that lovely zing in the finished pie.
Step 3 — Bake Until Just Set
Pour the filling into your cooled crust, smoothing the top with a spatula. Bake again at 350°F (175°C) for 12 to 15 minutes. Keep an eye on it—the center should have a gentle jiggle, but not be runny. This gentle set means the pie will finish firming as it cools without cracking. Let it cool at room temperature for 30 minutes before chilling.
Step 4 — Chill and Whip the Cream Topping
Refrigerate your pie for at least 3 hours or overnight until fully set. When you’re ready to serve, whip heavy cream, powdered sugar, and vanilla extract on medium-high speed until stiff peaks form. The cream should be light yet stable enough to hold its shape. Spread or pipe this over the chilled pie and sprinkle with extra key lime zest for a refreshing pop of color and flavor.
Things to Remember
As someone who's made this Key Lime Pie Recipe countless times, I’ve learned a few tricks to keep in mind so it turns out perfectly every time.
- Doneness Cue: The center should jiggle slightly but not be liquid—this ensures a creamy set.
- Temperature Trick: Always bake with a preheated oven to ensure even cooking and avoid curdling.
- Make-Ahead Move: Chill the pie overnight; the flavors deepen and the texture firms beautifully.
- Common Pitfall: Don’t overwhip the cream topping, or it’ll turn buttery and lose its lightness.
Ways to Serve It

Finishing Touches
I like to keep it classic with a dusting of key lime zest on top—it adds that extra citrus fragrance and a lively pop of green. Sometimes, a few extra graham cracker crumbs scattered over the whipped cream give a satisfyingly rustic texture contrast that’s just lovely.
Plays Well With
This pie pairs beautifully with fresh berries or a tart raspberry sauce if you want to add a sweet-tart twist. For balance, a cup of strong coffee or lightly sweetened iced tea rounds out the flavors perfectly, especially on warm afternoons.
Simple Plating Upgrades
For a quick upgrade, pipe the whipped cream in pretty rosettes around the edges and top each with a tiny lime wedge or a mint leaf. It’s an effortless way to impress friends without adding any fuss.
Make-Ahead & Keeping Fresh
Storing Leftovers
Store leftover Key Lime Pie covered with plastic wrap or in an airtight container in the fridge. It’s best enjoyed within 3 days to keep that fresh lime vibrancy and creamy texture intact. After a day, the crust may soften slightly, but that’s nothing a quick chill won’t fix.
Freezing Tips
If you want to freeze the pie, I recommend doing so without the whipped cream topping. Wrap tightly in plastic wrap and foil to prevent freezer burn. It keeps well for up to 1 month. Thaw overnight in the refrigerator—avoid thawing at room temperature to maintain texture.
Reheating Key Lime Pie Recipe Without Drying Out
Since this pie is best enjoyed chilled, reheating isn’t usually necessary. But if you do want a slightly warmer slice, try a quick 10-15 second zap in the microwave on low power—watch it carefully to avoid melting the topping. Another option is a warm plate or letting it sit at room temp for 15 minutes; this brings out the flavors without drying it out.
Frequently Asked Questions
Yes, regular limes will work in this recipe if you can’t find key limes. The flavor will be slightly less tart and aromatic, but still delicious.
Overbaking is usually the culprit. Removing the pie from the oven while the center still jiggles slightly helps prevent cracking as it cools and sets.
For best texture and flavor, chill the pie at least 3 hours, but overnight is ideal to let it fully set and the flavors deepen.
Definitely! Use gluten-free graham crackers for the crust, and follow the rest of the recipe as is. It’s just as tasty.
Final Thoughts
Making this Key Lime Pie Recipe at home is one of those satisfying experiences where simple ingredients come together to create something truly special. Keep your ingredients fresh, handle the filling gently, and don’t rush the chilling step — you’ll be rewarded with a pie that’s tangy, creamy, and utterly delightful. I hope you enjoy it as much as I do, whether for a casual dessert or a show-stopping finish to a dinner party!
PrintFull Printable Recipe
Key Lime Pie Recipe
This classic Key Lime Pie recipe features a buttery graham cracker crust filled with a tangy, creamy key lime filling, topped with fluffy homemade whipped cream and a sprinkle of lime zest for a refreshing finish. Perfect for a light dessert with a tropical twist.
- Total Time: 4 hours 20 minutes
- Yield: 8 servings
Ingredients
Graham Cracker Crust
- 1 ½ cups (180 g) graham cracker crumbs
- ⅓ cup (65 g) granulated sugar
- ½ teaspoon salt
- 6 tablespoons (85 g) unsalted butter, melted
Key Lime Filling
- 4 large egg yolks
- 1 can (14 oz / 396 g) sweetened condensed milk
- ½ cup (120 ml) fresh key lime juice (about 12 key limes)
- 1 tablespoon key lime zest (or regular lime zest)
- ½ teaspoon vanilla extract
- ⅛ teaspoon salt
Whipped Cream Topping
- 1 cup (240 ml) heavy whipping cream
- 2 tablespoons (15 g) powdered sugar
- ½ teaspoon vanilla extract
- Key lime zest, for garnish
Instructions
- Preheat Oven: Preheat your oven to 350°F (175°C) to prepare for baking the crust and filling.
- Make Crust Mixture: In a bowl, combine the graham cracker crumbs, granulated sugar, salt, and melted butter. Stir until the mixture is evenly combined and holds together when pressed.
- Form and Bake Crust: Press the graham cracker mixture firmly into the bottom and sides of a 9-inch (23 cm) pie pan to form an even crust. Bake the crust in the preheated oven for 8 minutes, then remove and allow it to cool while you prepare the filling.
- Prepare Filling Base: In a large bowl, whisk the egg yolks until they become slightly thickened, which helps create a creamy texture.
- Add Filling Ingredients: Whisk in the sweetened condensed milk, fresh key lime juice, lime zest, vanilla extract, and salt until the filling is smooth and well combined.
- Fill and Bake Pie: Pour the key lime filling into the cooled crust, smoothing the top evenly. Bake the pie at 350°F (175°C) for 15 minutes, or until the center is just set with a slight jiggle remaining.
- Cool and Chill: Allow the pie to cool at room temperature for 30 minutes, then refrigerate it for at least 3 hours or overnight to fully set and develop flavors.
- Make Whipped Cream: Using a hand mixer or stand mixer, beat the heavy whipping cream, powdered sugar, and vanilla extract on medium-high speed until stiff peaks form.
- Top and Garnish: Spread or pipe the whipped cream topping evenly over the chilled pie. Garnish with key lime zest and additional graham cracker crumbs if desired.
- Serve: Slice the pie, serve, and enjoy this refreshing and tangy dessert.
Notes
- For best flavor, use fresh key lime juice and zest. Regular lime can be substituted if key limes are unavailable.
- Make sure the crust is fully cooled before adding the filling to prevent sogginess.
- Chilling the pie overnight enhances the texture and flavors.
- Use cold heavy cream for easier whipping when making whipped cream topping.
- Store leftovers covered in the refrigerator for up to 3 days.
- For a dairy-free variation, consider using coconut cream in place of heavy cream and a suitable non-dairy sweetened condensed milk.
- Prep Time: 20 minutes
- Cook Time: 23 minutes
- Category: Dessert
- Method: Baking
- Cuisine: American
- Diet: Vegetarian


Leave a Reply