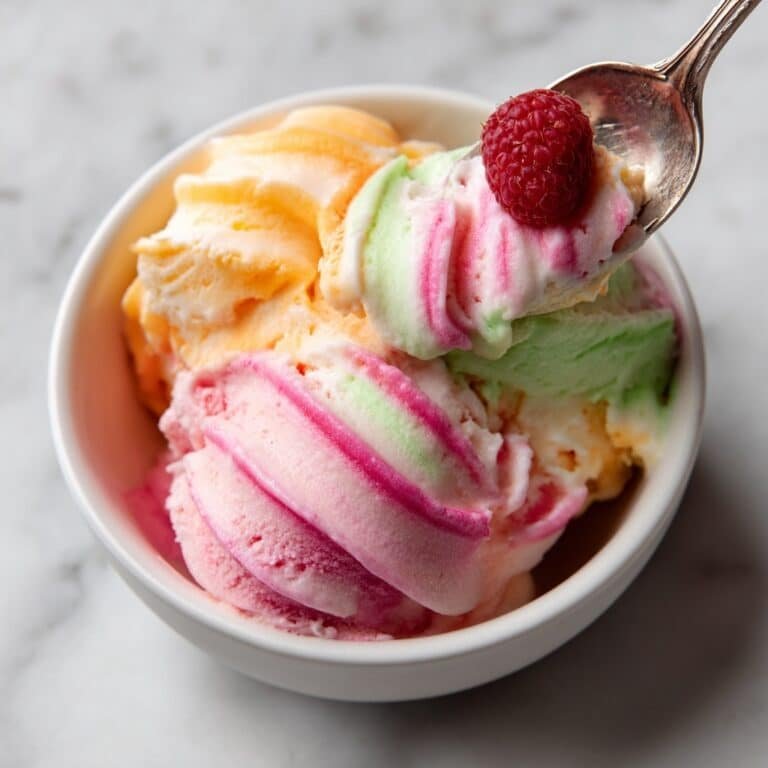
If you’re craving a vibrant, tangy, and creamy frozen treat, then this Homemade Rainbow Sherbet Recipe is just the thing. It’s a colorful delight perfect for warm afternoons, backyard gatherings, or whenever you want to transport yourself back to childhood summers with every spoonful. You’ll love how fresh juices and berries come alive in a smooth, refreshing sherbet that’s surprisingly simple to whip up at home.

Jump to:
In the Kitchen
I’ve always loved rainbow sherbet because it’s a perfect mix of creamy, fruity, and tart all in one scoop. This homemade version feels so fresh and vibrant—it’s like a mini celebration in your mouth! Plus, it’s easier than you’d think to make, with ingredients you probably already have.
- Juicy and Tender Every Time: Using fresh fruit juices and real raspberries gives this sherbet that authentic zesty tang that punches through the creaminess.
- Golden, Satisfying Finish: The balance between creamy dairy and bright fruit layers keeps each bite smooth but never too heavy.
- Simple Ingredients, Big Impact: You’ll be amazed how just a few basics—cream, milk, sugar, and juice—combine to make magic.
- Weeknight to Weekend Ready: Prep it after dinner and enjoy it at your next BBQ, picnic, or just an at-home treat with loved ones.
Ingredients at a Glance

When it comes to the ingredients for this Homemade Rainbow Sherbet Recipe, quality makes a difference. Fresh juice and ripe raspberries bring the brightness, while full-fat dairy ensures that smooth, creamy texture we all crave.
- Heavy Cream: Look for fresh cream with at least 36% fat for that velvety richness.
- Whole Milk: Full-fat milk balances the cream without overpowering the fresh fruit flavors.
- Granulated Sugar: Ensures the sherbet isn’t overly tart but perfectly sweetened.
- Raspberries: Fresh or frozen, but always ripe and vibrant for the best color and flavor.
- Orange and Lime Juices: Fresh squeezed if possible — store-bought works in a pinch but lacks brightness.
- Vanilla Extract: Just a splash adds warmth and rounds out the tartness nicely.
Heads-Up: Exact measurements are in the printable recipe card at the bottom.
How to Make Homemade Rainbow Sherbet Recipe
Step 1 — Create the Creamy Base
Start by combining the heavy cream, whole milk, and 1 cup of sugar in a medium saucepan over medium heat. Stir gently but continuously so the sugar dissolves evenly. You’re aiming for a fragrant, almost steaming mixture without boiling—this usually takes about 5 to 7 minutes. Then remove from heat and stir in the vanilla extract. Set it aside to cool fully; room temperature is fine but you can pop it in the fridge to speed things up. This step is key to getting a smooth, luscious base for your sherbet.
Step 2 — Prepare the Raspberry Layer
While your base cools, blend the raspberries with 2 tablespoons of sugar until smooth. Then, push the puree through a fine mesh sieve to remove seeds—this gives the sherbet a silky texture without gritty bits. If the raspberries are on the tart side, don’t worry; the balance with the cream will be perfect!
Step 3 — Churn the Sherbet Base
Pour the cooled cream mixture into your ice cream maker and churn according to the manufacturer’s instructions, usually about 20–25 minutes. Aim for a soft serve consistency—the sherbet should be fluffy but holding its shape. This is where the magic of that creamy texture happens, so make sure not to rush.
Step 4 — Mix and Layer the Flavors
Divide your sherbet base into three equal parts. Mix one with the fresh orange juice and a few drops of orange food coloring (optional for vibrancy). Another with lime juice and green food coloring. The third remains raspberry-flavored, combining the sieved puree with one portion of the base. Now for my favorite part: spoon the layers into a container, alternating each color to create beautiful rainbow stripes. Use a butter knife to gently swirl for a marble effect if you want.
Step 5 — Freeze Until Firm
Cover your layered sherbet and freeze for 4 to 6 hours, or until it's firm enough to scoop. Patience pays off here—the flavors meld beautifully and the texture firms up just right. When you scoop it, you’ll see those gorgeous, ice-cold layers of orange, lime, and raspberry all mingling on your spoon.
Things to Remember
Making this Homemade Rainbow Sherbet Recipe is really about timing and balance. Don’t skimp on chilling the base before churning, and be gentle when layering so your beautiful colors don’t blend into a muddy mess.
- Doneness Cue: Look for soft serve texture in the ice cream maker before layering.
- Temperature Trick: Fully cool your dairy base to avoid icy crystals forming later.
- Make-Ahead Move: You can prepare the sherbet base and purees a day ahead to save time.
- Common Pitfall: Avoid rushing the freezing time; partially frozen sherbet won’t scoop well or develop full flavor.
Ways to Serve It

Finishing Touches
I love adding a few fresh mint leaves or a sprinkle of finely grated lime zest on top of this sherbet—it brightens each bite and adds a subtle aroma that’s irresistible. You can also drizzle a little honey or a light dusting of crushed pistachios for texture contrast. These simple extras make the Homemade Rainbow Sherbet Recipe feel festive and special, especially when sharing.
Plays Well With
This sherbet pairs beautifully with buttery shortbread cookies or a crisp, slightly toasted waffle cone. The crunch balances the creamy, fruity softness. It’s also fantastic alongside fresh berries or a dash of sparkling wine sorbet for adult get-togethers.
Simple Plating Upgrades
For a quick upgrade, scoop into clear glasses or small bowls to show off the colorful layers. Add a sprig of mint or a slice of citrus on the rim for instant charm. If you’re feeling creative, use small cookie cutters to serve sherbet shapes—kids love this twist and it’s perfect for parties.
Make-Ahead & Keeping Fresh
Storing Leftovers
Store your leftover sherbet in an airtight container to keep those fresh flavors intact. It keeps well in the freezer for up to two weeks before texture starts to degrade. When stored properly, it remains smooth and flavorful without becoming icy or grainy.
Freezing Tips
The Homemade Rainbow Sherbet Recipe freezes beautifully thanks to the sugar and dairy balance. If you can, scoop a layer of plastic wrap directly on the sherbet surface before sealing the container to prevent ice crystals. When ready to enjoy, let it sit about 5–10 minutes at room temperature for easy scooping.
Reheating Homemade Rainbow Sherbet Recipe Without Drying Out
Sherbet isn’t intended to be reheated like other desserts since its charm lies in being frozen and fresh. However, if slightly too firm, allow it to soften naturally at room temperature for a few minutes rather than microwaving, which can cause separation or dryness.
Frequently Asked Questions
Yes, but it requires extra attention. You can place the mixture in the freezer and stir it vigorously every 30 minutes for a few hours to break up ice crystals and encourage creaminess. It takes more time and patience but can work well.
Absolutely! Strawberries, mango, or blueberries make great alternatives. Just adjust sweetness as needed and strain to keep the sherbet smooth.
Make sure to fully dissolve the sugar in the dairy base and chill it completely before churning. Also, cover the sherbet tightly during freezing to avoid moisture evaporation which can cause iciness.
Serve it slightly softened for the best texture—perfectly scoopable but still icy cold. Pair it with fresh fruit, a cookie, or enjoy it solo to savor the layered flavors.
Final Thoughts
This Homemade Rainbow Sherbet Recipe is one of those treats that feels both nostalgic and fresh. Every time I make it, I’m reminded how a few simple ingredients and a bit of patience can yield something truly special. You’ll enjoy the bright, juicy layers as much as I do—plus, it’s a crowd-pleaser that looks stunning on any dessert table. Give it a whirl—you might just find this becomes your go-to summer indulgence!
PrintFull Printable Recipe
Homemade Rainbow Sherbet Recipe
Homemade Rainbow Sherbet is a refreshing, colorful frozen dessert made with cream, milk, fresh fruit juices, and raspberries. This recipe features vibrant layers of raspberry, lime, and orange flavors creating a delightful sweet and tangy treat perfect for warm weather or anytime you crave a fruity ice cream alternative.
- Total Time: 6 hours 27 minutes
- Yield: 8 servings
Ingredients
Base
- 1 ½ cups heavy cream
- 1 ½ cups whole milk
- 1 cup granulated sugar
- 1 teaspoon vanilla extract
Fruit Flavors
- ¾ cup orange juice
- ½ cup lime juice
- 8 ounces raspberries
- ¾ cup granulated sugar (divided: 2 tablespoons for raspberries, 11 tablespoons for base)
- Food coloring: orange and green (amount as desired for coloring)
Instructions
- Prepare the Base: In a saucepan, combine the heavy cream, whole milk, and 1 cup of granulated sugar over medium heat. Stir continuously until the sugar dissolves completely, which typically takes 5-7 minutes. Remove the saucepan from heat and stir in the vanilla extract. Allow the mixture to cool completely to room temperature.
- Make Raspberry Puree: Blend the raspberries together with 2 tablespoons of sugar until smooth. Strain the raspberry mixture through a fine mesh sieve to remove seeds, yielding a smooth puree. Set aside.
- Churn the Base: Pour the cooled cream mixture into an ice cream maker and churn according to manufacturer instructions until it reaches a soft serve consistency, usually about 20-25 minutes.
- Divide and Flavor: Split the churned base into three parts. To one part, stir in the orange juice and add orange food coloring until desired color is achieved. To the second part, mix in the lime juice and green food coloring. The third part will be combined with the strained raspberry puree.
- Layer the Sherbet: In a container suitable for freezing, layer the three mixtures by alternating between raspberry, lime, and orange flavors. Continue layering until all mixtures are used.
- Freeze until Firm: Place the container in the freezer and freeze for 6 hours to allow the sherbet to set fully and develop firm texture.
Notes
- For a smoother texture, chill the cream mixture thoroughly before churning.
- Adjust the amount of sugar according to the sweetness of your fruit juices and personal taste.
- If you don’t have an ice cream maker, you can freeze the mixture in a shallow container and stir every 30 minutes until firm to mimic churning.
- Use natural food colorings or pure fruit juice concentrates to keep the sherbet vibrant and natural.
- Serve sherbet within a week for best freshness and texture.
- Prep Time: 20 minutes
- Cook Time: 7 minutes
- Category: Dessert
- Method: Baking
- Cuisine: American


Leave a Reply