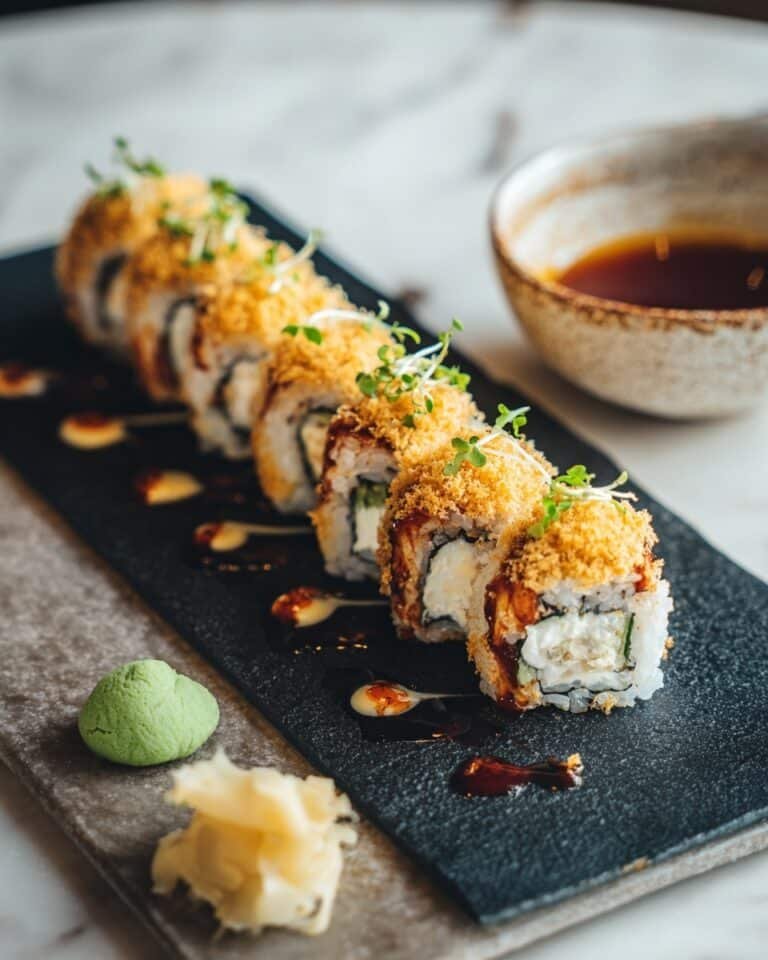
If you’re craving restaurant-quality sushi without leaving your kitchen, this Homemade California Crunch Roll Sushi Recipe is your new best friend. It’s perfect for an impressive yet approachable meal anytime you want to wow family or friends—or just treat yourself to something special. The combination of creamy avocado, tender crab, and that irresistible crunchy topping makes these rolls not just tasty but downright addictive.

Jump to:
In the Kitchen
This recipe brings the flavors and textures of your favorite California roll, elevated by a crunchy panko topping that adds the perfect golden crispiness. You’ll love how straightforward it is to prepare, even if sushi rolling is new to you.
- Juicy and Tender Every Time: The sushi rice stays fluffy and well-seasoned, holding together without being mushy.
- Golden, Satisfying Finish: The crunchy panko topping is toasted just right for that perfect contrast.
- Simple Ingredients, Big Impact: Everyday items like imitation crab and ripe avocado transform into something special.
- Weeknight to Weekend Ready: This roll recipes fits both casual dinners and special occasions with ease.
Ingredients at a Glance

Choosing fresh, quality ingredients makes all the difference in your Homemade California Crunch Roll Sushi Recipe. A little care upfront delivers sushi that’s light, silky, and balanced with crunchy highlights.
- Short-grain white rice: Essential for that sticky yet tender sushi texture.
- Rice vinegar: Adds the signature tang and shine to the sushi rice.
- Nori sheets: Make sure they’re sushi-grade for the best flavor and snap.
- Imitation crab or real crab meat: Choose fresh or chilled—both work great depending on your budget.
- Avocado: Ripe but firm, so your slices hold their shape.
- Cucumber: Thin strips added for cool crunch and brightness.
- Spicy mayo & eel sauce: These add layers of creamy heat and savory sweetness.
- Panko breadcrumbs or French fried onions: Toasted to golden perfection for that irresistible crunch.
Heads-Up: Exact measurements and detailed steps are in the printable recipe card at the bottom, so you can cook confidently.
How to Make Homemade California Crunch Roll Sushi Recipe
Step 1 — Prepare Perfect Sushi Rice
Start by rinsing your rice under cold water until the water runs clear—this removes excess starch and makes your rice fluffy instead of sticky clumps. Cook it with a 1¼:1 water-to-rice ratio; I like using a rice cooker for perfect consistency, but stovetop works fine too. While the rice cooks, gently heat rice vinegar with sugar and salt until dissolved, then fold this seasoning into the warm rice carefully so you don’t mash the grains. Spread the rice to cool quickly, covering it with a damp towel to prevent drying out. This step sets the foundation for your whole Homemade California Crunch Roll Sushi Recipe.
Step 2 — Set Up Your Rolling Station
Working with sticky rice can get tricky, so I always wrap my bamboo sushi mat in plastic wrap—this keeps it clean and helps the roll slide out smoothly later. Have a small bowl of water mixed with a splash of rice vinegar handy for dipping your fingers and knife; this prevents the rice from sticking and makes every step much easier and tidier.
Step 3 — Assemble the Roll Just Right
Place a nori sheet on the mat with the shiny side down. Spread an even layer of cooled sushi rice on the nori, leaving about a half-inch gap at the top edge—this helps seal the roll. Flip the nori over so the rice faces down (this is an inside-out roll style). Then layer your crab, avocado slices, cucumber strips, and any optional add-ins like cream cheese or jalapeño in a neat line across the middle. This arrangement ensures every bite has a perfect balance of flavors.
Step 4 — Roll and Shape with Confidence
Using your thumbs to lift the edge closest to you, start rolling the sushi mat away from you while holding the filling in place with your fingers. The key here is to roll tightly but gently—too loose and the roll won’t hold, too tight and you might squeeze out the fillings. Once you’ve reached the bare nori edge, moisten it slightly to seal the roll firmly. Give the roll a gentle squeeze with the mat to compact it into that perfect cylinder shape.
Step 5 — Add the Crunchy Topping
Brush the top of your roll with spicy mayo or eel sauce for sticky flavor and moisture. Then sprinkle a generous layer of toasted panko breadcrumbs or French fried onions—watch how the golden crunch transforms the texture entirely. Lightly press down with the bamboo mat to set the topping without squashing your roll. This is where your Homemade California Crunch Roll Sushi Recipe really shines!
Step 6 — Slice and Serve Like a Pro
Use a very sharp knife dipped in water and wiped dry to slice the roll into eight equal pieces. The wet knife cuts cleanly through sticky rice and the crunchy topping with minimal mess. Arrange neatly on a plate, drizzle extra eel sauce or spicy mayo on top if you like, and serve alongside soy sauce, pickled ginger, and wasabi. The vibrant colors and inviting layers will have everyone reaching for seconds!
Things to Remember
Rolling sushi can feel intimidating, but with these tips, you'll find it’s easier than it looks. Keep your hands damp, don’t rush the rolling motion, and taste as you go to adjust seasoning.
- Doneness Cue: Your sushi rice should be sticky but not mushy—if it clumps together gently when squeezed, you’re on track.
- Temperature Trick: Use slightly warm rice when rolling to help it stick and shape better.
- Make-Ahead Move: Prepare your sushi rice a few hours before rolling and cover tightly with a damp cloth to maintain moisture.
- Common Pitfall: Avoid overfilling your roll—it’s tempting to pack it full, but this makes rolling tricky and causes the roll to fall apart.
Ways to Serve It

Finishing Touches
I love adding a drizzle of eel sauce or spicy mayo on top for extra flavor layers and a glossy finish. Sprinkle some toasted sesame seeds or finely chopped scallions for a bright pop. These little extras elevate your Homemade California Crunch Roll Sushi Recipe and invite hungry eyes at the table.
Plays Well With
Pair your California Crunch Roll with miso soup or seaweed salad for a fresh, balanced meal. Pickled ginger adds a refreshing palate cleanser, while a small bowl of soy sauce infused with wasabi amps up the umami factor beautifully.
Simple Plating Upgrades
Serving sushi on a rustic wooden board with neatly arranged pickled ginger and wasabi mounds instantly ups the style game. Add a small bamboo leaf or edible flower for a delicate, restaurant-worthy touch on special occasions.
Make-Ahead & Keeping Fresh
Storing Leftovers
Store leftover sushi tightly wrapped in plastic wrap in an airtight container to preserve moisture and prevent drying. Keep refrigerated and consume within 24 hours for best texture and safety. The crunch topping stays crispier if you add it fresh just before serving leftovers.
Freezing Tips
Freezing Homemade California Crunch Roll Sushi Recipe isn’t recommended because rice and avocado don’t thaw well—textures change and can become mushy. If you want to prep in advance, I suggest making components like sushi rice and toppings separately and assembling just before eating.
Reheating Homemade California Crunch Roll Sushi Recipe Without Drying Out
If you do need to reheat sushi, a quick steam or warming in a microwave covered with a damp paper towel helps retain moisture. Avoid oven reheating, as it dries the rice and avocado. Remember, freshest is best with sushi, so try to enjoy it soon after making.
Frequently Asked Questions
Absolutely! Real crab adds a delicious, natural sweetness and texture to your roll. Just make sure to use fresh or well-cooked crab meat and shred it finely for easier rolling.
Keep a small bowl of water mixed with rice vinegar nearby to dip your fingers in before handling the rice. This little trick keeps your hands slick and stops the sticky rice from clinging to you.
Yes, you can toast the panko breadcrumbs or prepare fried onions ahead of time, but it’s best to add the crunchy topping right before serving to maintain maximum crispness.
While a bamboo sushi mat makes rolling much easier and neater, you can improvise with parchment paper or a clean kitchen towel if needed. Just be gentle when shaping your roll.
Final Thoughts
I hope this Homemade California Crunch Roll Sushi Recipe inspires you to bring a little sushi magic to your home kitchen. It’s a fun, rewarding process that tastes just as good as your favorite sushi spot, maybe even better because you made it yourself. Once you get the hang of rolling and layering these flavorful ingredients with that unforgettable crunch, you’ll be eager to experiment with your own twists and toppings. Enjoy the journey—and the delicious rewards!
PrintFull Printable Recipe
Homemade California Crunch Roll Sushi Recipe
Learn how to make a delicious Homemade California Crunch Roll Sushi with perfectly seasoned sushi rice, fresh avocado, imitation crab, cucumber, and a crunchy panko topping, all wrapped in nori sheets and served with spicy mayo and eel sauce.
- Total Time: 50 minutes
- Yield: 4 rolls
Ingredients
Sushi Rice
- 1 cup short-grain white rice
- 1¼ cups water
- 2 tablespoon rice vinegar
- 1 tablespoon sugar
- ½ teaspoon salt
Sushi Roll
- 4 roasted nori sheets (sushi-grade)
- 1 cup imitation crab (or real crab meat)
- 1 ripe avocado, sliced
- 1 small cucumber, cut into thin strips
- 2 tablespoon spicy mayo (mayo + sriracha)
- 1 tablespoon eel sauce
Crunchy Topping
- ½ cup toasted panko breadcrumbs or French fried onions
Optional Add-ins
- Cream cheese strips
- Thinly sliced jalapeño
- Teriyaki glaze
Instructions
- Prepare the Rice: Rinse the short-grain rice under cold water until the water runs clear to remove excess starch. Cook the rice with 1¼ cups of water using a rice cooker or on the stovetop. Meanwhile, in a small saucepan, combine rice vinegar, sugar, and salt, heating gently until dissolved. Once the rice is cooked, fold the vinegar mixture into the warm rice gently and allow it to cool to room temperature.
- Set Up Your Rolling Station: Wrap a bamboo sushi rolling mat with plastic wrap to prevent sticking. Place a bowl of water mixed with a little rice vinegar nearby; this will keep your hands and knife wet to prevent rice from sticking during rolling and slicing.
- Assemble the Roll: Lay a nori sheet shiny side down on the bamboo mat. Spread a thin, even layer of the cooled sushi rice over the nori, leaving about ½ inch uncovered at the top edge. Flip the nori so the rice side is facing down. Arrange the crab meat, sliced avocado, cucumber strips, and any optional add-ins like cream cheese or jalapeño in a line across the center of the nori.
- Roll the Sushi: Using your thumbs to lift the edge of the mat and fingers to hold the filling in place, roll the sushi tightly into a cylinder, sealing the edge of the nori to close the roll. Press gently but firmly along the bamboo mat to shape and secure the roll.
- Add the Crunch: Brush the top of the roll with spicy mayo or eel sauce, then sprinkle toasted panko breadcrumbs or French fried onions over the top. Lightly press with the bamboo mat to ensure that the crunchy topping adheres well.
- Slice and Serve: Using a sharp knife dipped in water to prevent sticking, slice the roll into 8 equal pieces. Optionally drizzle extra spicy mayo or eel sauce on top. Serve immediately with soy sauce, pickled ginger, and wasabi on the side.
Notes
- Use sushi-grade imitation crab or fresh real crab meat for best flavor and texture.
- Spicy mayo can be adjusted in heat level by varying the amount of sriracha added to mayo.
- Keep your knife wet when slicing to achieve clean cuts without crushing the roll.
- Substitute panko with French fried onions for extra crunch and flavor variation.
- If you don’t have a bamboo mat, use a clean kitchen towel wrapped in plastic wrap as an alternative.
- Prep Time: 30 minutes
- Cook Time: 20 minutes
- Category: Main Course
- Method: Stovetop
- Cuisine: Japanese
- Diet: Low Lactose


Leave a Reply