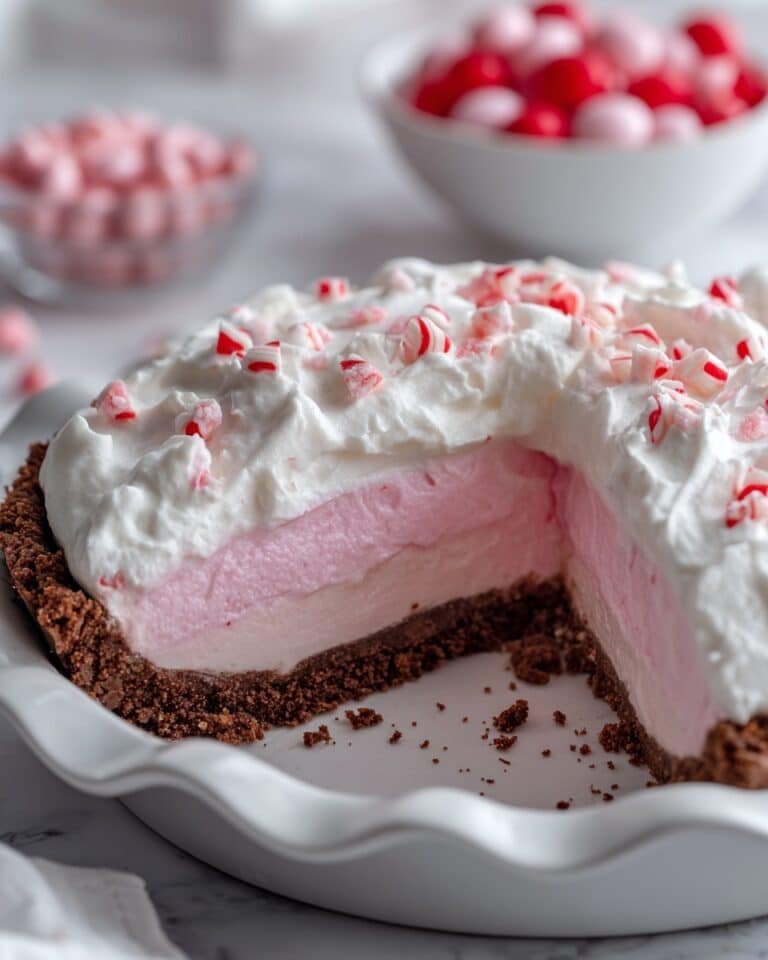
If you’re craving a festive dessert that comes together in a flash without turning on the oven, this Easy No Bake Christmas Peppermint Pie Recipe is exactly what you need. Perfect for those busy holiday days, it’s creamy, minty, and beautifully colorful—a delightful treat to share when you want something impressive yet effortless.

Jump to:
In the Kitchen
What makes this Easy No Bake Christmas Peppermint Pie Recipe a holiday standout is how simple it is to whip up a show-stopping dessert with minimal fuss. I love how the peppermint candy bits give it a nice crunch, while the creamy filling stays light and fluffy thanks to carefully folded whipped cream. Plus, it’s ready after just a couple hours chilling, making it a great last-minute go-to that still wows guests.
- Juicy and Tender Every Time: Folding the whipped cream carefully keeps the filling airy but stable, so every bite feels dreamy without being heavy.
- Golden, Satisfying Finish: Using an Oreo cookie crust adds that hint of chocolate crunch that perfectly complements the peppermint flavors.
- Simple Ingredients, Big Impact: A few pantry staples like cream cheese and peppermint extract combine for a festive dessert that’s fresh and delicious.
- Weeknight to Weekend Ready: No baking means you can enjoy this anytime—even on hectic days with little prep time.
Ingredients at a Glance

Choosing quality ingredients makes a world of difference in this Easy No Bake Christmas Peppermint Pie Recipe. Fresh cream cheese and real peppermint extract elevate the flavors, while a firm Oreo crust delivers texture without extra work.
- Cream Cheese: Softened, full-fat cream cheese ensures richness and smoothness in the filling.
- Powdered Sugar: For that classic sweet and creamy texture—you want it finely powdered to dissolve easily.
- Heavy Cream: Cold and whipped until stiff peaks to fold into the filling—this lightens things up beautifully.
- Peppermint Extract: Use pure extract for the best fresh, minty aroma.
- Oreo Cookie Crust: A pre-made crust saves time and adds an irresistible crumbly chocolate base.
- Peppermint Candy Bits: Coarsely crushed to give little bursts of minty crunch in each bite.
- Cool Whip: For a simple, fluffy topping that keeps this dessert extra festive.
- Red Food Coloring (optional): Just a few drops for charming holiday swirls without overpowering flavor.
Heads-Up: Exact measurements are in the printable recipe card at the bottom.
How to Make Easy No Bake Christmas Peppermint Pie Recipe
Step 1 — Whip the Heavy Cream to Stiff Peaks
Start by pouring your cold heavy cream into a large bowl and whipping it with a hand or stand mixer. Watch carefully as it thickens, turning from liquid to soft peaks, then finally to stiff, fluffy ones. You want it firm enough to hold its shape when you lift the whisk but still light. This step builds the airy texture that makes the pie feel light and delicate rather than dense.
Step 2 — Cream the Softened Cream Cheese and Sugar
In a separate bowl, beat the softened cream cheese until perfectly smooth. Then gradually add the powdered sugar, continuing to beat until the mixture feels silky and lump-free. This smooth base is key—it prevents any graininess and sets you up for a velvety filling.
Step 3 — Add Peppermint and Color for Festive Flair
Mix in the peppermint extract to the cream cheese mixture. If you’re using red food coloring, add a small drop here and fold gently to create those pretty swirls. Remember, a little goes a long way—better to start with less and add more if you want a brighter color.
Step 4 — Fold in Peppermint Candy Bits
Carefully fold half of the crushed peppermint candy bits into the filling. This is where you start to get those delightful surprises of crunch with every bite. Folding rather than stirring preserves the airiness from the whipped cream you’ll add next.
Step 5 — Gently Fold in Whipped Cream
Next, fold the whipped cream into your cream cheese mixture. Take your time here—gently fold with a spatula using broad strokes from the bottom up so your mixture stays fluffy. The filling should be light, airy, and perfectly smooth.
Step 6 — Assemble and Chill Your Peppermint Pie
Spoon the creamy filling into your prepared Oreo crust and smooth the surface with a spatula. Cover it loosely and refrigerate for at least 2 hours, though overnight is even better to let those flavors meld and the filling set beautifully.
Step 7 — Add Topping and Final Peppermint Crunch
Just before serving, spread a generous layer of Cool Whip on top and sprinkle with the remaining crushed peppermint candy bits for that festive finishing touch. You’ll love how the topping balances the minty filling with creaminess and a little sparkling color.
Things to Remember
This Easy No Bake Christmas Peppermint Pie Recipe is forgiving, but a few simple pointers helped me nail it every time. Folding gently keeps the filling fluffy, and chilling it well allows it to set up just right. Don’t over-pour the food coloring—peppermint flavor should take center stage, balanced with just a hint of festive color.
- Doneness Cue: The filling should be firm enough to slice cleanly after chilling, with no weeping liquid on top.
- Temperature Trick: Keep heavy cream chilled until just before whipping to reach perfect stiff peaks easily.
- Make-Ahead Move: This pie can be made a day ahead—cover well and store in fridge to let flavors deepen.
- Common Pitfall: Folding too aggressively can deflate the whipped cream, so use gentle motions to maintain airiness.
Ways to Serve It

Finishing Touches
Adding a dollop of fresh whipped cream or a sprinkle of extra crushed peppermint candy elevates the pie’s look and flavor. For a little sparkle, you might even dust some edible glitter or finely grated white chocolate on top—the perfect way to make this easy pie feel special on your holiday table.
Plays Well With
This peppermint pie pairs wonderfully with hot drinks like coffee or rich hot cocoa. If you want more texture contrast, serve alongside gingerbread cookies or buttery shortbreads to complement the creamy, minty pie with some crunch.
Simple Plating Upgrades
Slice the pie into generous wedges, and plate with a sprig of fresh mint or a whole peppermint candy for a festive touch. For a casual gathering, serve it right in the dish with a pie server—easy and inviting. For holiday dinner parties, individual slices on pretty dessert plates with a drizzle of melted chocolate is always a crowd-pleaser.
Make-Ahead & Keeping Fresh
Storing Leftovers
Store leftover peppermint pie covered tightly with plastic wrap or in an airtight container to keep it from absorbing fridge odors. It stays fresh and creamy for up to 3 days, though I find it best within the first 48 hours when the texture feels most luscious and light.
Freezing Tips
While this pie can be frozen, I recommend freezing before adding the Cool Whip topping to avoid texture changes. Wrap it tightly with plastic wrap and foil, then thaw overnight in the fridge before serving. Keep in mind the peppermint candy bits might soften slightly after freezing but still provide nice flavor.
Reheating Easy No Bake Christmas Peppermint Pie Recipe Without Drying Out
This pie is best served chilled and isn't meant to be reheated. If you want to bring out flavors on a cold day, pair a slice with a warm beverage rather than applying heat yourself—otherwise, the texture and creaminess can break down quickly with warming.
Frequently Asked Questions
You can substitute dairy-free cream cheese and coconut-based whipped topping, and use a dairy-free cookie crust. Just be sure your peppermint extract and candy bits are vegan-friendly to keep flavors consistent.
At least 2 hours is necessary for the filling to set properly, but chilling overnight gives the best texture and flavor meld. It’s worth the wait!
Pop the candy in a sealed zip-top plastic bag and gently bash with a rolling pin or the back of a heavy pan. This keeps pieces contained and gives you control over how coarse the bits are.
Absolutely! A graham cracker crust or even a ginger snap crust would add great flavor and texture contrasts—just make sure it’s firm enough to hold the creamy peppermint filling.
Final Thoughts
This Easy No Bake Christmas Peppermint Pie Recipe has become one of my favorite holiday desserts precisely because it feels luxurious yet comes together effortlessly. Whether you’re whipping it up for a family gathering or last-minute party, it’s guaranteed to impress without the stress. Give it a try—you’ll love how the cool peppermint and creamy filling brighten up your festive celebrations every single time.
PrintFull Printable Recipe
Easy No Bake Christmas Peppermint Pie Recipe
This Easy No Bake Christmas Peppermint Pie is a festive, creamy dessert perfect for the holiday season. Made with a smooth peppermint-flavored cream cheese filling, crushed peppermint candy bits, and a crunchy Oreo cookie crust, it combines refreshing flavors with a luscious texture. Topped with Cool Whip and festive candy accents, it is simple to prepare and requires no baking, making it an ideal quick holiday treat.
- Total Time: 2 hours 15 minutes
- Yield: 8 servings
Ingredients
Filling
- 8 ounces Full-Fat Cream Cheese, softened
- 1 cup Powdered Sugar
- 1 cup Heavy Cream, chilled
- 1 teaspoon Peppermint Extract
- 1 teaspoon Red Food Coloring, optional
- ½ cup Peppermint Candy Bits, coarsely crushed
Crust and Topping
- 1 pre-made Oreo Cookie Crust
- 1 cup Cool Whip, for topping
- Remaining crushed peppermint candy bits, for garnish
Instructions
- Whip the Cream: In a large mixing bowl, whip the chilled heavy cream until stiff, fluffy peaks form, creating a light and airy base for the pie filling. Set aside.
- Mix Cream Cheese and Sugar: In a separate bowl, beat the softened cream cheese and powdered sugar together until smooth and creamy, ensuring no lumps remain for perfect consistency.
- Add Flavor and Color: Stir in the peppermint extract and, if desired, red food coloring into the cream cheese mixture, mixing until the flavors and color are evenly distributed for a festive look.
- Fold in Candy Bits: Gently fold half of the coarsely crushed peppermint candy bits into the cream cheese mixture to add a delightful crunch throughout the filling.
- Combine with Whipped Cream: Carefully fold the whipped heavy cream into the cream cheese mixture, maintaining the airy texture to create a light and luscious filling.
- Fill the Crust: Spoon the peppermint filling into the pre-made Oreo cookie crust. Use a spatula to smooth the top for an even, picture-perfect finish.
- Chill the Pie: Place the pie in the refrigerator to chill for at least 2 hours, or ideally overnight, to allow the filling to set properly.
- Add Topping and Garnish: Before serving, top the pie with a generous dollop of Cool Whip and sprinkle the remaining crushed peppermint candy bits on top for a dazzling festive finish.
Notes
- For best flavor and texture, use full-fat cream cheese and cold heavy cream.
- If you don’t have red food coloring, you can omit it or substitute with a few drops of natural beet juice for color.
- Make sure to whip the heavy cream thoroughly to stiff peaks for a light filling.
- Allowing the pie to chill overnight enhances the flavors and helps the filling set perfectly.
- Store leftover pie covered in the refrigerator for up to 3 days.
- To make this dessert gluten free, use a gluten-free cookie crust alternative.
- Prep Time: 15 minutes
- Cook Time: 0 minutes
- Category: Dessert
- Method: No-Cook
- Cuisine: American


Leave a Reply