If you’re looking for a festive dessert that combines the rich, velvety charm of red velvet cake with the creamy indulgence of cheesecake, this Christmas Red Velvet Cheesecake Recipe is exactly what you want. It’s perfect for holiday gatherings, offering those classic Christmas colors and a texture that’s both smooth and satisfying every single time you take a bite.

Jump to:
In the Kitchen
I've made this Christmas Red Velvet Cheesecake Recipe a few times during the holiday season, and what I love most is just how festive yet straightforward it is to pull off. It’s that sweet spot between impressive and approachable, perfect for holiday hosts who want to wow without stress.
- Juicy and Tender Every Time: The mix of cream cheese and fluffy whipped cream creates a luscious filling that never feels dense or heavy.
- Golden, Satisfying Finish: Baking in a water bath gives the cheesecake a gently baked, silky texture and prevents cracking.
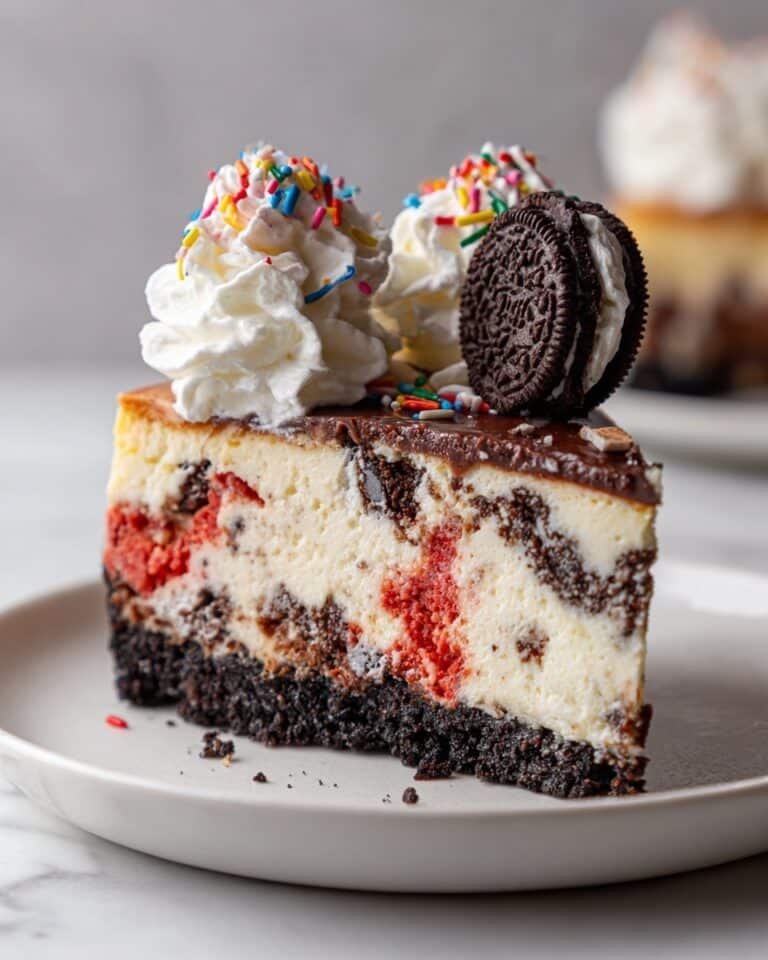
- Simple Ingredients, Big Impact: Using crushed Oreos for the crust adds a chocolaty crunch that complements the red velvet flavor beautifully.
- Weeknight to Weekend Ready: You can prep this cheesecake a day ahead, letting it chill overnight for the best flavor and sliceability.
Ingredients at a Glance

When selecting ingredients for your Christmas Red Velvet Cheesecake Recipe, quality will shine through in the final bite—especially with cream cheese and heavy cream. Freshness matters here!
- Oreos: Choose original Oreos for their sturdy crunch and classic chocolate flavor that makes the crust irresistibly good.
- Cream Cheese: Use full-fat and room temperature cream cheese for the smoothest, creamiest filling without lumps.
- Heavy Whipping Cream: Look for fresh cream with at least 36% fat to whip up stable soft peaks that lighten the cheesecake perfectly.
- Cocoa Powder: Opt for unsweetened Dutch-process cocoa for a deeper red velvet flavor without adding bitterness.
- Red Food Coloring: Gel or paste works best to get a vibrant red without watering down the batter.
- Christmas Sprinkles: Pick ones that hold up in baking for a festive pop inside the filling.
Heads-Up: Exact measurements and detailed steps are neatly laid out in the printable recipe card at the bottom of this post for your convenience.
How to Make Christmas Red Velvet Cheesecake Recipe
Step 1 — Prep the Crust and Pan for No Leaks
First things first: preheat your oven to 350°F (175°C). Since this cheesecake is baked in a water bath, you'll want to wrap your 9-inch springform pan tightly with heavy-duty aluminum foil—this prevents any water from seeping inside and ruining the crust. Take your time here; a secure wrap is the best way to avoid soggy edges later.
Step 2 — Crush Oreos and Bake the Base
Now, crush those Oreos into fine crumbs—either in a food processor or in a zip-top bag with a rolling pin. Toss the crumbs with melted butter and 2 tablespoons of sugar until they bind together well. Press this moist mixture firmly into the bottom of your prepared pan to create a compact, even crust. Pop it into the oven for 8 to 10 minutes. When it comes out, let it cool completely on a wire rack before adding the filling.
Step 3 — Mix the Creamy Red Velvet Filling
Beat the room-temperature cream cheese until smooth—no lumps here! Add the remaining ½ cup sugar gradually and mix just until blended. Stir in vanilla, cocoa powder, and as much red food coloring as you like to achieve that festive hue. In another bowl, whip 1 cup of heavy cream to soft peaks, then gently fold it into the cream cheese mixture. This lightens the filling and gives it that melt-in-your-mouth luxury. Lastly, fold in ¼ cup of Christmas sprinkles for fun bursts of color and texture.
Step 4 — Bake in a Water Bath for Even Doneness
Reduce oven temperature to 325°F (160°C). Place your foil-wrapped pan into a larger roasting pan, then carefully pour hot water into the roasting pan until it reaches halfway up the springform sides. This gentle steam helps the cheesecake bake evenly without cracking. Bake for 1 hour to 1 hour and 15 minutes, keeping an eye for when the edges look set but the center still wiggles slightly—your sign that it’s perfect.
Step 5 — Cool Slowly and Chill Overnight
Once baked, turn off the oven and leave the cheesecake inside for an hour with the door cracked open—this prevents sudden temperature changes that cause cracks. Afterward, remove from the water bath and cool completely on a wire rack for 2 to 3 hours. Run a knife around the edges to loosen before covering loosely with foil and refrigerating for at least 6-8 hours, or better yet, overnight. This resting time lets the flavors marry and texture firm up beautifully.
Step 6 — Garnish and Serve Your Christmas Red Velvet Cheesecake Recipe
Carefully remove the springform sides. Top your cheesecake with a cloud of whipped cream, then garnish with mini Oreos and extra Christmas sprinkles for that holiday sparkle. When slicing, heat a sharp knife under hot water and wipe clean between cuts to get crisp, clean slices every time. Trust me, these little touches make all the difference in presentation!
Things to Remember
Some tips I've picked up over a few holiday seasons will help your Christmas Red Velvet Cheesecake Recipe come out flawless, whether it’s your first time or fiftieth.
- Doneness Cue: The cheesecake should be set at the edges with just a slight jiggle in the center—overbaking dries it out.
- Temperature Trick: Keep ingredients like cream cheese at room temperature before mixing to avoid lumps and ensure smooth batter.
- Make-Ahead Move: This cheesecake gets better after chilling overnight; plan ahead to let flavors deepen.
- Common Pitfall: Don’t skip wrapping the pan tightly in foil; water leaks can turn your crust soggy fast.
Ways to Serve It

Finishing Touches
Whipped cream is the classic topper here—it adds a light, fluffy contrast to the dense, creamy filling. I like to pipe it decoratively or simply spread it with a spatula for a rustic look. The mini Oreos and sprinkles add texture and a little festive surprise with every forkful.
Plays Well With
A drizzle of chocolate ganache or a handful of fresh raspberries pairs beautifully if you want to elevate the dessert. For a more casual vibe, a cup of coffee or a glass of festive mulled wine is the perfect companion.
Simple Plating Upgrades
Sprinkling crushed candy canes or edible gold dust around the plate adds instant holiday cheer. You can also serve slices on vintage Christmas-themed plates to really make the occasion feel special, no fuss required.
Make-Ahead & Keeping Fresh
Storing Leftovers
Keep leftovers sealed in an airtight container or cover the springform pan tightly with plastic wrap. The cheesecake will stay fresh and creamy in the fridge for up to 4 days. You’ll notice the flavors deepen the longer it rests, making it even more enjoyable.
Freezing Tips
This cheesecake freezes well if you wrap it tightly in plastic wrap and then foil to prevent freezer burn. Thaw overnight in the refrigerator before serving. While the texture might be a touch denser after freezing, it still tastes fantastic and holds its color beautifully.
Reheating Christmas Red Velvet Cheesecake Recipe Without Drying Out
For a quick warm-up, microwave individual slices for 15-20 seconds on low power, adding a small dollop of whipped cream afterward to regain moisture. Oven reheating at 300°F for about 10 minutes wrapped loosely in foil can refresh the texture without drying out. Avoid overheating—it’s best enjoyed slightly cool or at room temperature.
Frequently Asked Questions
A springform pan is best because it allows you to remove the cheesecake sides without damaging the delicate crust and filling. If you don’t have one, consider lining a regular pan with parchment paper and carefully lifting out the cheesecake once chilled.
The water bath creates steam in the oven which gently cooks the cheesecake, resulting in a smooth, crack-free surface. It prevents the outside from baking too fast and the inside from drying out.
Absolutely! This Christmas Red Velvet Cheesecake Recipe is even better after chilling overnight. You can make it up to two days in advance for convenient holiday prep.
Without red food coloring, the cheesecake will look less vibrant but still taste delicious thanks to the cocoa and vanilla. If you want natural options, beet juice powder can be an alternative, though it might slightly alter the flavor.
Final Thoughts
This Christmas Red Velvet Cheesecake Recipe is one of those desserts that looks impressive but is surprisingly straightforward to make. With its creamy texture, festive colors, and that perfect balance of richness and lightness, it’s a crowd-pleaser in any holiday setting. I hope you enjoy baking and sharing this delightful treat as much as I do each season!
PrintFull Printable Recipe
Christmas Red Velvet Cheesecake Recipe
This festive Christmas Red Velvet Cheesecake combines a rich Oreo cookie crust with a smooth, creamy red velvet filling, adorned with colorful Christmas sprinkles and topped with whipped cream and mini Oreos, perfect for holiday celebrations.
- Total Time: 10 hours 30 minutes
- Yield: 12 servings
Ingredients
Crust
- 24 Oreo cookies (about 2 cups crumbs)
- ⅓ cup butter, melted
- 2 tablespoons white sugar
Filling
- 4 (8-ounce) blocks cream cheese, softened to room temperature
- ½ cup white sugar
- 2 cups heavy whipping cream
- 1 teaspoon vanilla extract
- 2 tablespoons cocoa powder
- Red food coloring, as needed for desired shade
- ¼ cup Christmas sprinkles
Topping and Garnish
- Whipped cream (for topping)
- Mini Oreos (for garnish)
- Extra Christmas sprinkles (for garnish)
Instructions
- Preheat and Prepare Pan: Preheat oven to 350°F (175°C). Wrap a 9-inch springform pan tightly with heavy-duty aluminum foil to prevent water seepage during baking.
- Make Crust: Crush Oreo cookies finely and combine the crumbs with melted butter and 2 tablespoons white sugar. Press the mixture firmly into the bottom of the prepared springform pan. Bake for 10 minutes. Cool completely on a wire rack.
- Prepare Filling: In a mixer, beat softened cream cheese until smooth, then gradually add ½ cup white sugar mixing until just combined. Stir in vanilla extract, cocoa powder, and red food coloring until uniformly vibrant. In a separate bowl, whip 1 cup heavy whipping cream until soft peaks form. Gently fold the whipped cream and Christmas sprinkles into the cream cheese mixture. Pour filling over the cooled crust.
- Bake Cheesecake: Reduce oven temperature to 325°F (160°C). Place the foil-wrapped springform pan into a larger roasting pan. Carefully pour hot water into the roasting pan, reaching halfway up the sides of the springform pan. Bake for 1 hour and 15 minutes or until edges are set but center still jiggles slightly.
- Cool Gradually: Turn off oven, leave cheesecake inside with oven door ajar for 1 hour. Remove from oven and water bath; cool completely on wire rack for 3 hours. Run a knife around the edge to loosen, then cover loosely and refrigerate for at least 8 hours or overnight until firm.
- Decorate and Serve: Remove springform pan sides. Top cheesecake with whipped cream, garnish with mini Oreos and extra Christmas sprinkles. For clean slices, use a sharp knife heated and wiped clean between cuts. Store leftovers refrigerated.
Notes
- Softening cream cheese to room temperature ensures a smooth filling without lumps.
- Use heavy-duty foil to prevent water from leaking into the springform pan during the water bath.
- Adjust red food coloring gradually to achieve your preferred shade of red velvet.
- Allowing the cheesecake to cool gradually in the oven helps prevent cracks on the surface.
- Chilling overnight improves the texture and flavor of the cheesecake.
- Heating the knife between slices helps achieve clean cuts without sticking.
- Prep Time: 30 minutes
- Cook Time: 1 hour 25 minutes
- Category: Dessert
- Method: Baking
- Cuisine: American
- Diet: Vegetarian


Leave a Reply