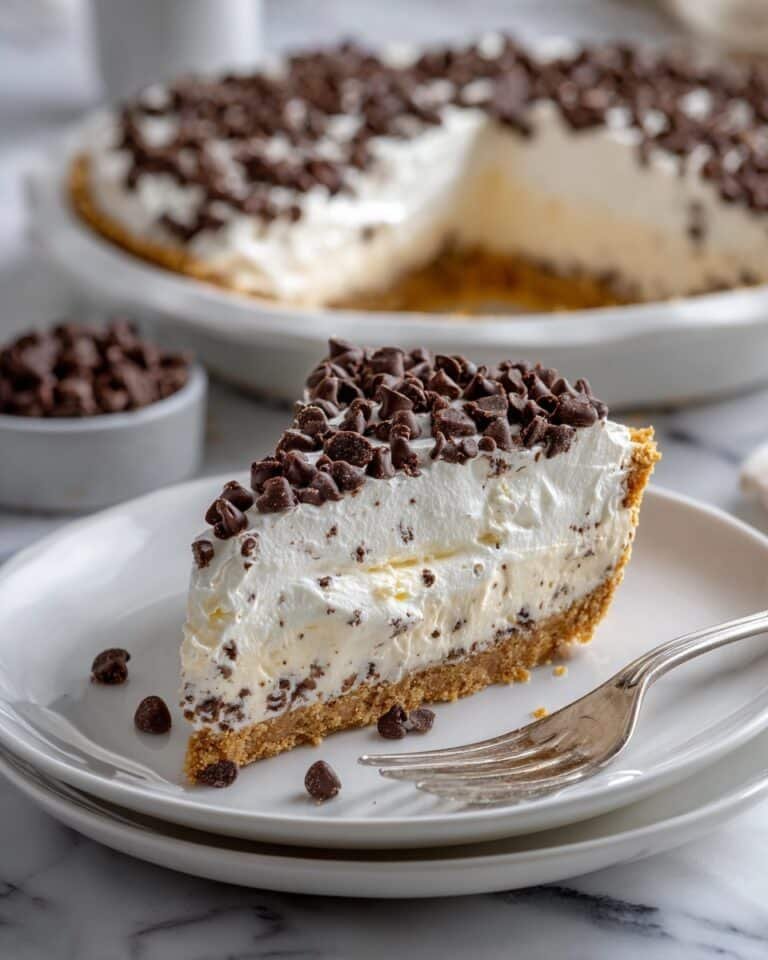
If you love the classic Italian flavors of cannoli but want an easy, shareable dessert, then this Chocolate Chip Cannoli Pie Recipe is exactly what you need. Perfect for dinners with friends or when you’re craving something sweet yet light, this pie blends creamy ricotta and mascarpone with zesty lemon and mini chocolate chips for a luscious finish you’ll keep coming back to.

Jump to:
In the Kitchen
I adore this Chocolate Chip Cannoli Pie Recipe because it merges the creamy, tangy flavors of traditional cannoli cream with the ease of a no-bake filling in a crunchy, buttery crust. It’s a dessert that feels fancy but comes together with pantry staples and minimal fuss.
- Juicy and Tender Every Time: The ricotta and mascarpone combo keeps the filling silky yet light, so your pie is never heavy or dry.
- Golden, Satisfying Finish: Toasty vanilla wafer crumbs baked into a crisp, buttery crust have the perfect snap to contrast the creamy filling.
- Simple Ingredients, Big Impact: You don’t need fancy tools or rare ingredients—just good quality cheese, fresh lemon zest, and plenty of mini chocolate chips.
- Weeknight to Weekend Ready: Make it ahead and chill overnight, then impress guests or treat yourself after a busy day.
Ingredients at a Glance

For this Chocolate Chip Cannoli Pie Recipe, choosing fresh dairy and fragrant lemon zest is key to bright, luscious flavor. Opt for whole-milk ricotta for the creamiest results, and use good quality vanilla wafers or graham crackers for the crust.
- Vanilla wafer crumbs: Freshly crushed vanilla wafers give the crust a sweet, aromatic base; graham cracker crumbs can be a simple swap if needed.
- Mascarpone cheese: Adds richness and a smooth texture—don’t substitute unless you want a very different result.
- Whole milk ricotta: The moisture and creaminess keep the pie filling light and indulgent without heaviness.
- Mini chocolate chips: Use good-quality chips so they melt a little but still keep shape for that lovely chocolate bite inside.
- Fresh lemon zest: It’s the secret ingredient that lifts and brightens the filling beautifully.
Heads-Up: Exact measurements are in the printable recipe card at the bottom.
How to Make Chocolate Chip Cannoli Pie Recipe
Step 1 — Prepare and Bake the Crunchy Crust
Start by preheating your oven to 350°F. Spray a 9-inch pie dish with nonstick cooking spray so the crust separates easily later. Combine the vanilla wafer crumbs with brown sugar and melted unsalted butter in a bowl. Press the mixture firmly and evenly along the bottom and up the sides of the pie dish. I find a flat-bottomed glass works wonders to get the crust nice and compact. Bake for 10 minutes to bring out that toasty, buttery aroma and set the crust firmly. Let it cool completely on a wire rack before adding the filling.
Step 2 — Whip Up the Creamy Cannoli Filling
While the crust cools, it’s time for the filling magic. Using an electric mixer, whip the mascarpone cheese and confectioner’s sugar together for 2-3 minutes until silky smooth and light. Add the vanilla extract, ground cinnamon, fresh lemon zest, and ricotta cheese, mixing just until combined. In a separate bowl, whip the heavy cream until stiff peaks form — this gives the filling its airy texture without losing richness. Fold a third of the whipped cream into the cheese mixture to lighten it, then gently fold in the rest of the whipped cream. Finally, stir in about two thirds of your mini chocolate chips to distribute those delightful morsels throughout the cream.
Step 3 — Assemble and Chill Your Chocolate Chip Cannoli Pie Recipe
Evenly spread the creamy filling into your cooled crust with a spatula, smoothing the surface. Sprinkle the remaining mini chocolate chips generously over the top—they add a perfect texture contrast and chocolate burst in every bite. Cover the pie with plastic wrap and refrigerate it for at least 4 hours. I prefer to let it chill overnight; it sets beautifully and the flavors meld together wonderfully, making for a truly decadent slice.
Things to Remember
From my experience, this Chocolate Chip Cannoli Pie Recipe is pretty forgiving, but small details make a big difference in texture and flavor. Here are some things to keep in mind for a pie that wows every time.
- Doneness Cue: The crust should be just lightly golden and smell fragrant—avoid overbaking or it will dry out and harden too much.
- Temperature Trick: Make sure the crust has cooled completely before adding the filling to avoid melting or sogginess.
- Make-Ahead Move: This pie benefits from chilling overnight, so plan ahead to let the flavors develop fully.
- Common Pitfall: Don’t overmix the whipped cream into the filling to keep the texture light and airy.
Ways to Serve It

Finishing Touches
I love dusting a little extra confectioner’s sugar or a sprinkle of finely chopped pistachios over my Chocolate Chip Cannoli Pie Recipe just before serving. It adds a touch of elegance and a hint of crunch, complementing the creamy filling perfectly. A few fresh mint leaves can also brighten up the presentation and add a pop of color.
Plays Well With
This pie pairs beautifully with a robust cup of espresso or a dollop of lightly sweetened whipped cream if you want more indulgence. I often serve it alongside fresh berries to give the dessert some juicy, tart balance that cuts through the richness.
Simple Plating Upgrades
To make weeknight slices feel more special, arrange cut wedges on simple white plates topped with a drizzle of chocolate or a spoonful of citrus-scented whipped cream. For celebrations, a small drizzle of homemade caramel sauce or a scattering of edible gold leaf turns each serving into a real showstopper.
Make-Ahead & Keeping Fresh
Storing Leftovers
Store leftover Chocolate Chip Cannoli Pie Recipe in an airtight container or tightly covered with plastic wrap in the refrigerator. It keeps well for about 3-4 days, and the filling holds its creamy texture without drying out or becoming watery. Just make sure to keep it chilled until serving.
Freezing Tips
This pie doesn’t freeze as well as some other desserts because the creamy filling can separate or become grainy when thawed. I recommend enjoying it fresh, but if you must freeze, do so uncovered in a freezer-safe dish for up to 1 month. Thaw overnight in the fridge and gently stir before serving to help smooth it out.
Reheating Chocolate Chip Cannoli Pie Recipe Without Drying Out
Since this pie is best served chilled, reheating isn’t usually necessary. If you prefer a slightly softer texture, let slices sit at room temperature for 15 minutes before serving. Avoid microwave or oven reheating, which can dry out the delicate filling and alter the texture.
Frequently Asked Questions
I haven’t tried a dairy-free version myself, but you might experiment by swapping mascarpone and ricotta for plant-based cream cheeses and using coconut cream in place of heavy cream. Keep in mind the texture and flavor will differ from the traditional pie.
I usually place the wafers in a sealed plastic bag and gently crush them with a rolling pin until fine. You want small crumbs, not powder, for the best crust texture.
Absolutely! Graham cracker crust or even a pre-made cookie crust can work well, just adjust the baking time slightly. I like vanilla wafer crumbs for a classic flavor but flexibility is great here.
Baking the crust until golden and fully cooled before adding the filling is key. Also, don’t add the filling while it’s warm. The chilling step helps everything firm up nicely, keeping the crust crisp.
Final Thoughts
This Chocolate Chip Cannoli Pie Recipe is one of my favorite desserts to bring to any gathering because it looks impressive, tastes incredible, and is so straightforward to make. The combination of creamy, zesty filling and buttery crust with bursts of chocolate is just irresistible. Once you try it, I’m sure it’ll find a happy place in your dessert rotation, just like it has in mine.
PrintFull Printable Recipe
Chocolate Chip Cannoli Pie Recipe
A decadent Chocolate Chip Cannoli Pie featuring a crispy vanilla wafer crust filled with a creamy mascarpone and ricotta filling, infused with vanilla, cinnamon, and lemon zest, and studded with mini chocolate chips. Perfect for a delightful dessert that's sure to impress.
- Total Time: 4 hours 30 minutes
- Yield: 8 servings
Ingredients
For the Crust
- 2¼ cups vanilla wafer crumbs (~60 vanilla wafers, can use graham cracker crumbs instead)
- ¼ cup brown sugar
- ½ cup unsalted butter, melted
For the Filling
- 1 cup mascarpone cheese (1 8-oz. container)
- ½ cup confectioner’s sugar
- 1½ teaspoon vanilla extract
- ¼ teaspoon ground cinnamon
- 2-3 teaspoon lemon zest (zest of 1 lemon)
- 1 cup whole milk ricotta cheese
- ¾ cup heavy whipping cream
- 1⅓ cups mini chocolate chips, divided
Instructions
- Prepare the crust: Preheat your oven to 350 degrees Fahrenheit. Spray a 9-inch pie dish with nonstick cooking spray and set aside. In a medium mixing bowl, combine the vanilla wafer crumbs, brown sugar, and melted butter; stir until well mixed. Press the mixture firmly into the bottom and sides of the prepared pie dish, using a flat-bottomed glass if helpful. Bake for 10 minutes, then remove from oven and transfer to a wire rack to cool to room temperature.
- Make the filling base: Using an electric mixer, whip together the mascarpone cheese and confectioner’s sugar for 2 to 3 minutes until completely smooth. Add vanilla extract, ground cinnamon, lemon zest, and ricotta cheese; mix gently until just combined.
- Whip the cream: In a separate bowl, whip the heavy whipping cream on medium speed until stiff peaks form, approximately 2 to 3 minutes. Fold one-third of the whipped cream into the mascarpone and ricotta mixture to lighten it.
- Combine filling: Add the remaining whipped cream and gently fold with a rubber spatula until just combined. Then fold in ⅔ cup of the mini chocolate chips carefully to distribute evenly.
- Assemble the pie: Spread the filling evenly into the cooled crust. Sprinkle the remaining mini chocolate chips on top of the pie for a decorative finish.
- Set the pie: Cover the pie securely with plastic wrap and refrigerate for at least 4 hours, preferably overnight, until the filling is completely set and chilled.
Notes
- Substitute graham cracker crumbs for the vanilla wafer crumbs if preferred.
- Use a flat-bottomed glass or measuring cup to press the crust mixture firmly and evenly into the pan.
- Let the crust cool completely before adding filling to avoid melting or softening the filling.
- For best flavor, refrigerate the pie overnight to allow taste development and firm setting.
- Use chilled heavy cream for easier whipping and better volume.
- Gently fold whipped cream and chocolate chips to maintain the airy texture of the filling.
- Prep Time: 20 minutes
- Cook Time: 10 minutes
- Category: Dessert
- Method: Baking
- Cuisine: Italian-American


Leave a Reply