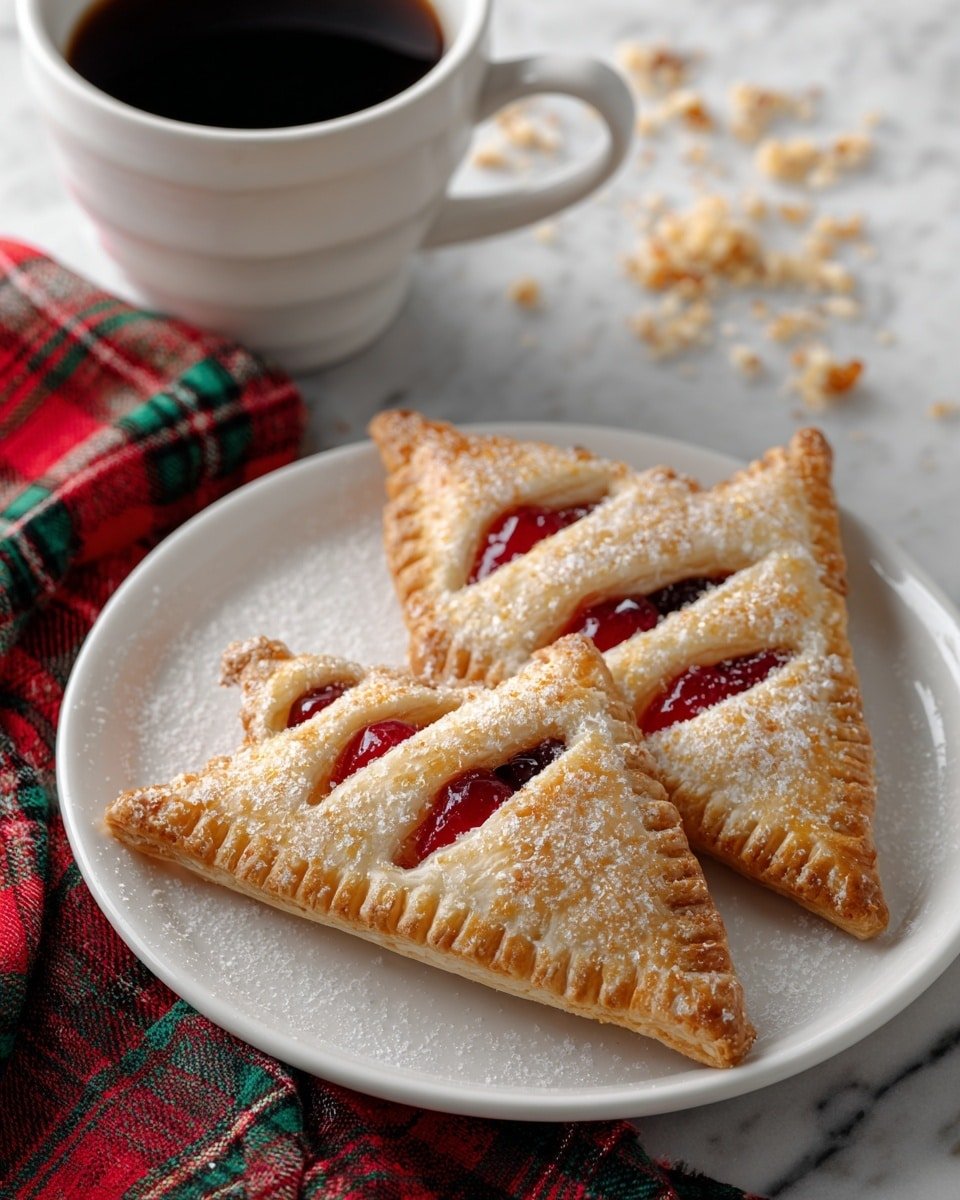
If you’re craving a sweet, portable treat that tastes like a slice of summer any time of year, this Cherry Hand Pies Recipe is just what you need. These little beauties are perfect for snack times, picnics, or a cozy afternoon coffee break because they’re easy to make and wonderfully satisfying.

Jump to:
In the Kitchen
I love making these hand pies because they’re a perfect balance of juicy filling and crisp, flaky crust — and you’ll notice how easy they are to customize and whip up anytime you want a nostalgic, handheld dessert.
- Juicy and Tender Every Time: Using canned cherry filling ensures that sweet-tart pop that’s just right inside each flaky parcel.
- Golden, Satisfying Finish: Brushing the pies with an egg wash creates a beautiful, toasty exterior you’ll want to bite into immediately.
- Simple Ingredients, Big Impact: The few pantry staples required make this recipe accessible and reliably delicious.
- Weeknight to Weekend Ready: These pies come together quickly enough for a weeknight treat, but fancy enough for weekend guests or kid’s lunches.
Ingredients at a Glance

For the best Cherry Hand Pies Recipe, I recommend using quality refrigerated pie crusts for ease, and a cherry filling that’s rich but not overly sweet. Fresh cherries would be lovely too if you're up for a little extra prep.
- Refrigerated Pie Crusts: Choose ones that come in two crusts per box for perfect-sized hand pies and easy handling.
- Cherry Pie Filling: The canned variety is consistent and full of flavor, ensuring juicy, reliable results every time.
- Eggs: For the wash, bringing a beautiful sheen and helping the sugar stick if you decide to sprinkle some on top.
- Water: Mixed with the egg for a smooth wash that’s easy to apply without dripping.
- Coarse Sanding Sugar (optional): Adds a lovely sparkle and crunch to the crust’s surface.
Heads-Up: Exact measurements are in the printable recipe card at the bottom.
How to Make Cherry Hand Pies Recipe
Step 1 — Prep Your Workspace and Filling
Start by preheating your oven to 375°F (190°C) and lining a baking sheet with parchment paper. Open your boxed pie crusts, keeping them chilled until you're ready to work — this helps keep them flaky. Spoon about 1 to 2 tablespoons of cherry pie filling onto one half of each crust square, leaving a bit of space around the edges to seal. Don’t overfill or you’ll risk spills later.
Step 2 — Seal and Shape the Hand Pies
Fold the crust over the filling to form a neat half-moon shape. Press the edges firmly but gently with a fork; this seals in those delicious cherries and creates a charming design. I always find that a light sprinkle of flour on your fingers helps prevent the dough from sticking while shaping.
Step 3 — Egg Wash and Sugar Sprinkle
Whisk together your eggs and water. Brush each hand pie generously on top — this will give them that irresistible golden glow once baked. For an extra touch of sparkle and crunch, sprinkle coarse sanding sugar on top before baking. It’s a small step that makes a big difference in texture and looks.
Step 4 — Bake to Golden Perfection
Pop the tray in the oven and bake for about 25 to 30 minutes, or until the pies are puffed up, golden, and irresistibly fragrant. You’ll know they’re done when the crust feels crisp and sounds hollow if tapped gently. Let them cool slightly on the baking sheet before enjoying — the filling will be hot and worth the wait.
Things to Remember
Based on my experiments with this Cherry Hand Pies Recipe, these tips will help you avoid common pitfalls and get the best possible pie every time.
- Doneness Cue: Look for a deep golden color and a firm, crisp crust before pulling pies from the oven.
- Temperature Trick: Keep your pie crust well chilled before assembling to ensure flaky layers.
- Make-Ahead Move: You can assemble the pies and freeze them uncooked, then bake fresh whenever you want.
- Common Pitfall: Overfilling the pies can cause filling to leak, so be careful with your portions.
Ways to Serve It
Finishing Touches
I like to serve these hand pies warm, sometimes with just a dusting of powdered sugar, or a small dollop of whipped cream on the side. A scoop of vanilla ice cream turns this simple Cherry Hand Pies Recipe into an elegant dessert that guests rave about.
Plays Well With
Pair these pies with a crisp cup of black tea or coffee to balance the sweetness. For a brunch spread, they’re fantastic alongside creamy yogurt and fresh fruit for a complete, crowd-pleasing meal.
Simple Plating Upgrades
Serving on a rustic wooden board or colorful plates adds charm. I often garnish a few fresh cherries and mint leaves for a fresh pop of color that makes them look bakery-worthy.
Make-Ahead & Keeping Fresh
Storing Leftovers
Store any uneaten hand pies in an airtight container at room temperature for up to two days. They maintain a crisp crust if you let them cool completely before storing, but the filling stays best at room temp rather than refrigerated.
Freezing Tips
This Cherry Hand Pies Recipe freezes beautifully. Pop unbaked pies on a tray into the freezer till firm, then transfer to a freezer-safe bag. When ready, bake from frozen adding a few extra minutes to the cooking time for perfectly fresh pies anytime.
Reheating Cherry Hand Pies Recipe Without Drying Out
To warm leftovers, I prefer the oven at 300°F for about 10 minutes — this revives crispness without drying. The air fryer also works well on low heat. Microwave reheating can be quick, but cover them with a slightly damp paper towel to keep moisture in.
Frequently Asked Questions
Yes! But make sure to pit and cook them down with sugar and a thickener like cornstarch so the filling isn’t too runny. This provides the juicy texture that canned filling offers without excess liquid.
Don’t overfill your pies and be sure to seal the edges tightly with a fork. Chilling your assembled pies for 15 minutes before baking can also help keep the crust firm and minimize leaks.
Absolutely! Swap out pie crust for a vegan or gluten-free version, and replace egg wash with a plant-based milk or maple syrup glaze. Just be mindful that textures may vary slightly.
Store them in an airtight container at room temperature for up to two days or freeze for longer storage. Reheat in the oven or air fryer to maintain crispness and warmth.
Final Thoughts
Making this Cherry Hand Pies Recipe truly feels like a tiny celebration in the kitchen each time. Whether you enjoy them fresh from the oven or as a make-ahead sweet bite, these pies bring that warm, nostalgic joy to any snack or dessert moment. I hope you try making them soon and find they become a quick favorite in your home like they have in mine.
PrintFull Printable Recipe

Cherry Hand Pies Recipe
These Cherry Hand Pies are delightful individual pastries filled with sweet cherry pie filling wrapped in flaky, golden pie crusts. Perfect for on-the-go treats or dessert, they combine a buttery crust with a luscious cherry filling and a sparkling sugar topping for an irresistible finish.
- Total Time: 40 minutes
- Yield: 12 hand pies
Ingredients
Pie Crust
- 3 boxes refrigerated pie crust (2 crusts each box)
Filling
- 1 can cherry pie filling (21 ounces)
Egg Wash & Topping
- 2 large eggs
- 2 Tablespoons water
- Coarse sanding sugar (optional)
Instructions
- Preheat the Oven: Preheat your oven to 375 degrees Fahrenheit to ensure it reaches the perfect temperature for baking the hand pies.
- Prepare the Egg Wash: In a small bowl, whisk together the 2 large eggs and 2 tablespoons of water until well combined to use for brushing over the pies.
- Roll out the Pie Crusts: Unroll the refrigerated pie crusts on a lightly floured surface and cut each crust into 4 equal squares to create the pie bases.
- Add the Cherry Filling: Spoon about 1 to 2 tablespoons of cherry pie filling onto the center of each pie crust square, ensuring not to overfill to prevent leakage during baking.
- Seal the Pies: Brush the edges of each square with some egg wash, then fold the dough over to form a triangle or rectangle, pressing edges together firmly. Use a fork to crimp the edges securely.
- Brush and Sugar the Pies: Brush the entire surface of each hand pie with the egg wash and sprinkle with coarse sanding sugar if desired for a sparkly finish.
- Vent the Pies: Use a sharp knife or fork to poke a few small holes or slits on the top of each pie to allow steam to escape during baking.
- Bake the Hand Pies: Place the prepared pies on a parchment-lined baking sheet and bake in the preheated oven for 25 minutes or until the crust is golden brown and crisp.
- Cool and Serve: Remove the pies from the oven and allow them to cool slightly on a wire rack before serving warm or at room temperature.
Notes
- Refrigerated pie crusts can sometimes stick to the surface; use flour on your rolling surface to prevent tearing.
- Make sure to seal the edges well to avoid filling leakage during baking.
- Coarse sanding sugar adds a lovely sparkle and crunch but can be omitted for a subtler finish.
- Allow the hand pies to cool a bit before eating to avoid burning from hot filling.
- Store leftovers in an airtight container at room temperature for up to 2 days or in the fridge for up to 5 days.
- Prep Time: 15 minutes
- Cook Time: 25 minutes
- Category: Dessert
- Method: Baking
- Cuisine: American


Leave a Reply