If you’re after a fun, eye-catching treat that’s as delightful to bite into as it is to look at, this Waffle Pops with Chocolate Dip and Pink Glaze Recipe is going to be your new go-to. Perfect for parties, weekend brunches, or just a special snack, these pops are crispy, colorful, and covered in luscious chocolate and a pretty pink glaze that make every bite feel like a celebration.

Jump to:
In the Kitchen
This recipe is a playful twist on classic waffles, turned into delightful handheld pops. I love them because you get all the crispy, golden waffle goodness with the added fun of dipping and glazing, making it perfect for kids and adults alike. There’s something so satisfying about the contrast between the crunchy waffle, the silky chocolate dip, and the sweet, slightly tangy pink glaze—it's a guaranteed mood lifter.
- Juicy and Tender Every Time: Using a simple batter with just the right mix of wet and dry ingredients ensures your waffle pops come out fluffy inside but crispy on the outside.
- Golden, Satisfying Finish: Cooking your waffle pops until they’re just golden gives you that perfect toasty aroma and crunch.
- Simple Ingredients, Big Impact: A few pantry staples transform into a treat with chocolate dip and that gorgeous pink glaze adding a festive flair.
- Weeknight to Weekend Ready: Make a batch in under 30 minutes; they’re fantastic fresh, but also fun to prepare with the family ahead of time.
Ingredients at a Glance

Choosing quality and fresh ingredients really makes a difference here. Whether it’s the waffle batter or the glaze, I recommend staying simple but thoughtful for the best results with your Waffle Pops with Chocolate Dip and Pink Glaze Recipe.
- Waffle mix or batter: Use your favorite from scratch or a well-loved store-bought mix for consistency and flavor.
- Chocolate (dark or milk): Opt for good-quality chocolate to melt smoothly and add rich depth.
- Powdered sugar: For the pink glaze, powdered sugar helps achieve that smooth, shiny finish.
- Milk or dairy-free alternative: To thin out the glaze and add moisture.
- Food coloring or beet powder: For that lovely pink hue without artificial colors.
- Sticks (like popsicle sticks): Essential for making the waffles handheld & fun.
Heads-Up: Exact measurements and full instructions await you in the printable recipe card at the bottom of the page.
How to Make Waffle Pops with Chocolate Dip and Pink Glaze Recipe
Step 1 — Prepare Your Batter and Preheat
Start by mixing your waffle batter according to your chosen recipe or package instructions. I like to do this with a whisk to get a light, airy texture. While your batter rests for a few minutes, heat up your waffle iron and get your sticks ready. Make sure the iron is well-oiled or non-stick sprayed, so your waffle pops release easily without breaking. The key is a hot, preheated iron for crisp waffles.
Step 2 — Cook the Waffle Pops
For each pop, pour a small ladle of batter onto the waffle iron, then quickly place a stick gently into the center. Close the lid carefully to avoid displacing the stick. Cook for 3–5 minutes until the waffle is golden brown and holds firm on the stick. You’ll notice a wonderful toasty aroma and a crispy outer shell when they’re done. Let them cool a few minutes before dipping or glazing to avoid melting your coatings too fast.
Step 3 — Make the Chocolate Dip
While the waffle pops cool, melt your chocolate in a double boiler or microwave in short bursts, stirring often. You want it silky and smooth, not overheated or grainy. If desired, add a splash of coconut oil for extra shine and a little drizzle when dipped. This dip is where the magic happens—the rich chocolate coating lifts the simple waffle into a dessert-worthy delight.
Step 4 — Whip Up the Pink Glaze
In a small bowl, mix powdered sugar with just enough milk (or dairy-free milk) to achieve a glaze consistency—smooth but thick enough to coat the pops. Add a few drops of pink food coloring or a pinch of beet powder to get that cheerful blush shade. Stir well until beautifully glossy. Don’t make it too runny, or it won’t stick nicely.
Step 5 — Dip, Drizzle, and Decorate
Dip each waffle pop into the melted chocolate, letting excess drip off. Place on parchment paper and immediately drizzle with the pink glaze using a spoon or small piping bag. I love adding sprinkles or crushed nuts right after glazing to make a festive finish. Let everything set for about 10–15 minutes at room temperature or pop briefly in the fridge to speed it up.
Things to Remember
I always tell friends it’s the little shifts that make your Waffle Pops with Chocolate Dip and Pink Glaze Recipe truly shine. Keeping the waffle crisp, chocolate silky, and glaze just thick enough will give you those picture-perfect, delicious pops every time.
- Doneness Cue: Look for a deep golden hue and a firm lift from the waffle iron before removing your pops.
- Temperature Trick: Let the chocolate cool slightly after melting; dipping when it’s too hot can cause the glaze to melt prematurely.
- Make-Ahead Move: Waffle pops can be made ahead and stored in an airtight container; glaze just before serving to keep them crisp.
- Common Pitfall: Avoid overcrowding your waffle iron so the batter cooks evenly and sticks don’t slip out.
Ways to Serve It

Finishing Touches
I recommend serving these waffle pops with fresh berries or a dusting of powdered sugar for an extra pop of color. A side of whipped cream or vegan coconut cream adds a lovely lightness against the chocolate and glaze. The beauty of the Waffle Pops with Chocolate Dip and Pink Glaze Recipe is their versatility—you can easily swap the pink glaze for other colors or try flavored glazes for celebrations.
Plays Well With
These pops pair perfectly with a simple fruit salad, a scoop of ice cream, or a cup of coffee or tea for an indulgent snack. I love how the crispiness contrasts with creamy sides and fresh fruit, keeping the texture exciting with every bite.
Simple Plating Upgrades
Fresh edible flowers, a drizzle of berry coulis, or arranging the pops in a colorful vase like a bouquet can instantly transform these treats for party tables or a cozy weekend brunch. They look as good as they taste!
Make-Ahead & Keeping Fresh
Storing Leftovers
Keep any leftover waffle pops in an airtight container at room temperature for up to 24 hours. If you store them in the fridge, the waffles may lose some crispness and become soft. For the best texture, re-crisp gently before enjoying.
Freezing Tips
You can freeze uncooked waffle pops on sticks by flash-freezing them on a tray, then transferring to a freezer-safe bag. When ready, cook them straight from frozen, adding a minute or two to cooking time. This way, you always have a batch ready for quick treats.
Reheating Waffle Pops with Chocolate Dip and Pink Glaze Recipe Without Drying Out
To warm leftover waffle pops, use a toaster oven or regular oven set to 325°F (160°C) for 5–7 minutes. Avoid microwaving directly, as it can make them chewy or soggy. If microwaving is your only option, heat in short 15-second bursts and enjoy immediately for the best texture.
Frequently Asked Questions
Absolutely! Gluten-free waffle mixes work wonderfully here. Just ensure your batter is thick enough to hold shape on the sticks, adjusting with a little extra flour if needed.
The trick is to gently press the stick into the batter right after pouring it on the iron, not too deep to avoid imbalance, and cook with the iron closed firmly. Don’t overload the batter either!
Beet powder or a small amount of fresh beet juice is perfect — it adds a lovely natural pink shade without overpowering the flavor.
Yes! Use dairy-free chocolate chips or bars and add a bit of coconut oil to smooth the melt. This keeps the dip creamy and vegan-friendly.
Final Thoughts
Making Waffle Pops with Chocolate Dip and Pink Glaze Recipe has quickly become one of my favorite kitchen adventures because it’s creative, approachable, and just plain fun. Whether you’re treating the kids or impressing guests, these pops always spark joy and bring smiles. Once you try them, you’ll see why I keep coming back to this recipe—it’s as charming as it is delicious. Now it’s your turn!
PrintFull Printable Recipe
Waffle Pops with Chocolate Dip and Pink Glaze Recipe
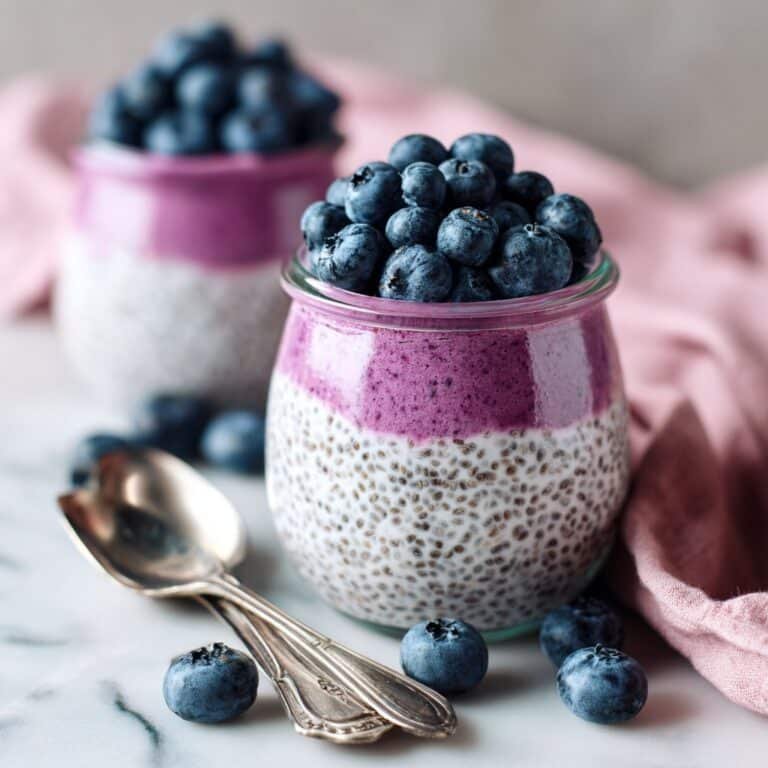
This Vegan Blueberry Chia Pudding is a nutritious and delicious plant-based breakfast or snack option. Made with chia seeds soaked in unsweetened soy milk and sweetened with maple syrup, it’s layered with a creamy blueberry vegan yogurt and topped with fresh blueberries for a refreshing and antioxidant-rich treat.
- Total Time: 2 hours 10 minutes
- Yield: 2 servings
Ingredients
Chia Pudding
- ¼ cup chia seeds
- 1 cup unsweetened soy milk
- 1 tablespoon maple syrup
- ½ teaspoon vanilla extract
Blueberry Yogurt Layer
- 1 cup vegan yogurt (unsweetened or vanilla-flavored)
- ½ cup fresh blueberries
Topping
- ½ cup fresh blueberries
Instructions
- Prepare chia pudding: In a bowl, combine the chia seeds, unsweetened soy milk, maple syrup, and vanilla extract. Stir well to mix all ingredients thoroughly. Let the mixture sit for 5 minutes, then stir again to break up any clumps.
- Refrigerate chia pudding: Cover the bowl and place it in the refrigerator for at least 2 hours or overnight, allowing the mixture to thicken to a pudding-like consistency.
- Make blueberry yogurt: In a blender or food processor, blend half of the fresh blueberries with the vegan yogurt until smooth, adjusting the texture to your liking.
- Assemble the pudding cups: Spoon a layer of the blueberry yogurt mixture into the bottom of each serving cup or bowl.
- Add chia pudding layer: Add a layer of the chilled chia pudding on top of the blueberry yogurt in each cup.
- Top with fresh blueberries: Garnish each cup with the remaining fresh blueberries for added freshness and texture.
Notes
- Use any plant-based milk such as almond, oat, or coconut milk as a substitute for soy milk.
- Maple syrup can be replaced with agave nectar or another preferred vegan sweetener.
- Allowing the chia pudding to rest overnight ensures the best pudding-like texture.
- For added crunch, sprinkle some granola or nuts on top before serving.
- This recipe can be prepared a day ahead for convenient grab-and-go breakfasts.
- Prep Time: 10 minutes
- Cook Time: 0 minutes
- Category: Breakfast
- Method: No-Cook
- Cuisine: Vegan
- Diet: Vegan

Leave a Reply