If you’re looking for a fun, boozy twist on a classic dessert, this Banana Pudding Shots Recipe is the perfect treat for parties or any playful get-together. It’s creamy, sweet, and has just the right kick to keep things interesting. I love making these when friends drop by because they always disappear fast and bring a smile to everyone’s face.

Jump to:
In the Kitchen
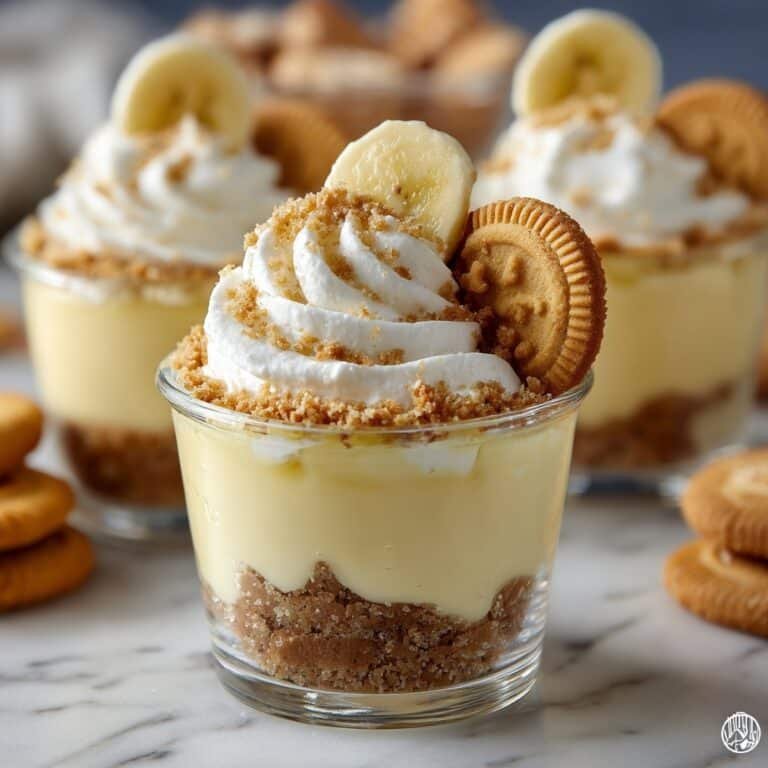
This recipe combines creamy banana pudding with whipped vodka and crunchy Nilla Wafers for a flavor party in every bite. It’s delightful and straightforward enough to whip up anytime you need a crowd-pleaser.
- Juicy and Tender Every Time: Using instant banana cream pudding and freshly whipped topping creates that signature smooth, luscious texture.
- Golden, Satisfying Finish: The crushed Nilla wafers add a toasty, buttery crunch that balances the creamy shot perfectly.
- Simple Ingredients, Big Impact: You won’t find complicated steps here—just easy-to-get pantry staples and a splash of vodka.
- Weeknight to Weekend Ready: These shots chill quickly and store well, ideal for last-minute parties or relaxing weekends.
Ingredients at a Glance

Quality ingredients make a difference here. Fresh banana slices and a good whipped cream vodka will really elevate your Banana Pudding Shots Recipe, so don’t skimp where you can taste the difference.
- Banana Cream Pudding Mix: Choose a good instant pudding box—freshness matters for that vibrant banana flavor.
- Whipped Topping: Use a stable whipped topping or freshly whipped cream for the best texture and creaminess.
- Whole Milk: Adds richness, making the pudding mix thick and velvety without being too runny.
- Whipped Cream Vodka: Adds a smooth boozy note; select one with a flavor you enjoy!
- Nilla Wafers: Get classic vanilla wafers for both crushing and garnish—they bring the signature crunch.
- Banana Slices (optional garnish): Use ripe but firm bananas so they don’t brown or get mushy in the shots.
Heads-Up: Exact measurements are in the printable recipe card at the bottom.
How to Make Banana Pudding Shots Recipe
Step 1 — Whisk the Pudding Mixture
Start by whisking the banana pudding mix with whole milk in a medium bowl. You’ll want to whisk for about 2–3 minutes until the mixture thickens and feels smooth. If you rush this, the pudding might be lumpy or too thin, so take your time. Then, mix in the whipped cream vodka to infuse that boozy flavor. Give it one last good whisk so everything’s silky and combined.
Step 2 — Fold in Whipped Topping and Chill
Gently fold in half of your whipped topping (about 8 ounces)—this keeps the pudding light and fluffy. Be gentle; fold, don’t stir vigorously, so you keep air in the mixture for that creamy texture. Cover the bowl with plastic wrap and pop it in the fridge to chill while you prep the shot cups. Cooling helps everything set firmly when you assemble.
Step 3 — Prep the Shot Glasses with Crushed Nilla Wafers
Arrange your shot cups on a cookie sheet or tray for easy handling. Crush Nilla Wafers using a rolling pin or food processor until you get fine crumbs with some small pieces for texture. Spoon about a half tablespoon of crumbs into the bottom of each cup and press down slightly to create a toasty, buttery base. Save the leftovers for later—don’t waste that crunch!
Step 4 — Fill and Garnish the Shots
Fill each cup about three-quarters full with the pudding mixture. If you want to get fancy, use a piping bag with a frosting tip to add a dollop of the remaining whipped topping on the top of each shot—it gives a neat, professional look. Then garnish with a banana slice and a mini Nilla Wafer. Sprinkle the saved crushed wafers on top for that extra crunch and visual appeal. Now, enjoy your Banana Pudding Shots Recipe immediately or chill a bit more for a cooler, firmer texture.
Things to Remember
Making sure your Banana Pudding Shots Recipe comes out silky smooth and balanced depends on a few key tips I’ve learned from experience. These little things can turn a good shot into a memorable one.
- Doneness Cue: Look for the pudding mixture to thicken enough to coat the whisk ribbons—it should be thick but still pourable.
- Temperature Trick: Chilling the pudding mixture before assembly makes it easier to pipe and keeps shots firm.
- Make-Ahead Move: Prepare the pudding base up to 24 hours in advance and fold in whipped topping just before filling the cups for maximum freshness.
- Common Pitfall: Avoid stirring whipped topping too hard—overmixing will deflate its fluffiness, leading to dense shots.
Ways to Serve It

Finishing Touches
For the perfect finishing touch on your Banana Pudding Shots Recipe, I like to add just a little extra whipped topping piped on top. It adds a soft, cloud-like texture that contrasts nicely with the crunchy wafer and silky pudding. A fresh banana slice brightens things up with a natural fruity zing, and mini wafers give that legit classic vibe every time.
Plays Well With
These banana pudding shots go great with fresh berries or a sprinkle of toasted coconut if you want to mix things up. I’ve also served them with light, crispy cookies or alongside a chilled sparkling wine to balance the sweetness and liquor kick, which your guests will definitely appreciate.
Simple Plating Upgrades
Set your shot cups on a rustic wooden tray, add a few edible flowers or fresh mint sprigs nearby, and you have a charming presentation within minutes. Even a thin dusting of powdered sugar or cinnamon on top of the whipped cream makes a big difference for that special occasion look.
Make-Ahead & Keeping Fresh
Storing Leftovers
Leftover Banana Pudding Shots Recipe should be stored in airtight containers or with lids on the shot cups. They’ll keep well in the fridge for up to 3 days, but the banana garnish may brown a bit—if that bothers you, add fresh slices just before serving.
Freezing Tips
Because of the creamy pudding and whipped topping, freezing isn’t the best choice here. The texture can separate and get grainy when thawed. I recommend enjoying these freshly chilled rather than frozen to savor that perfect consistency.
Reheating Banana Pudding Shots Recipe Without Drying Out
These shots are best served chilled, so reheating isn’t really necessary or recommended. If you prefer them a little less cold, simply let them sit at room temperature for 10–15 minutes before serving. Microwaving or heating will ruin the texture, so trust me on this one!
Frequently Asked Questions
Absolutely! While whipped cream vodka pairs perfectly here, you can experiment with cream liqueurs or banana-flavored rums for a different twist. Just be mindful of the alcohol proportion to keep the texture right.
I like placing the wafers in a zip-top bag and gently hitting them with a rolling pin. You want mostly fine crumbs with a few small chunks for texture. Avoid pulverizing them into dust for better mouthfeel.
You can try using dairy-free pudding mixes, coconut whipped topping, and almond milk. The texture may vary slightly, but it’s a delicious alternative for those avoiding dairy.
You can make the pudding base and assemble shots up to 24 hours ahead. Keep them tightly covered and chilled to maintain freshness. Adding fresh banana slices just before serving prevents browning.
Final Thoughts
Making this Banana Pudding Shots Recipe is one of those simple pleasures that brings a bit of cheer and whimsy to any gathering. I love how quick it is to pull together but still feels special. Whether you’re hosting a backyard party or just craving a cool, creamy treat with a kick, these shots won’t disappoint. Give it a try, and you’ll be reaching for seconds (and maybe thirds!) in no time.
PrintFull Printable Recipe
Banana Pudding Shots Recipe
These Banana Pudding Shots are a fun and delicious dessert perfect for parties. Creamy banana pudding mixed with whipped topping and a splash of whipped cream vodka is layered with crushed Nilla Wafers and garnished with banana slices for a delightful bite-sized treat.
- Total Time: 15 minutes
- Yield: 30 servings
Ingredients
Main Ingredients
- 1 box (3.4 oz) banana cream pudding mix
- 1 cup whole milk
- 1 cup whipped cream vodka
- 16 ounces whipped topping, divided
- 40 Nilla Wafers, crushed
- About 3 large bananas (around 30 slices), optional garnish
- About 30 mini Nilla Wafers, optional garnish
Instructions
- Prepare pudding mixture: In a medium mixing bowl, whisk together the milk and banana pudding mix until the mixture thickens.
- Add vodka: Whisk in the whipped cream vodka until fully combined with the pudding mixture.
- Fold in whipped topping: Gently fold in half (8 ounces) of the whipped topping until the pudding mixture is smooth and well blended.
- Chill pudding: Cover the bowl and place it in the refrigerator to chill while preparing the shot cups.
- Arrange shot cups: Place 30 or more 2-ounce shot cups on a flat surface like a cookie sheet for easy transport.
- Add crushed wafers: Spoon about half a tablespoon of crushed Nilla Wafers into the bottom of each shot cup, spreading evenly. Save the remaining crushed wafers for later.
- Fill with pudding: Spoon the chilled pudding mixture over the crushed wafers in each cup, filling about three-quarters full.
- Add whipped topping garnish: Optionally, use a piping bag and tip to pipe a dollop of the remaining whipped topping on top of each pudding shot.
- Garnish and serve: Add a banana slice and a mini Nilla Wafer to each cup, then sprinkle the leftover crushed wafers on top. Enjoy immediately or keep chilled until serving.
Notes
- Use chilled ingredients to help the pudding set properly and keep the shots cool.
- Mini Nilla Wafers and banana slices are optional but add a nice decorative touch and extra flavor.
- If you don’t have a piping bag, simply spoon the whipped topping on top.
- These shots should be kept refrigerated and consumed within 24 hours for the best taste and texture.
- For a non-alcoholic version, omit the whipped cream vodka and add an equal amount of milk or vanilla extract for flavor.
- Prep Time: 15 minutes
- Cook Time: 0 minutes
- Category: Dessert
- Method: No-Cook
- Cuisine: American


Leave a Reply