If you're a fan of cookies and cream and crave a dessert that feels both indulgent and refreshingly light, this Oreo Cheesecake Recipe is exactly what you need. Whether it’s a special occasion or just a weekend treat, this no-bake cheesecake combines the rich creaminess of cheesecake with the unmistakable crunch and flavor of Oreos—making it a crowd favorite every time.

Jump to:
In the Kitchen
I love how this Oreo Cheesecake Recipe strikes the perfect balance between rich, creamy, and crunchy textures. It’s simple enough for even a beginner to craft but delivers big on flavor and presentation, making it a dessert you’ll want to serve time and again.
- Juicy and Tender Every Time: Using softened cream cheese and gently folding in whipped cream ensures a velvety, light filling that isn’t too dense.
- Golden, Satisfying Finish: Chilling the crust and cheesecake properly lets flavors meld and the Oreo base stay crisp yet tender.
- Simple Ingredients, Big Impact: Just a handful of pantry staples and quality Oreos make this cake taste like it came from a bakery.
- Weeknight to Weekend Ready: It’s a set-it-and-forget-it dessert, perfect when you want an impressive sweet but don’t have hours to bake.
Ingredients at a Glance

Quality ingredients always shine through in a good Oreo Cheesecake Recipe. I recommend picking fresh cream cheese and Oreos with the classic filling to keep the nostalgic flavor you’re after.
- Oreo Cookies: Opt for classic Oreos as their balance of chocolate and cream filling is perfect and crushing fresh ones ensures crunch.
- Cream Cheese: Use full-fat cream cheese, softened to room temperature for a smooth batter.
- Heavy Cream: Look for at least 33% fat content to whip up fluffy peaks that lighten the cheesecake filling.
- Powdered Sugar: This dissolves easily and keeps your filling silky without any grit.
- Unsalted Butter: Melted and mixed into the crust, it binds those cookie crumbs perfectly.
- Vanilla Extract: Adds a subtle warmth and deepens the flavor without overpowering the Oreos.
Heads-Up: Exact measurements are in the printable recipe card at the bottom.
How to Make Oreo Cheesecake Recipe
Step 1 — Crafting the Perfect Oreo Crust
Start by crushing about 24 Oreos into fine crumbs. I like using a food processor for a uniform texture, but if you don’t have one, pop the cookies in a sealed bag and roll with a rolling pin until finely crushed. Then, mix these crumbs with six tablespoons of melted unsalted butter until the mixture looks evenly moistened and holds together when pressed. Press this into your 7–8 inch springform pan evenly, focusing on creating a compact base. Chill it in the fridge for 20 minutes—it’ll firm up and become that wonderfully crisp foundation you’re aiming for.
Step 2 — Whipping Up the Creamy Filling
While the crust chills, whip the cream in a cold bowl until soft peaks form—this lightness is key for a melt-in-your-mouth cheesecake. In another bowl, beat the softened cream cheese with powdered sugar and vanilla extract until silky smooth with no lumps. Next, gently fold the whipped cream into the cream cheese mix, taking care not to deflate it—you want to keep it airy and light. Last, fold in twelve crushed Oreo cookies for that classic crunch throughout the creamy filling.
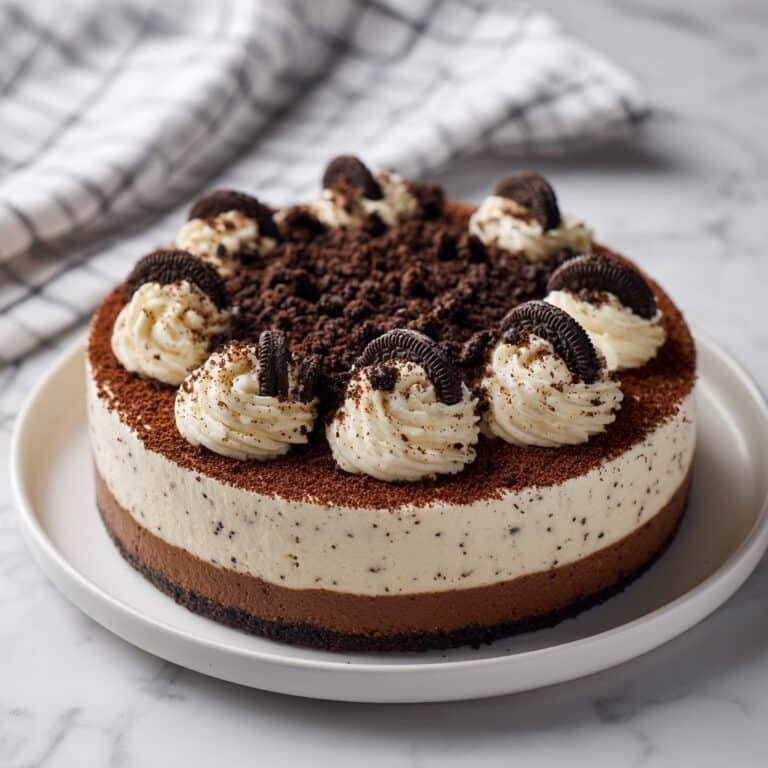
Step 3 — Chill and Decorate Your Oreo Cheesecake Recipe
Spread the filling evenly over your chilled crust, smoothing the top with an offset spatula or the back of a spoon. This step is fun because you’ll watch your cheesecake start to take form—rich, creamy, and flecked with Oreo bits. Refrigerate your cake for 4–6 hours, or better yet, overnight. This patience pays off—you’ll notice the flavors marry and the cheesecake firms to the perfect sliceable texture. When ready to serve, sprinkle with a few more crushed Oreos and stand three whole Oreos upright or angled on the top for a striking finish.
Things to Remember
Having made this Oreo Cheesecake Recipe a handful of times myself, I can say a few little tricks make all the difference in achieving that perfect cheesecake texture and flavor balance.
- Doneness Cue: The edges should be set and the center slightly wobbly when ready to chill, ensuring a creamy, not rubbery, texture.
- Temperature Trick: Always bring cream cheese to room temperature before mixing; cold cream cheese creates lumps and a grainy filling.
- Make-Ahead Move: This cheesecake keeps well overnight or even up to 2 days, making it a fantastic advance dessert option.
- Common Pitfall: Don’t overfold whipped cream or you risk a dense filling—fold gently until just combined.
Ways to Serve It

Finishing Touches
I love topping this Oreo Cheesecake Recipe with a little extra flair: a drizzle of chocolate ganache or caramel sauce adds a deep, glossy richness that complements the cookies and cream. If you want a lighter touch, a dusting of powdered sugar or a few fresh berries adds a pop of color and a hint of brightness.
Plays Well With
This cheesecake pairs wonderfully with a cup of strong coffee or a chilled glass of milk. If serving at a gathering, you can balance its richness with some fresh fruit salad or citrus sorbet—it cuts through the creamy sweetness beautifully.
Simple Plating Upgrades
For a quick but impressive plate, slice the cheesecake cleanly with a warm knife and arrange slices on simple white plates. Add a crumble of Oreos on the side or a sprig of mint for freshness. For parties, individual serving jars layered with whipped cream and Oreo crumbs add that fun “deconstructed” feel.
Make-Ahead & Keeping Fresh
Storing Leftovers
Store leftover Oreo cheesecake in an airtight container or cover the springform pan with plastic wrap. It keeps well in the fridge for up to 3 days. Just be mindful the crust may soften slightly over time but the flavor only improves as it rests.
Freezing Tips
This Oreo Cheesecake Recipe freezes beautifully. Wrap the cake tightly with plastic wrap and then foil to avoid freezer burn. Thaw it overnight in the fridge before serving for best texture without sogginess.
Reheating Oreo Cheesecake Recipe Without Drying Out
Because this cheesecake is best served chilled, reheating isn’t usually necessary. But if you want a slightly softened slice, let it sit at room temperature for 15–20 minutes or briefly warm in the microwave at 30-second intervals on low power, watching carefully to avoid curdling or drying.
Frequently Asked Questions
Absolutely! While Oreos give this cheesecake its iconic flavor, you can swap in sandwich cookies with similar textures like chocolate wafers or even flavored cookies for a twist.
Nope! This Oreo Cheesecake Recipe is no-bake, relying on chilling to firm up the filling, making it perfect for those who prefer a quick and easy cheesecake without turning on the oven.
Cracks usually happen with baked cheesecakes due to overbaking or rapid cooling. In this no-bake version, cracks are rare but can occur if the filling isn’t mixed smoothly—be sure to beat cream cheese well and fold whipped cream gently.
Yes! Use small jars or ramekins to create single-serving cheesecakes. Layer the crust and filling just like the full cake, chill, and enjoy personalized portions with minimal fuss.
Final Thoughts
This Oreo Cheesecake Recipe is one of those reliably delightful desserts that feels special yet is surprisingly easy to pull off any day of the week. Its tender, creamy filling studded with cookie chunks, atop a buttery Oreo crust, hits all the right comfort-food notes and brings smiles to everyone’s face. Give it a try—you’ll quickly find it’s a beloved staple in your dessert rotation as it is in mine.
PrintFull Printable Recipe
Oreo Cheesecake Recipe
A rich and creamy Oreo cheesecake featuring a buttery Oreo crust and a luscious cream cheese filling studded with crushed Oreos. Perfectly chilled for a refreshing dessert treat.
- Total Time: 5 hours
- Yield: 8 servings
Ingredients
Crust
- 2 cups Oreo cookie crumbs (from about 24 cookies) (250 g)
- 6 tablespoon unsalted butter, melted (80 g)
Filling
- 14 oz cream cheese, softened (400 g)
- 1 cup heavy cream (33% fat) (250 ml)
- 1 cup powdered sugar (120 g)
- 1 teaspoon vanilla extract
- 12 Oreo cookies, crushed
Topping
- 3–4 tablespoon crushed Oreo cookies (for sprinkling)
- 3 whole Oreo cookies
Instructions
- Prepare the crust: Crush the Oreo cookies into fine crumbs using a food processor or a sealed bag with a rolling pin. Mix the crumbs with melted butter until evenly combined. Press the mixture firmly into the bottom of a 7–8 inch (18–20 cm) springform pan. Refrigerate the crust for 20 minutes to set.
- Whip the cream: In a clean bowl, whip the heavy cream until soft peaks form. This will add lightness to the filling.
- Mix the cream cheese filling: In a separate bowl, beat the softened cream cheese with powdered sugar and vanilla extract until smooth and creamy. Gradually fold in the whipped cream gently until fully combined to maintain a fluffy texture.
- Add crushed Oreos: Fold the 12 crushed Oreo cookies into the cream cheese mixture to distribute the cookie pieces evenly throughout the filling.
- Assemble the cheesecake: Spread the Oreo cream cheese filling evenly over the chilled crust. Smooth the top with a spatula for an attractive finish.
- Chill and set: Refrigerate the cheesecake for 4–6 hours, or preferably overnight, allowing it to set firmly and the flavors to meld.
- Add toppings: Before serving, sprinkle 3–4 tablespoons of crushed Oreos on top for texture. Decorate with 3 whole Oreo cookies placed vertically or at an angle for a decorative touch.
- Serve: Slice the cheesecake and serve chilled for the best creamy and refreshing experience.
Notes
- Use softened cream cheese for a smoother filling and easier mixing.
- Press the crust firmly to prevent it from crumbling when serving.
- Chilling the crust before adding filling helps it set properly.
- Whip the heavy cream to soft peaks to create a light, airy texture in the filling.
- For firmer cheesecake, chill overnight.
- You can substitute Oreos with gluten-free cookies to make the crust gluten-free.
- Decorate with whole cookies just before serving to prevent them from sogging.
- Prep Time: 25 minutes
- Cook Time: 0 minutes
- Category: Dessert
- Method: No-Cook
- Cuisine: American


Leave a Reply