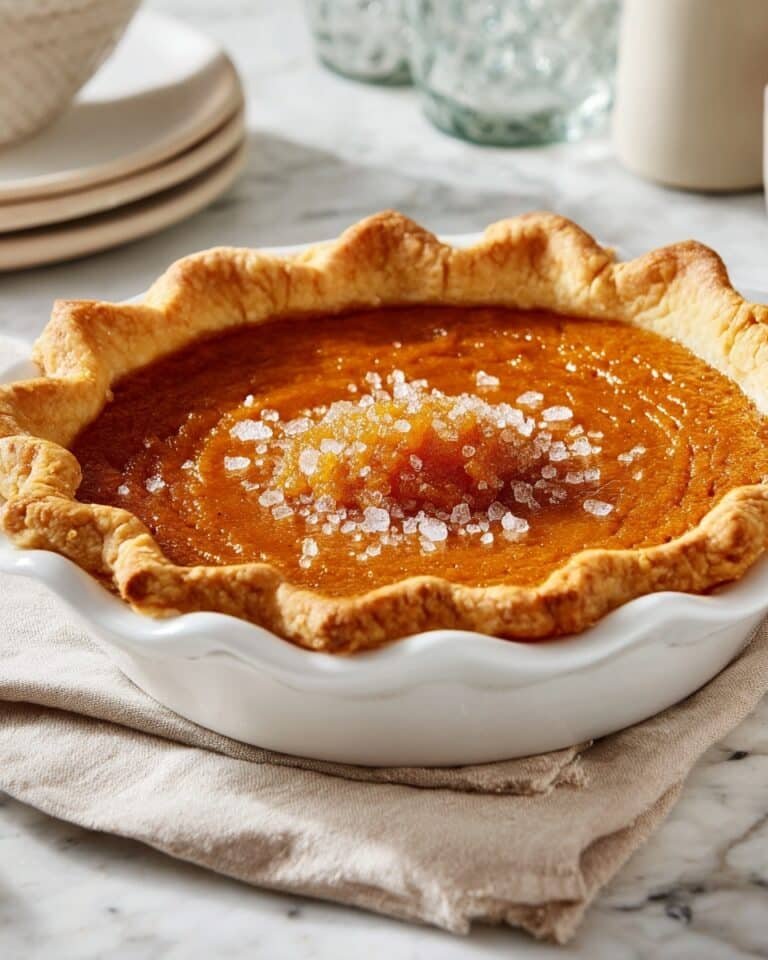
Salted Honey Pie is a wonderfully unique dessert that balances the rich sweetness of honey with a subtle salty kick. Whether you’re baking for a cozy weekend treat or impressing guests at a dinner party, this Salted Honey Pie Recipe delivers smooth, creamy custard nestled in a flaky crust with a sprinkling of flaky sea salt on top. You’ll love how it fills your kitchen with warm, comforting aromas while offering a perfect harmony of flavors and textures.

Jump to:
In the Kitchen
This salted honey pie is a true standout for anyone who loves that sweet-and-salty combination done just right. What I adore about this recipe is how it’s approachable yet feels special—a perfect dessert to pull together when you want something comforting but elegant.
- Juicy and Tender Every Time: The custard filling is silky smooth and gently thickened with cornstarch to give you that luscious texture with no graininess.
- Golden, Satisfying Finish: Baking brings out a light caramelization on top and the buttery crust crisps up beautifully without any extra fuss.
- Simple Ingredients, Big Impact: Just a handful of pantry staples plus quality honey and flaky sea salt make this pie shine.
- Weeknight to Weekend Ready: You can whip this up after work or save it for special occasions—the flavor always impresses.
Ingredients at a Glance

Looking for the best results in your Salted Honey Pie Recipe? Choose fresh, high-quality ingredients—especially the honey and cream—as they’re the flavor stars of this dessert.
- Pie crust: Opt for a homemade or refrigerated crust that's cold to maintain flakiness when baked.
- Heavy whipping cream: Use full-fat for richness and the perfect custard thickness.
- Light brown sugar: Adds depth and caramel notes; make sure it’s packed properly for consistent sweetness.
- Cornstarch: Sifted to prevent lumps for that silky custard texture.
- Honey: Pick a flavorful honey like wildflower or clover for subtle complexity.
- Flaky sea salt: Provides the signature salty crunch and highlights the honey’s sweetness.
Heads-Up: Exact measurements and detailed instructions are in the printable recipe card at the bottom, so don’t worry about jotting everything down right now!
How to Make Salted Honey Pie Recipe
Step 1 — Prepare and Chill the Pie Crust
Start by placing your pie crust in an 8- or 9-inch pie pan and pop it into the refrigerator to keep it cold. I like to skip pre-baking here because a chilled crust prevents shrinking and ensures a wonderfully flaky base. If you make crust from scratch, chilling the butter-rich dough helps it puff up when baked, giving you that perfect buttery crunch we’re after. You can even sprinkle a little sugar on top for extra sparkle, but that’s optional.
Step 2 — Heat the Cream Mixture Until It Thickens
Combine heavy cream, light brown sugar, cornstarch, and salt in a medium saucepan. Heat over medium, stirring constantly. You’ll notice the mixture slowly thickens as the sugar caramelizes and the cornstarch activates. This is where the magic starts, so don’t walk away! Once it reaches a rolling boil, keep stirring vigorously to avoid lumps—having a smooth base is key to a flawless custard.
Step 3 — Temper the Egg Yolks to Avoid Scrambling
Remove the cream mixture from heat and slowly add a bit into your lightly beaten egg yolks while whisking nonstop. This slow warming prevents the eggs from curdling. Gradually whisk in the rest of the cream mixture until silky smooth—this step is non-negotiable for that melt-in-your-mouth texture. I remember the first time I rushed this step and ended up with scrambled bits, so take your time here!
Step 4 — Combine, Add Honey and Vanilla, Then Fill the Crust
Pour your tempered egg mixture back into the saucepan and stir gently. Mix in honey and vanilla extract for that enchanted flavor duo. The honey will deepen the custard’s color to a golden shade and impart a complex sweetness. When your filling is smooth and warm, pour it evenly over the chilled crust. Spread it gently to avoid air bubbles—this helps with a consistent texture throughout.
Step 5 — Bake the Pie Until Golden and Slightly Jiggly
Slide the pie into a 375°F (190°C) oven for 40 to 45 minutes. You’ll see the custard bubble around the edges and the top turn a lovely golden brown. Don’t let it overbake—if it jiggles lightly in the center, it’s perfect. The filling will firm up while cooling, so trust the process here. I always remind friends to set a timer so they don’t get distracted by kitchen chatter!
Step 6 — Cool Thoroughly and Finish with Flaky Sea Salt
After baking, allow the pie to cool completely at room temperature, then refrigerate until chilled and set—at least a few hours, preferably overnight. Right before serving, sprinkle flaky sea salt across the top. This final touch awakens the honey’s sweetness and adds a delightful crunch that keeps every bite interesting.
Things to Remember
A smooth custard and flaky crust are the stars here, so patience at each step is your best friend to avoid common pitfalls.
- Doneness Cue: Remove the pie when the center jiggles gently—it’ll firm up nicely as it cools.
- Temperature Trick: Always temper the eggs slowly to avoid lumps or scrambled bits in your custard.
- Make-Ahead Move: Bake the pie a day ahead to let flavors meld and custard fully set in the fridge.
- Common Pitfall: Don’t over-bake or your custard may turn grainy; watch the clock and trust the visual cues.
Ways to Serve It

Finishing Touches
Before serving your salted honey pie, I love to sprinkle on the flaky sea salt—it really pulls everything together. You might also try an elegant dusting of powdered sugar or a few fresh berries for a pop of color and contrast. A light dollop of softly whipped cream adds even more indulgence without overpowering the pie’s delicate flavor.
Plays Well With
This pie pairs beautifully with hot coffee or a delicate dessert wine like Moscato or Riesling. For texture play, I sometimes serve toasted pecans or almonds on the side or sprinkled atop for a crunchy, nutty complement. Vanilla ice cream is a classic partner, melting into the warm custard to create a heavenly experience.
Simple Plating Upgrades
For casual nights, slice and serve with a drizzle of honey or caramel sauce. For special occasions, add edible flowers or a sprig of fresh mint as garnish. Setting the pie on a beautiful platter with a linen napkin always elevates the presentation without extra effort.
Make-Ahead & Keeping Fresh
Storing Leftovers
Keep any leftover salted honey pie covered tightly in an airtight container or wrapped with plastic wrap in the refrigerator. It will stay fresh and creamy for up to 3 days. You’ll notice the custard softens slightly but remains deliciously rich.
Freezing Tips
This pie freezes fairly well if wrapped securely in plastic wrap and foil. Freeze for up to 2 months. To thaw, place in the fridge overnight and avoid microwaving frozen pie as the custard can separate or become grainy.
Reheating Salted Honey Pie Recipe Without Drying Out
To gently warm slices, use a low oven (about 300°F or 150°C) for 10-15 minutes, covered loosely with foil to prevent drying. Alternatively, a quick microwave burst at 50% power for 20 seconds works but watch carefully to avoid overheating. The air fryer on low heat can also revive crust crispness without drying the custard.
Frequently Asked Questions
Absolutely! A quality refrigerated pie crust works perfectly here, especially if you keep it chilled before filling. Just be mindful not to overwork it to keep that flaky texture intact.
Try to use a flavorful, natural honey like wildflower or clover. Darker honeys bring more caramel depth, but avoid overly strong types like buckwheat, which might overpower.
Tempering warms the eggs gradually, avoiding sudden heat that scrambles them. This technique ensures your custard stays silky smooth instead of curdling.
Yes! Substitute heavy cream with full-fat coconut milk for a luscious dairy-free version. The texture will change slightly but the flavor will remain indulgent.
Final Thoughts
Making this Salted Honey Pie Recipe has always been one of my favorite kitchen adventures—its combination of sweet, salty, creamy, and crunchy delights never fails to impress and comfort. Whether you’re new to custard pies or a seasoned baker, this recipe offers an accessible yet impressive dessert you'll want to make again and again. Trust me, the scent alone will have your household gathering around the oven before the pie even cools! Give it a try, enjoy the process, and savor every creamy, toasty bite.
PrintFull Printable Recipe
Salted Honey Pie Recipe
Salted Honey Pie is a luscious dessert that perfectly balances the sweetness of honey with a subtle salty kick from flaky sea salt. Featuring a creamy custard filling set in a flaky pie crust, this pie offers a rich caramel-like flavor and smooth texture that makes it an irresistible treat for any occasion.
- Total Time: 3 hours 5 minutes
- Yield: 8 servings
Ingredients
Pie Crust
- 1 refrigerated or homemade pie crust (for 8- or 9-inch pie pan)
Custard Filling
- 4 large egg yolks, lightly beaten
- 2 ½ cups heavy whipping cream
- ⅔ cup packed light brown sugar (150 g)
- ⅓ cup cornstarch, sifted (45 g)
- ½ teaspoon salt
- ½ cup honey (120 ml)
- 2 teaspoons vanilla extract
Finishing
- Flaky sea salt, for sprinkling on top
Instructions
- Prepare the Pie Crust: Place the pie crust into an 8- or 9-inch deep dish pie pan and chill in the refrigerator while preparing the filling. This helps the crust bake evenly and maintain a flaky texture without shrinking.
- Heat the Cream Mixture: In a medium saucepan over medium heat, combine heavy cream, brown sugar, cornstarch, and salt. Stir constantly until the mixture reaches a rolling boil and thickens slightly, then remove from heat immediately.
- Temper the Eggs: Slowly ladle small amounts of the hot cream mixture into the beaten egg yolks while whisking constantly to prevent scrambling. Gradually add all the cream mixture until smooth and fully combined.
- Combine the Mixture: Pour the tempered egg yolk mixture back into the saucepan with remaining cream mixture. Stir in honey and vanilla extract until the filling is smooth and uniform.
- Fill the Pie Crust: Pour the warm custard filling evenly into the chilled pie crust, spreading gently to avoid air pockets.
- Bake the Pie: Bake in a preheated oven at 375°F (190°C) for 45 minutes. The custard will bubble and the top will brown slightly. The center may jiggle slightly but will firm up as it cools.
- Cool and Set: Allow the pie to cool to room temperature on the counter, then refrigerate until completely chilled and set, approximately 3 hours.
- Finish with Sea Salt: Before serving, sprinkle flaky sea salt generously over the top to enhance the flavor combination.
- Serve and Enjoy: Slice the pie into 8-10 portions and serve chilled. Optionally, pair with whipped cream, toasted nuts, or vanilla ice cream.
Notes
- For a dairy-free option, substitute heavy whipping cream with full-fat coconut milk; texture will vary slightly.
- You can experiment with different honey varieties (e.g., clover, wildflower, lavender) for unique flavor profiles.
- A homemade pie crust offers superior flaky texture and flavor compared to store-bought.
- Gluten-free pie crusts or graham cracker crusts are good alternatives for dietary needs or flavor variation.
- Enhance presentation and flavor with toppings like whipped cream, toasted pecans or almonds, and caramel drizzle.
- This pie pairs well with coffee, dessert wines like Riesling or Moscato, or a scoop of vanilla ice cream for an indulgent dessert.
- Prep Time: 20 minutes
- Cook Time: 45 minutes
- Category: Dessert
- Method: Baking
- Cuisine: American
- Diet: Vegetarian


Leave a Reply